

Use the Snap tool to: 1 – Move an object so that a point of this object is positioned exactly (snapped to) a point of another object. See illustration below: |
|

2 – Move only part of the element (a point or a group of points) so that a point of the selection is positioned exactly on a point of another object. Of course, this will distort the current object:

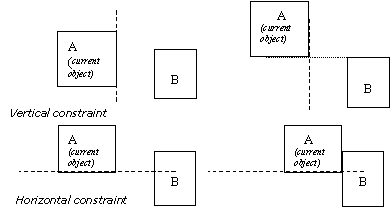
3 – Align an object relative to another one. Define a horizontal or a vertical constraint to the Snap tool so as to align a point of the current object horizontally or vertically with the point of another object.
 See
See
Usage:
1. Select the element or the part of the element you want to Snap.
¨ Click with the Wand on the element.
¨ If you want to snap only part of the element (remember, this will distort the element), use the selection tools (the Lasso and the Bullseye). (See chapter User Manual/Tools/Assistant Palette/Selection Tools.)
2. Select the Snap tool.
Click on the icon depicting the tool in the Tools Palette.
The Bullseye and two axes are displayed.
3. Defining a constraint (if you want to align objects).
Set a horizontal or vertical constraint if you want to align objects:
Þ Press the spacebar to set a vertical or a horizontal constraint.
Or
Þ Click on the constraint icon you need in the Assistant Palette.
4. Defining the point to snap on the object.
Click on a point of the current object.

5. Define the Snapping point.
Click on a point of another element of the scene: This is the point to which the point selected on the current object will snap to.
If no constraint was defined:
¨ The current object will move and be snapped to the snapping point.
If you set a constraint:
¨ The point selected on the current object will be aligned horizontally or vertically with the snapping point of the 2nd object (depending on the constraint defined).
6. Ending the tool action.
Validate or put the tool aside to end the tool action (depending on the interface). See chapter User Manual/Tools/Generic use of a tool/How do you end a tool action?
![]() You can use other types of constraints with the Snapping tool:
You can use other types of constraints with the Snapping tool:
· An existing point
· A point along a segment
· Constraint lines
(See chapter User Manual/Tools/Assistant Palette/Cursor movement and positioning constraint.)
![]()
The Snap tool is one of the tools that allows you to change the current object while you are using the tool.
To change current object while within the tool:
Þ Press Shift+ESC or select the Wand in the Assistant Palette. The cursor switches to the Wand.
Þ Click on another object: it becomes the current object.
![]()
Snapping a point or a group of points of an object onto a point of another object achieves the same result as pulling a point or a group of points of an object using the Stretch tool while holding down the Shift key so that the cursor snaps onto a point of another object.
See chapter User Manual/Tools/Modeling/Stretch. See chapter User Manual/Tools/Assistant Palette/Cursor movement and positioning Constraints/Snapping the cursor on existing points.
![]()
If, while selecting the Snapping tool, you simultaneously press the Control key, Amapi 3D will automatically generate a copy of the current object. This copy becomes the current object and the tool action will be applied to it. The original object will reappear at the next screen redraw.