


This tool is used to change an object’s dimension, either keeping its original proportions or distorting it horizontally or vertically. |
|


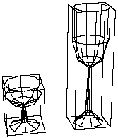


Examples of results using the Scale tool
Usage:
1. Selecting the element or part of the element to scale.
Þ Click on the element using the Wand. It becomes the current object.
Þ To scale only part of the element: Use the Lasso or the Bullseye (clicking on the corresponding icon in the Assistant Palette or through the mouse – right mouse button on PC; Option + mouse click on Mac).
2. Selecting the tool.
Click on the icon depicting the Scale tool in the Tools Palette.
A bounding box now surrounds the selection.
3. Defining a reference point (optional).
The reference point designates the side of the bounding box (and thus of the object) that will not be distorted by the action of the scale tool.
A small cross symbolizes the reference point: ![]()
The default location of the reference point is the center of the bottom facet of the bounding box.
If you want to change the location of the reference point:
Þ On PC: Click the right mouse button. On Mac: Press the Option key and click the mouse button. The Wand cursor changes to the cross.
Þ Click on the object where you want to set the new position of the reference point.
4. Choosing the scaling mode (proportional, horizontal or vertical).
|
|
|
|
Proportional scale
|
Horizontal distortion |
Vertical distortion |
There are two ways to set the scaling mode:
¨ 1st method: Click on one of the three icons of constraint along an axis.
The “Constrain along the horizontal axis” icon defines a horizontal distortion.
The “Constrain along the vertical axis” icon defines a vertical distortion.
The “No constraint” icon defines a proportional scaling.
¨ 2nd method: Press the spacebar to switch from one scaling mode to another.
5. Scaling.
You now need to specify the scaling you want to apply.
There are three methods:
¨ 1st method: Using the cursor
Þ Click to grab the bounding box or a point of the object (it will follow the cursor’s movements).
Þ Move the cursor: You can see the bounding box being scaled according to the constraint previously defined.
Þ Click to validate when the object reaches the correct size.
¨ 2nd method: Using the keyboard
Þ Press the Tab key.
Enter through the keyboard:
· A new width (if you want to re-scale the object horizontally).
· A new height and width (if you want to do proportional scaling).
Þ Press the Return key to validate the entry.
¨ 3rd method: Using the Remote Control
The Remote Control is used to remotely fine-tune an operation.
Press Ctrl+Shift+Arrow key. (See chapter User Manual/Tools/The Data Window/Numerical data/Modifying a numerical value/Distant Interaction/The Remote Control.)
6. Ending the tool action.
Validate or put the tool aside to end the tool action (depending on the interface). See chapter User Manual/Tools/Generic use of a tool/How do you end a tool action?
![]()
The Scale tool is one of the tools that allows you to change the current object while you are using the tool.
To change current object while within the tool:
Þ Press Shift+ESC. The cursor switches to the Wand.
Þ Click on another object; it becomes the current object.
![]()
If, while selecting the Scale tool, you also press the Option key, Amapi 3D will automatically create a copy of the current object and the scaling operations will be applied to the copy generated. The original object will reappear at the next screen redraw.
|
Practical exercises:
|