
|
| Previous Top Next |
|
Using SOAP debugger
|
| 1. | Select the menu option Project | Open Project.
|
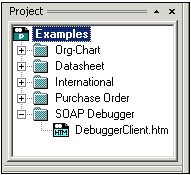
| 2. | Select the "Examples.spp" file in the ..\Altova\XML Spy Suite\Examples folder.
|
| 3. | Click the + sign of the SOAP Debugger folder to see the folder contents.
|
|
| 4. | Double click the DebuggerClient.htm file to start the SOAP Client and connect to the web service.
|

|
| The htm window displays the current Eastern Standard Time (5:01 in this example).
|
| 5. | Click the GMT radio button to see the current Greenwich Mean Time.
|

|
| An error has obviously occured at this point. We should have a correct time in the clock display. We will have to activate the SOAP debugger to analyze the SOAP messages, and see if we can locate the error and perhaps fix it.
|
| 1. | Select the menu option SOAP | SOAP debugger options.
|
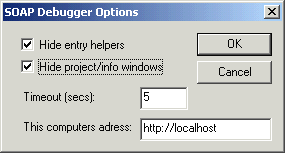
| 2. | Activate the "Hide project/info windows" check box, and click OK to confirm.
|
|
| This allows more room for the SOAP request and response windows. Make sure you define these settings before you start the SOAP debugger session.
|
| 1. | Select the menu option SOAP | SOAP Debugger Session.
|
| This opens the "Enter the WSDL file location..." dialog box.
|

|
| 2. | Enter the WSDL file location into the text box http://www.nanonull.com/TimeService/TimeService.asmx?WSDL and click OK.
|
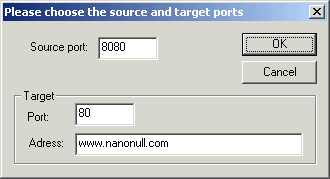
| The following dialog box displays the source and target port settings. The source port setting (8080) is a default setting and is automatically entered. This setting can be changed every time the debugger is started.
|
| The target settings are supplied by the WSDL file, and also appear automatically.
|
|
| 3. | Click the OK button to start the SOAP debugger session.
|
|
| This opens the SOAP debugger proxy server in its inactive state. You can see this by noting that the proxy server icon |
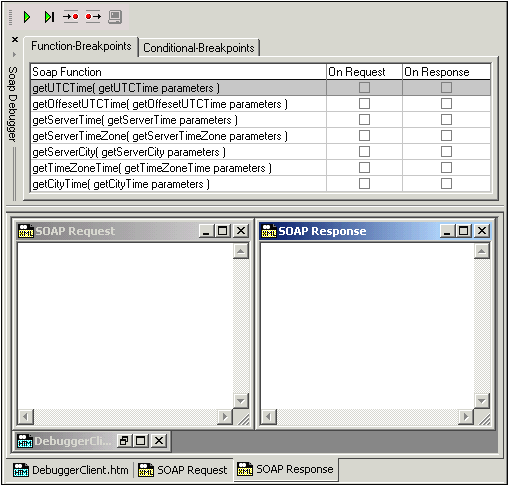
| 1. | Activate the On Request and On Response check boxes for this method (getTimeZoneTime). This enables you to analyze both SOAP requests and responses for errors.
|

|
| 2. | Click the GO icon |
| 3. | Click the DebuggerClient tab to switch to the Client. You may have to maximize the window to see more of the contents.
|

|
| 4. | Click the "Turn On Debugging Mode" button in the client window.
|

|
| This displays a "Debugging is on" message, and sends off the SOAP request to the debugger.
|
|
|

|

|
| Looking at the timezone element, we notice that the value is GMD. This cannot be correct, so we will change it to GMT and see what happens.
|
| 1. | Double click in the timezone field, change the entry to GMT and hit Enter.
|

|
| 2. | Click the GO icon |
| After a few seconds, the web service response to the SOAP request appears in the SOAP response window.
|

|
| We did not receive an error message in the response, so we can assume that this is the correct time.
|
| 3. | Click the debugger GO icon |
| 4. | Click the DebuggerClient.htm tab to switch back to the client, and see the new result.
|
|
|

|
| The error message has disappeared, and the correct GMT time is displayed.
|
| 5. | Select the menu option SOAP | SOAP debugger session to close the debugger session.
|
| 1. | Click the Text View button, open the Find dialog (Edit | Find), and search for "GMD".
|
| XML Spy will display this code fragment:
|
| 2. | Change the value from "GMD" to "GMT" and switch back to the Browser View.
|
| The SOAP Client now works correctly, the "Unknown Time zone" message has gone and the correct time appears in the window. Problem solved!
|
|