After installing G6 FTP Server, you may want to launch the Server (Start menu).
So you see the loading bar and then the main Interface.
At this state your server is useless, because you must first setup user accounts, file access, ...
Setup user accounts
Click on the toolbar
 button to bring this form :
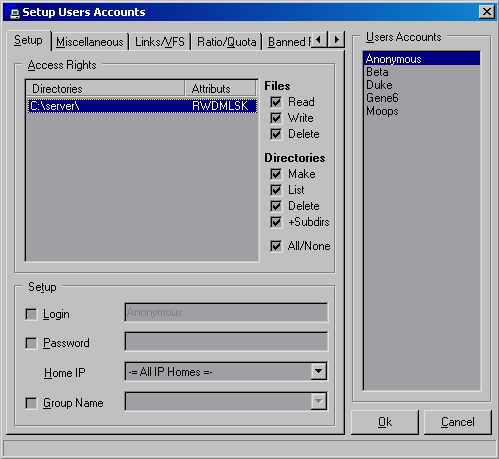
1 - Create a new user : right-click on the left list and select "Add" in the popupmenu
2 - Enter the new user account (note : this is not always the user login) and click "OK"
3 - If you want your user to use a login ("demo" in the example) then check the case "login". (if you do not check "login" case the user can login with any login. This can be useful for anonymous)
4 - Setup a password : check the password case or let this user enter with any password, even blank (again a sort of free account).
As I know that it is not very easy to understand, let's see the different combination :
Case 1 :
+Login checked and specified
+Password checked and specified
->User log with Login and Pass
Case 2 :
-Login not checked
-Password not checked
->Any user can have access to this FTP account, providing any username, password even blank
Case 3 :
+Login checked
-Password not checked
->User must specify the correct login but can provide any password even blank
Case 4 :
-Login checked
+Password checked
->Any login can be specified, only the password is meaningfull -> if a user with this password exists then the user will be logged as this user
->In fact this acts as if the password was the login for those loginless user
In case there is a free account and user try to log with bad password or bad username, they will automatically be logged in the free/anonymous account (one with no login&password enabled).
So I'm sure you will find the good combination that feets your needs
In our example, the user must supply : Login=demo and Password=forthemanual
If you want to setup an anonymous user then just create an account (named anonymous) with no login and no password (both unchecked)
(Note: Login and Password are case sensitive : "DeMo" and "demo" are not the same login.)
Directory Access
Now that user can login, you must provide access to your shared files.
- Right Click on the Directory List and select add in the popup menu
- Choose the right directory and choose access mode :
Files :Note :
R : Read Access enabled : User can Download from the specified directory
W : Write Access enabled : User can Upload in the specified directory
D : Delete Access enabled : User can Delete Files in the specified directory
Directory :
M : Make Directory enabled : User can create directory in the specified directory
L : List Directory enabled : User can list the file in the specified directory
K : Delete Directory enabled : User can delete directory in the specified directory
S : Subdir enabled : User can go in Subdirectories of the specified directory
1) If you try to share the server directory, meaning allowing user to have access to your inifiles then the server will ask you to confirm the specified directory
2) If you specify an incorrect directory (not existing) then the directory will be strike through
3) Home directory is the first directory in the list, font is red for him
4) You can change directory by just renaming the existing if you just click on a directory
5) Directory orders is not important as G6 Server will always know what is the most near parent of the directory in the list :
If a user has access to :6) Try to play a little with directory and you will make marvellous FTP Server !
- c:\temp\upload - RWDMLSK
- c:\temp\upload\read - R---L--
and c:\temp\upload has following structure :
c:\temp\upload\my favourite picture\
c:\temp\upload\amiga 500\
c:\temp\upload\read\
Then user will only be able to go in "c:\temp\read" with RL access, other directory will be accessible with RWDMLSK, no need to specify an order for the directory.
Misc properties
Need more advanced properties for your account ?
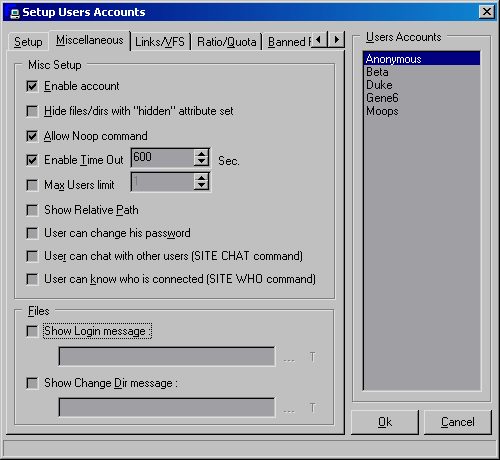
For a better configuration we provide you with some extra options :
- Hide hidden files/dirs : file whose attribute is Hidden won't be visible in the list
- Enable Account : should always be enabled unless you don't want this user to log in your server temporarly without deleting his accounts
- Allow Noop Command : Noop happens when user does nothing on the server but can stay connected if he sends a NOOP command, otherwise he will be disconnected for Time Out
- Enable Time Out : users who don't do anything for this period will be disconnected
- Max Users : allows only N same account user to log on the server, default is unchecked => no restrictions
- Show Relative Path : User see the Home dir as root of the file system. If "c:\userroot\" is the default home dir then user will see '\' as root.
- User can change his password : SITE PSWD
- User can chat with other users : using SITE CHAT
- User can see who is connected : SITE WHO
=> returns User Name - Date of connection - IP/HostName - Speed
Message Files
There are 3 types of message files:
- Login File Message : Sent after the welcome message sent by the event manager
- ChangeDir File Message : Sent each time a user changes current directory
- Links File : processed while sending directory list
Note : ChangeDir file can only be a filename, in that case server will check if the file exists in the current directory and process it. You can have differents ChangeDir File Message for all your directory.
(Example : "Ch_Dir.Text" with hidden attributes in all user directories)
The first two message files support many tags :
%MAXUSERS = The maximum number of users which can be connected on the server at the same time
%LOCALIP = The IP Adress of the server
%UIP = The IP Adress of the client
%CNOW = Number of User actually connected
%CALL = Total Number of Users connection on the server since started
%C24H = Number of connections last 24h
%UTIMEOUT = Current User TimeOut
%URATIOCREDIT = Current User Ratio Credit (If Ratio is enabled)
%UHOME = Current User Home Dir (If showrelativepath is disabled)
%UCURRENTDIR = Current User Dir
%URATIO = Current Ratio Upload/Ratio Download
%URATIOUP = Current Ratio Upload
%URATIODOWN = Current Ratio Download

%SERVERSECS  = \
%SERVERMINS  = Server Online Time
%SERVERHOURS = /
%SERVERDAYS  =/

 -= All Session =-

%SERVERKBUP = Kb uploaded on the server overall sessions
%SERVERKBDOWN = Kb downloaded from the server overall sessions
%SERVERKBALL = Kb Transfered on the server = %SERVERKBUP + %SERVERKBDOWN

 -= Server Session =-

%SESSIONKBUP = Kb uploaded on the server by clients
%SESSIONKBDOWN = Kb downloaded from the server by clients
%SESSIONKBALL = Kb Transfered on the server = %SESSIONKBUP + %SESSIONKBDOWN

%SESSIONKBTOTAL = Kb Transfered by server including upload, download, directory list, answer to commands ...

%SESSIONFILESUP = Number of Files uploaded to the server
%SESSIONFILESDOWN = Number of Files downloaded from the server
%SESSIONFILESALL = %SESSIONFILESUP + %SESSIONFILESDOWN

%SESSIONAVG = Average bytes transfered by the server

 -= Time/Date =-

%SERVERTIME = Server's Machine Time
%SERVERDATE = Server's Machine Date
%SERVERLOCALHOST = Server Local Hostname
%SERVERVERSION = Server Version

%DISK = If not Relative Path enabled then return Disk Drive
%DFREE = Space Free in current directory

 -= User =-

%FUP = Number of Files uploaded by current user
%FDOWN = Number of Files downloaded by current user
%FTOT = %FUP + %FDOWN

%BUP = Number of bytes uploaded by current user
%BDOWN = Number of bytes downloaded by current user
%BTOT = %BUP + %BDOWN

%TMIN = minutes since current user is connected
%TSEC = seconds since current user is connected (not equal to %TMIN * 60)

 -= Server =-

%PCPROC = Type and number of server Processor (Intel, AMD, Cyrix ... K6, Pentium II, ...)
%PCRAM = Amoun of physical Memory

%OSVER = Windows version (95, 98, NT, Service pack if available ...)
A typical login file could be :
==========================================
Hello, user from %UIP !
You are user #%CNOW of %MAXUSERS maximum users
It is %SERVERTIME, we are the %SERVERDATE.
==========================================
You are connected to %SERVERVERSION, this server has %PCPROC and %PCRAM Kb of Ram.
This server has already served %SESSIONKBUP Kb to client and received %SESSIONKBDOWN Kb at an average rate of %SESSIONAVG Kb/s.
You will be disconnected after %UTIMEOUT s of inactivity.

Have a nice day on our server  !
That's all for those files.
Links Settings
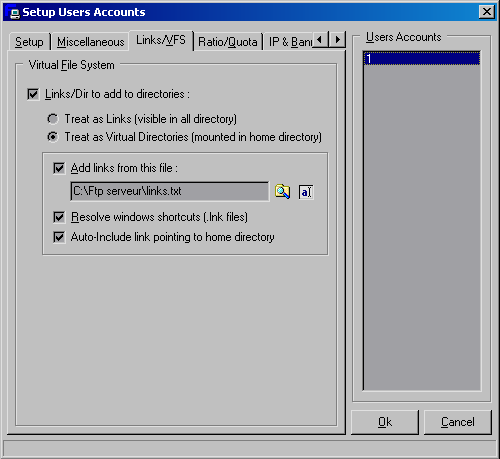
This feature allows you to redirects client to some directory placed on other drives.
You can specify how links are treated :
- As Links : When user clicks on a links current directory becomes the target link directory
- As Virtual Directory : user sees fake directory (non physical existence in home directory) that redirects on drives/directory on other location.
You can add links from a file (see links file) or define links using Windows ShortCut (.lnk file) : simply create a shortcut to the target directory, give user access to this directory.
Last option is to auto include link to home directory called "Home" which will always redirect to user's Home Directory.
Notes :
- Virtual directories are only mountable in home directory.
- Virtual directories' date will be the target directory date.
- Only .Lnk files in home directory will be processed other will be ignored.
For more information see configuring links
Ratio/Quota Settings
Well, you have certainly seen such features in other servers ;)
What is it ?
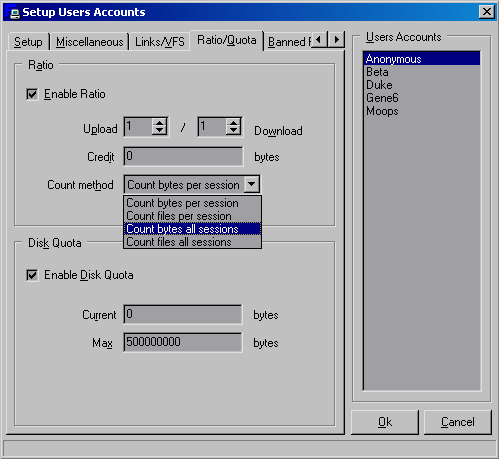
1 - Ratio
When you don't want lame user to download your file without uploading some of their then you can set ratio.
For example if you want user to get 1 byte of download for every byte they upload, the ratio is set to 1/1, 1 byte uploaded for 2 byte to download = 1/2. If they upload a 100 bytes file then with ratio set to 1/2 they will have 200 bytes for credit, 50 bytes if ratio is set to 2/1 .
For Upload : NewCredit = CurrentCredit + RatioDownload / RatioUpload * FileSize
For Download : NewCredit = CurrentCredit - FileSize
Count byte per session / count files per session2 - Quota
Some ratio may have to bee temporary such those of anonymous sharing the same account : when user log in they are given a default credit specified in the credit box. This credit is only valid for the time of connection and is not shared by all users connected under this account.
Count byte all sessions / Count files all sessions
Well those ratio persist after disconnection, so you will be given the credit you had the last time you disconnect from the server. If two users connect under the same account with this ratio method then credit are shared between the users (If Credit is 1000 bytes, ratio 1/1 and A download 500 bytes then A & B Credit will be 500 after A download.)
(Note : credits are updated during the operation so that if you stop a download your credit will only be decremented from what you have successfully downloaded, if you continue the download later credit will be corresponding. Another point is that credit are internally pre-calculated.
Example : A & B connected under the same account with 30 Mo, A starts downloading 16 Mo before B, B wants to download 15 Mo (A has not finished his download) then B can not download cause 16 Mo + 15 Mo > 30 Mo. If A stops his download then credit will only be decremented from the amount downloaded => B will be able to download if A has downloaded less than 1 Mo. This thing only happens for Counting byte all Sessions/Counting files all sessions (credit is decremented only at the end of the download for files methods))
Another useful feature which allows you to set maximum space that user can used on your server. Like Ratio Quota are calculated during upload (for REST method and so ...). User can not upload if he exceeds his quota => he needs to delete some files.
Note for Quotas : If user quota is zero and he deletes a file then quota remains at zero.
IP & Banned Files
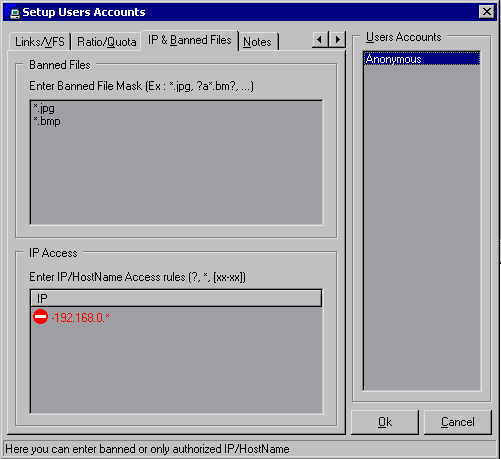
These options are here to limit annoyance on your server :
- IP Access : Specify IP that have access (or are banned) under this account : this means that you IP matching mask are allowed/not allowed to login under this account.
- Banned Files : client who try to upload filename matching masks are not allowed to upload. (they can rename filename though)
Note : IP Access follows the rules of Server global IP Access (wildcards, rules ...)
Choose a group for your user
If you want that user to have the same access property to the FTP Server as other same user without setting up each user account then create a group account for all these same "access users" :
Click on
 to define group
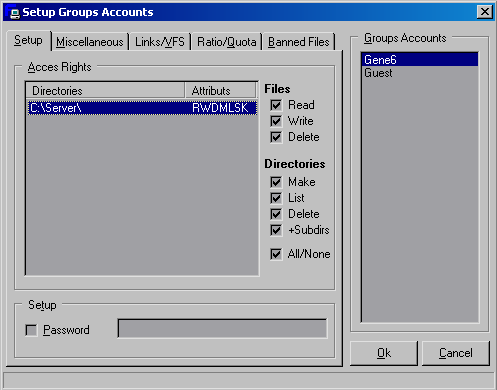
In our example we have created a group called "Demo group".
All the user in this group have access to "C:\TEMP" with all access
The group password is not defined so if you want your user to have a password then you can specify :
- one in the group => all the user will have the same password
- a password in all the user account => user in that group will have a personal password
There's no credit and no ratio so they can do what they want in "C:\TEMP"
No links file is defined for this group.
In this way you can add some properties to the user and give general properties with the groups :
Note concerning groups rules:
- User directorries are composed of User directory (if specified) + Group directories => the first directory is always the home dir of the user. If you don't specify dir for user then he will have access to group directory and the home dir of the group will be his home dir.
- Others things : User's properties have always priority over groups settings.
(If user ratio is checked then group ratio won't be effective, same for quota => you can than set up personal user settings inside groups.)
- Misc and Ratio acts same as User Settings
-> User > Group
-> Group properties are the default for all group user (if the user property considered is not defined)