RGB, Grayscale And Indexed
|
|
|
If you know that you want a grayscale or indexed image, you can easily convert your image later. Some commands, filters and Script-Fus require grayscales, whereas others require RGB images. |
|

|
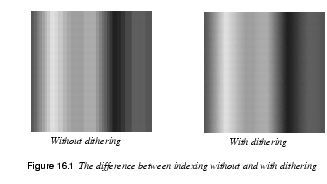
Tip: All color information is irreversibly lost as soon as you convert to Grayscale, and a lot of color information is lost when converting to indexed. Most commands, filters and Script-Fus give poor results or no result at all when used on indexed images. If you are using an indexed image, convert it to RGB immediately, and don't convert it back to indexed until you're finished with it! For more information on RGB, grayscale and indexed images, review "Color Models" starting on page 189. Indexed Palette OptionsSelect the When you think of indexed images, you probably think about GIF images with a maximum of 256 colors. In general, however, you are free to specify any number of colors for an indexed image. To set the number of colors, press the Generate optimal palette radio button and type the number of colors you want into the # of colors box. If you are doing web design, you should use the WWW-optimized palette to map the colors. You can also choose a custom palette from the drop-down list, or create a line art image by using a black/white palette for color mapping. The Enable Floyd-Steinberg dithering option helps to make indexed images look "good" even if they only include a few colors. |

|
|
Resize and Scale
|
|
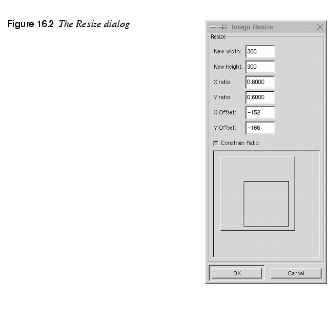
ResizeThe A. You're happy with the layers you have, but you need a new canvas size to make space for new and larger layers. When you resize the canvas, all new layers that you create will have this size and aspect ratio, unless you specify another width and height in the New Layer dialog box. The old layers, however, will remain as before. B. You find that your layers are too small to contain things you want to add to them, or perhaps you wish to change the shape (aspect ratio) of your image without distorting the information within it. To resize an old layer, use the Resize Layer option in the Layers menu you get from right-clicking in the Layers tab ( |
|

|
|
The Resize Dialog OptionsThe dialog box displays a preview of what the proposed changes in size, aspect ratio or offset will look like. Set where on the canvas you want to place the image by dragging at the gray "image rectangle" in the dialog window, or by specifying a value in the X Offset and Y Offset fields. If you check the Constrain Ratio checkbox, the proportions of the old canvas will be kept. If you uncheck Constrain Ratio and then change the proportions, Resize will either crop or add a transparent area to the image to fit the new size. Scale
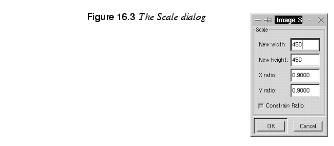
If you check the Constrain Ratio checkbox, the proportions of the old image will be kept. If you uncheck Constrain Ratio and then change the proportions, Scale will stretch or compress the image to fit the new size, thus distorting the image. Interpolating With ScaleWhen you enlarge your image with Scale, Gimp interpolates the new image. This means that when you add new pixels to an image, as you must when you make it larger, a process called interpolation will calculate the color and value of the new pixels based on the properties of the neighbor pixels. That is, an additional pixel between black-and-white original pixels will get a gray color. The consequence is that the enlarged image will look better than the original image zoomed to the same size, but it will also lose sharpness and clarity. Read Interpolation to get more information about interpolation in Gimp. |
|

|
|
Histogram
|
|
|
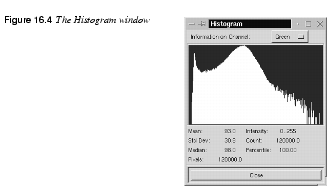
The Histogram always refers to the active layer. Every spike in the histogram represents pixels with a defined value. The higher the spike, the more pixels of that value in the image. The 256 spikes, one for every value, are ordered in a sequence from left to right, starting with low values to the left and continuing with increasing values to the right. You can chose a certain value or value interval by clicking on a spike or clicking and dragging at a part of the histogram. |
|

|
|
Histogram Parameters· Mean is the mean value of that interval. This figure will give you an approximate value of the range you're interested in. · Intensity tells you the value (from 0 to 255) of the chosen pixel spike, or the value of the first and last spike in a chosen interval. You can, for example, select an interval where there seems to be a large number of pixels and find out where on the brightness/darkness scale those pixels are. · Std Dev (Standard Deviation) is how homogeneous the pixel spike height is in a certain range. It tells you whether the pixels in a certain interval are equally distributed over that range (this usually means that there are many different shades and soft transitions in the image), or whether you can only perceive a few shades within a certain value or color range. · Count refers to the number of pixels a spike or interval represents. · Median is the median of the interval, i.e., the value of the fiftieth spike if you have chosen an interval of 100 spikes. · Percentile is the percentage of the total number of pixels in a selected range. This tells you how large that part of your image is. · Pixels tells you the total number of pixels in the active layer. | |
Save Palette
|
|
|
When you convert an image to indexed ( | |
 |
Creating A Palette From An Indexed ImageSelect
Back on your image, press Ctrl+z to Undo the indexed conversion and return your image to RGB. Open the Color Palette dialog (with either |
Transforms
|
|
Autocrop
Autocrop will crop your image so that everything but the important parts are cut away. Note that if you work in a layer, Autocrop will crop the entire image with no concern for the other layers. Image
Layer
Mirror | |
 |
Rotate
Zealous Crop
When Zealous Crop finds objects of a different color on a solid or transparent background in the same layer, it moves the objects as close to each other as possible without them overlapping, so that they remain in the same relative positions to each other. Zealous Crop lets you keep all of the objects in your image, but reduces the size as much as is possible without scaling the image. Zealous Crop works on all layers, but only compresses the objects in the active layer. Zealous Crop always crops the upper-left part of inactive layers, while Autocrop crops all layers in the position determined by the active layer. |
| Frozenriver Digital Design http://www.frozenriver.nu Voice: +46 (0)31 474356 Fax: +46 (0)31 493833 support@frozenriver.com |
Publisher Coriolis http://www.coriolis.com |