Introduction
|
|
What Is A Drawing Tablet?When we speak about a tablet, we refer to a digitized drawing tablet in combination with a digital pen. This pen can be pressure sensitive, which means that if you press harder, the pencil stroke will get thicker. There are other kinds of tablets that operate without pens, such as tablets for CAD. However, for working in Gimp, you'll need a pen-enabled tablet, because Gimp is a program for graphic artists. Platforms And BrandsWe will review Wacom tablets in this chapter. There are naturally other brands, such as SummaSketch, but due to hardware limits we will focus on Wacom tablets. We will cover all types of Wacom tablets from ArtPad to the latest Intuos tablet. Secondly, we will only discuss configuration and installation under Linux XFree86; it will, however, most likely be the same for all other versions of UNIX that can use XFree86. There is support for Xinput in most major Unix/X11 implementations, such as Solaris, OSF/1, HP-UX and AIX, but the main problem is that there are no drivers that enable you to use Wacom tablets. Wacom makes drivers for IRIX, but since we have no access to SGI machines, we are unable to continue the discussion in that direction. What About USB Tablets?Linux support of USB (Universal Serial Bus) is very limited at the time of writing. There are, to our knowledge, no supported USB tablets, so we strongly recommend that you buy a Serialport tablet instead. Installing And Configuring |
|

|
First of all, Gimp 1.0.x doesn't support tablets (even though the current developer version has tablet support, and the next Gimp release will include this feature). This limits the usage, but does not prevent it. There are two ways of using a tablet in Gimp 1.0.x. The simplest way is to use the pen as a complement to the mouse, but then you will not be able to bring the pressure sensitivity into play. If you want to make full use of the pen's capabilities, you will have to patch and compile Gimp yourself. However, this is no trivial task. It can get very complicated if you have an old version of X11 (XFree86), because then you will also have to recompile X11. |
Using The Pen As A Mouse Replacement
|
|
|
Without pressure sensitivity the pen is an incomplete instrument, but it will still improve the precision and ease of freehand drawing immensely compared to drawing with your mouse. This section provides you with information on how to use a digitized pen as a replacement or complement to the mouse with all Wacom tablets, except the Intuos tablet, which will be discussed in The Wacom Intuos Tablet. The Right XFree86 VersionXinput and Wacom tablets have been supported by XFree86 since the 3.1.2D release. However, we always recommend getting the latest and greatest version (which at the time of writing is 3.3.3.1), because many new features have been added and bugs resolved. One of the most notable new features is the Switch/AlwaysCore function, which makes it possible to use the pen and the mouse at the same time. You can switch between the mouse and the pen without having to specify which one is your pointing device. If you don't have XFree86 3.3.3, or never installed it, we strongly recommend that you upgrade. Otherwise, you'll find that working with your tablet will be slow and cumbersome. In relatively new Linux distributions, most major Linux distributors include upgrade packages that will make it relatively easy to upgrade to XFree86 version 3.3.3 or newer. We will cover the basic configuration of tablets within the XF86Config file. This section is required for all tablets, including the Intuos tablet and/or when pressure sensitivity is enabled. Without Auto Switch Between Mouse And PenIf you didn't upgrade to 3.3.3., you can't use the auto switch when changing from mouse to pen and vice versa. The XFree86 config file will in this case be very easy to configure. The XF86Config file can be found in the following locations:
(most of the time this file is symlinked to The Xserver will search for the file in the same order, so be sure to edit the right file (i.e., if you have a Most of the time the config data for Xinput and Wacom tablets are already present in the XF86Config file, and are just being commented out. We will describe how to edit the file to add the Xinput support, and if you already have the data, you can naturally just remove the comment hash mark. The three sections to edit are the Files, Module and Xinput sections. The Files SectionStart by making a backup copy of your XF86Config file (in a shell |
|

|
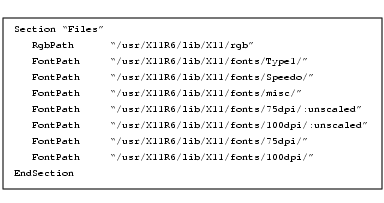
Note: You must edit the file as the root user; otherwise, you will not be able to save your changes. If you are in a KDE environment, type: Scroll down until you see the following section: |
|
|
|
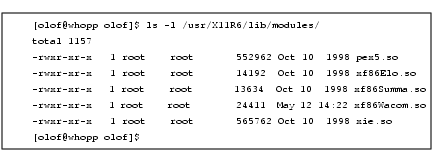
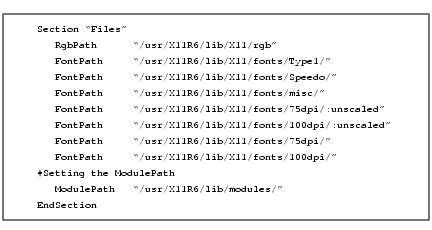
Notice that the RgbPath and FontPath may not be the same in your installation. All you have do here is add the ModulePath (i.e., where the Wacom driver is located). The most common location for all drivers (modules) available for XFree86 is To check it out, execute |
|
|
|
|
If you don't get this output, your drivers (modules) are located elsewhere and you will have to find them by executing something like:
in a shell. The file list above may not be exactly the same on your system, but you must have a file named Add the following entry to the files section ModulePath:
The path, i.e., |
|
|
|
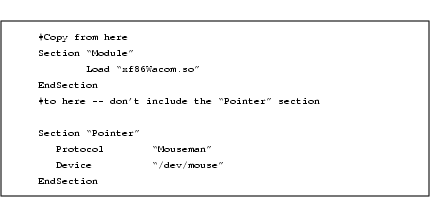
The Module SectionThe next step is to load/enable the driver/module for use within XFree86 (X11). The section in the XF86Config file that takes care of that, is the Module section. In a standard XF86Config file, this section is not present or commented out with a #. We have our Module section above the Pointer section. Here is an example that you can copy into your XF86Config file (don't copy the Pointer section). |
|
|
|
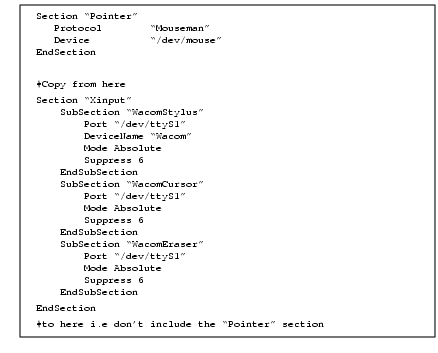
The Xinput SectionNow, you have to enable the pen/tablet as an extension to X11 (as an Xinput device). You do that in the Xinput section. This section is not present or commented out in the standard XF86Config file. We have added the Xinput section right after the Pointer section. As in the Module section, we provide an example for you to copy into your config file. We will talk about options and settings later, but we guess that you are eager to get started and use your pen: Here is an example that you can copy into your XF86Config file (don't copy the Pointer section). |
|
|
|
|
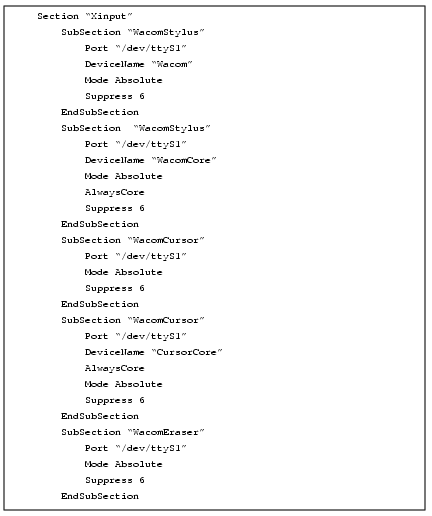
Actually, you don't need all of it, but it's better to be prepared to enable pressure sensitivity, isn't it? You're still not quite ready to start using your pen. First, you have to connect your Wacom tablet to the right serial port of your computer. According to our config file it will be the If you are all done now, restart your Xserver in order to load the driver and enable your tablet. You must, of course, save the config file before you restart the Xserver. The simplest way to restart the Xserver, and the whole Linux computer, is to press Ctrl+Alt+F2 and Ctrl+Alt+Delete. This will restart the whole computer, so before you do it, make sure to save all current work. There are more elegant ways to do this in a Unix/Linux environment, but this is an easy solution for a beginner. Using The Pen In GimpYou don't have to configure or rebuild Gimp. All you have to do now is empower the pen. This is done with xsetpointer. If you have heeded our configuration example, you will be able to use the pen by entering the command The digitized pen will now be your pointing device. You can set the buttons on the pen to emulate the mouse buttons; for example, enter As you may realize, this way of working is a real pain. The right way is to enable auto switch between the mouse and the pen. Enabling Auto Switch Between Mouse And PenIf you haven't read Without Auto Switch Between Mouse And Pen, do so now, because we will only cover the differences here. First of all, you must have XFree86 3.3.3 or newer installed on your Linux system. An easy way to find out what version you have is to read the man page; execute Because you will already have enabled tablet support in your XF86Config file, and we assume that you have tested it, all you have to do now is add some new entries in the config file. The only thing you need to edit is the Xinput section. Next, you'll find an example of an Xinput section that you can copy and use as a template for your own entries. |
|
|
|
|
As you can see, we have added several subsections containing a Core device that is in AlwaysCore "mode." This device and setting is what causes XFree86 to auto switch from the mouse to the pen when you let go of the mouse and touch the pen instead (and vice versa). Now restart your Xserver, and you will be able to test it out. XFree86 will now automatically switch and enable you to use the selected pointing device instantly -- no need to execute Auto Switch In GimpAuto switch between mouse and pen makes everything so much easier, doesn't it? You can instantly shift between the advantage of having fast and easy access to the menus (using the mouse) and being able to use the pen's superior painting qualities. There is no configuration that you must perform and no commands to execute. However, you can still only use the pen as an ordinary pointing device; there is no pressure sensitivity. Although this is undeniably better than when you had to switch between mouse and pen manually, there is still room for improvements. You can get pressure sensitivity in Gimp, and the next passage will tell you how. Pressure Sensitivity And Auto Switch Between ToolsBefore you start reading here, you should first read and comply with the passages Without Auto Switch Between Mouse And Pen and Enabling Auto Switch Between Mouse And Pen. Having followed these instructions, you will have the Xinput support that Gimp needs to enable pressure sensitivity and auto switch between tools. The auto switch function will also enable you to assign the pen to a certain tool in the Gimp toolbox. You can, for example, easily map the eraser part of your pen to the eraser tool. This section will cover all Wacom tablets except the new Intuos tablet. As before, you will still need the XFree86 3.3.3 or newer, but this time you will also need to enable Xinput in Gtk and patch Gimp. See FTP for where to download Gimp and Gtk. You will also need a special Gimp patch. See Xinput to learn where, find the most up-to-date version of this patch. Xinput Support In GtkGtk already has support for Xinput, so all you have to do is enable it, i.e., configure it using Compilation ProblemsIf your compilation failed, it could be for a number of reasons. First of all, check that you have all of the X11 development files available for your Gimp distribution. There are variations between the different distributions, so we can't give you an exact instruction on how to check this. However, if you have used In our Linux distribution this command would result in a line like this:
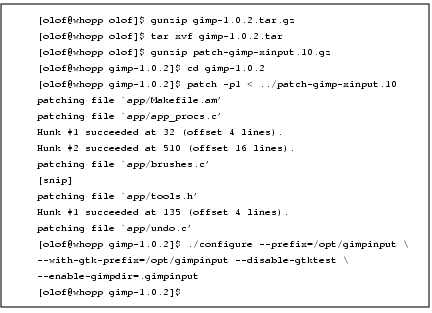
Your result may differ slightly, but the string to look for is We also recommend that you read Installing A Source Distribution. Here, you will find a lot of useful information concerning compilation and common compilation problems. Xinput Support In GimpWe need to enable Xinput support in Gimp in order to obtain auto switching tools and pressure sensitivity. You will have to patch Gimp and rebuild it from scratch. This is not a trivial task, but we hope that by guiding you through this procedure, we will make it as easy as possible for you. Patching GimpStart by downloading Gimp 1.0.2 and the special Gimp Xinput patch. We suggest that you to read Installing A Source Distribution before making any attempt to patch, configure and make Gimp. Okay, ready to give it a try? We will, as usual, give you an example to follow. We assume that you have both Gimp and the patch in your home directory. |
|
|
|
|
After this you have to edit the Makefile in the app directory. Just run desaturate.h \ Now, you have to insert two lines after the |
|

|
|
|
As you see, we have inserted two new lines: |
|

|
|
|
All you have to do now is compile and install Gimp Running The New GimpBefore you can run Gimp with Xinput support, you have to create a start-up file or set your |
|

|
|
|
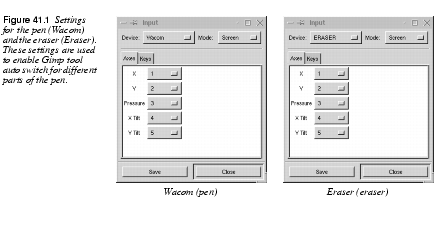
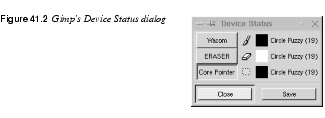
Before you use the start script, you must make it executable and move it to your The last line (above) will start up the new Xinput-enabled Gimp. If you run into any sort of problems during the installation and configuration of Gimp, read Obtaining Gimp and "Compiling Plug-ins" starting on page 769. Assigning Gimp Tools To The Pressure Sensitive PenTo be able to use the new features in Gimp you have to make some configurations. Gimp provides you with a nice GUI to do that. Invoke All you have to do is set the Wacom in the Device drop-down menu to Screen Mode. Then, set Eraser in the Device drop-down menu to Screen Mode. Take a look at Figure 41.1 to see how the settings should look. |
|
|
|
|
When you are done, press Save and then Close. Now, we will assign a Gimp tool to the end part of the pen (where there is an eraser on a real pencil). Bring up the Device Status dialog using Select the brush tool in the toolbox. Turn the pen around (point with the eraser), repeat the same steps as before, but this time enable the eraser tool instead of the brush tool. Grab the mouse and press Save in the Device Status dialog. |
|
|
|

|
You are now ready to use your tablet, but remember that this is a patched Gimp and that the pressure sensitivity can be a bit crude. There may also be bugs. A known bug is that the Device Status dialog doesn't get updated as it should. However, this bug does not affect the functionality. The only tool that is pressure sensitive is the brush; the other tools (such as the eraser) will just benefit from the convenient auto switching feature. |
The Wacom Intuos Tablet
|
|
What Is Intuos?Intuos is Wacom's latest tablet. It includes several new tools and features such as tool-ID (auto recognition of which pen you are using), Airbrush, a special 4Dmouse, and of course, the digital pen. There are also more buttons integrated with the pen, which makes it easier to work in an X11 environment that demands three buttons. All of those features are not supported in Gimp or XFree86. Naturally, you can still use the pressure-sensitive pen, the eraser and the 4Dmouse as you would with an ordinary Wacom tablet. The development version of Gimp, Gimp 1.1.x, which is still not ready for everyday use, has a much better support for Wacom tablets and especially the Intuos tablet (see A Sneak Preview Of Gimp 1.1.x). Enabling Intuos Support In XFree86Before you enable Intuos support, read and comply with the sections Using The Pen As A Mouse Replacement and Pressure Sensitivity And Auto Switch Between Tools. |
|

|
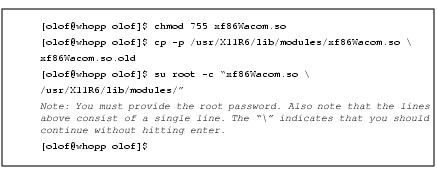
Don't restart X11 until we tell you to in the following example. As far as Intuos is concerned, you don't need to worry if you don't have XFree86 3.3.3 or newer, as long as you have (at least) XFree86 3.3.2. In XFree86 3.3.3.1 there is an early beta driver for Intuos, but we recommend that you get the latest development version of the driver (which works just like a charm for us). See Xinput to find out where to download it from. On A Glibc-Based SystemIf you are on a Glibc-based system, there are precompiled drivers for both XFree86 3.3.2 and 3.3.3; otherwise, you will have to recompile XFree86. If you are on a Glibc-based system, just download the precompiled driver for your XFree86 version and copy it to your module directory: |
|
|
|
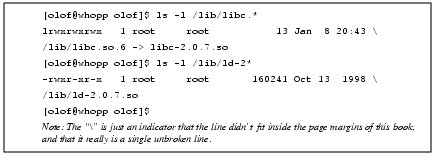
Now, you can restart your Xserver and/or computer to empower the Intuos support. Finding Out If Your System Is A Glibc SystemWhat if you don't have a Glibc Linux system, and how do you find out if you have one? To check if you have a Glibc system, you only have to enter an |
|
|
|
|
If your commands inform you that you have On A Non-Glibc SystemIf you don't have those files, then you have to get the source code of the driver, i.e., the First uncompress and extract your XFree86 3.3.3.1 source code distribution (or newer; we assume you didn't download an old one). Then, copy If you already have XFree86 3.3.2 or 3.3.3, 3.3.3.1, but not a Glibc system, then it may be wise to download the XFree86 source distribution that matches your system. This will save a lot of time, because you'll only need to rebuild the Wacom driver. If you have downloaded a source distribution of XFree86 that matches your XFree86 version and copied |
|

|
|
|
Now, copy the driver to the right directory, as we did before in this section. If you have a non-Glibc system as well as an old XFree86 version, then you have to recompile and install the whole XFree86 distribution, and that is really beyond the scope of this book. | |
A Sneak Preview Of Gimp 1.1.x
|
|
|
Gimp 1.1.x is the development version of Gimp that will be released as Gimp 1.2 when it's finished. Remember that it's still under development and may contain bugs that make it unstable to use. Furthermore, it may not even compile for you. Nevertheless, we think it would be nice to know what you can do in Gimp 1.1.x, since it provides advance information of what is to come in the next Gimp release. For Gimp artists who are thinking of investing in a digitized tablet, this information may help you decide which tablet to buy. Pressure SensitivityGimp 1.1.x has support for pressure sensitivity in all of the paint tools that make use of brushes, such as the paintbrush, eraser, airbrush and ink tools. This will, for example, make it possible to use the eraser with more precision than before. The pressure sensitivity is also very much improved, so it's not as crude as in the patched version of Gimp 1.0.x. You will be able to draw extremely fine lines, and the pen can be set to react to very small changes in pressure and tilt. The Ink ToolBut perhaps the biggest news is a new item in the toolbox called Ink. The Ink tool was created with tablets in mind. It supports tilting and pressure sensitivity, and you can easily regulate the shape of the tip. Using this tool with a digital pen is just like drawing with a calligraphic ink pen, where the stroke depends on both the pressure and the tilt of the pen. In fact, this tool is so good that you would have to buy a really expensive ink pen to match the precision you'll find in Gimp's Ink tool. To get the best out of the Ink tool we recommend the Intuos tablet. You can use an older Wacom tablet or a PenPartner as long as the ROM version is 1.4 and above. However, it's harder to configure and we haven't tested it with our ArtPad II, because it has an older ROM version. | |
Using Tablets With Gimp
|
|
Getting Started |
|

|
Note: This section does not apply to Gimp 1.0. We will, however, cover the usage of tablets in Gimp 1.1.x (which will become 1.2). Pen/Monitor CoordinationWhen you use a digitized tablet, a common misconception is that you can make instant sketches, as you would on ordinary paper. This is wrong. Drawing with a digital pen is quite different, and to control it, you need to practice. Coordination is the single most important training moment. On ordinary paper, you can see what you draw at a glance. When you draw on a tablet, you'll have to move your focus from the pen to the monitor to see what you're doing, which is totally different. You need to practice pen/monitor coordination. Try this simple, but effective training method: Create a new Gimp image, and with your mouse (and the Using Pressure SensitivityUsing Gimp's ordinary pressure-sensitive tools, the brush, eraser and airbrush, is no problem at all. The pressure you exercise will control the amount of paint; if you press harder you will get more paint, and vice versa. Note that the Device Status dialog is a bit different in Gimp 1.1.x. It will display the current brush (and pattern) assigned to the Ink tool (pen tip), Core tool (mouse) and Eraser (the eraser part of the pen), and the 4-D mouse if you have one. Obviously, patterns can't be applied by the Eraser tool, and brushes can't be used by the Ink tool, but you can of course choose to assign, for example, the clone tool to the eraser part of the pen, in which case the pattern swatch becomes relevant. |

|
|
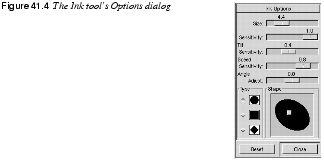
Using The Ink ToolGimp's best tablet tool is the Ink tool. Sketch with this tool, and you will get a genuine WOW feeling. The tool is so good that it will surpass all traditional ink pens that you have ever used before. Ink OptionsIf it's not already up, open the Ink tool's Option dialog by double-clicking with the digital pen on the Ink tool in the toolbox. · The first parameter sliders are Size and Sensitivity. These options refer to the general pixel size of the pen tip you're using and the general pressure sensitivity of the Ink tool. · Tilt Sensitivity is one of the more interesting Ink tool parameters, Because a tilt-sensitive pen behaves more like a real ink pen, it may be harder to master for an inexperienced hand, but it gives you an incomparable artistic freedom and always produces a more sophisticated pen stroke. In fact, there are certain calligraphic fonts that can't be drawn without changing the tilt. We recommend setting both Pressure and Tilt sensitivity to a rather high value in order to create a superb ink pen. If you set the values low, the ink pen will just feel sluggish. · Speed Sensitivity is the parameter that controls how the pen reacts to the speed of your hand as you move the pen over the tablet. When you make fast sketches, the pen stroke will turn thicker where you slow down, and get thinner the faster you move the pen, just the way an ordinary ink pen works. If you draw pencil-like sketches with a lot of lines, this parameter should be set to a high value. · Angle Adjust is dependent on the Tilt Sensitivity. Angle Adjust allows you to deviate from the inclination of the calligraphic pen tip shape. The higher the tilt sensitivity, the more change in the designated pen tip angle. This option is particularly interesting if you're an experienced calligraphic artist, and are used to holding traditional ink pens in a certain fixed angle as you draw (and sometimes need to tilt the pen in another angle to achieve a certain effect). Pen Tip Types And Shape AdjustmentGimp's Ink tool lets you choose between three basic pen types: Round, Square or Diamond-shaped.When you have chosen a pen type, you can adjust the shape and tilt angle manually in the Shape preview window. If you have worked with traditional calligraphic pens before, you'll know that you have to use many different pen tips to achieve different effects, most notably when you draw calligraphic text. Also, if you like to work with thick and large pen strokes, it is very important to choose an appropriate pen tip shape, because this will have a strong impact on the appearance of the start and finish of your pen strokes. |
|
|
|
Methods And TipsPerhaps you've seen your art teacher draw sketches on the blackboard? The drawing is ready in a blink of an eye, and it looks so perfect. This is naturally very impressive, but what you don't know is that the teacher cheats. Before class, he made some nearly invisible help lines and small dots. He will see the lines, but you will not because you view it from a distance. The same goes for computer graphics. Very realistic drawings are usually made with a photograph as a template. With a digitized tablet, this is a piece of cake. Just put your photo on the tablet and draw. It's an easy way to trace the image. Even if you want to paint imaginary things, one or several photos can be used as templates or models. If you are used to making sketches on paper, then a tablet will help. You can make you sketches as you are used to, and then put the sketch on top of the tablet and trace it. When you are more used to your new tablet you may want to skip the paper stage and sketch straight away on your Linux workstation. | |
 |
A Simple TutorialThere are, of course, as many ways to use a Wacom tablet as there are artists, and most traditional drawing techniques apply just as well to the digitized ink pen and tablet as for real paper and ink pens. We hope that this tutorial will give you some ideas on how you can use Gimp and a tablet when you create your own paintings and drawings. |

|
|
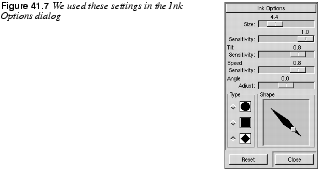
Creating A Template And A Palette 1. We started off with an old color photo. The photo was scanned and imported to Gimp, where it was converted to indexed color mode ( 2. Because the photo was too small to act as a template, we also made a letter-sized printout from our black-and-white laser printer. 3. The next step was to create a palette from the indexed image with the Making The SketchNow, we can start using our Wacom pen. 4. First, we created a new 500x1000 pixel Gimp image with a white background. Then, we opened up the Layers & Channels dialog and created a new transparent layer. 5. It is in this layer that we will draw the first sketch. We placed the printed copy of the photo under the tablet's transparent plastic sheet so that we could use the printed image as a template. 6. We activated the Ink tool in the toolbox, and "double-tapped" with the pencil tip on the Ink tool symbol to access the Ink Options dialog. 7. In the Ink Options dialog, we used the default values, except for Tilt Sensitivity, which we raised to 0.8. We used a diamond shaped pen type, and tilted it manually, as you can see in the Shape preview window in Figure 41.7. |
|
|
|
|
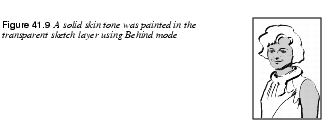
8. Following the outline of the template, we made a simple drawing, in which we varied the pressure so that the ink drawing would have thinner lines in brighter, or more detailed parts, and thicker lines where we wanted to put emphasis on shadow areas Painting The Sketch 9. The next step was to open the palette we made from the indexed image. We assigned the pen to the Free-hand select tool (lasso) and selected the face, arms and legs (using Shift+lasso to select several disconnected areas). Then, we chose one of the skin-colored swatches in the indexed palette, and filled the selected areas using the Bucket Fill tool. The Fill tool was set to Behind mode, so that the contours would remain intact. |
|
|
|
|
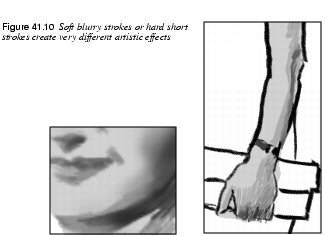
10. After applying the base color, we made a new transparent layer and continued to draw using colors from the color palette. For the purpose of demonstrating, we used a couple of different techniques. To build volume in the face area, we switched to the Brush tool, where we used a large, soft brush with low opacity. With the brush we painted soft shadows and color blend in the skin tone. For the arms and legs, we used the Ink tool again. With short, determined strokes and a fine pencil tip, we worked to achieve a crayon-like effect. |
|
|
|
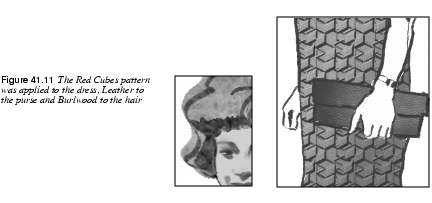
Making The Dress 11. For the dress, purse and hair, we used some of the default patterns in the Patterns dialog, and added a little 3-D effect by using a large, soft brush with low opacity in Overlay or Multiply mode. |
|
|
|
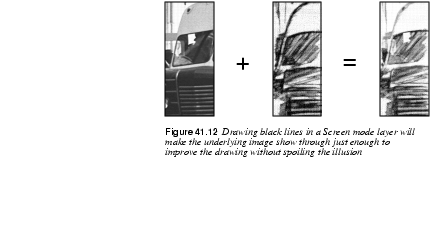
Drawing The BackgroundFor a background, we used a black-and-white photo of a busy street. To create the drawing, we used the same method that is described in Transforming A Photograph To A Drawing. 12. We copied the scanned image into the white background layer, and placed a new white layer on top of it. This layer was set to Screen mode, so that the black paint strokes would be transparent. 13. We momentarily set the screen layer to half the normal opacity, so that we could see the underlying image. The drawing was made with the Ink tool, where Tilt and Speed sensitivity were set to maximum values. 14. The sketch was made using many fast pen strokes, where we tried to follow the contours or the general direction of the dimensional planes in the image. The combination of the two layers made the drawing much more detailed without losing its sketch-like quality. 15. We also added some |
|
|
|
| Frozenriver Digital Design http://www.frozenriver.nu Voice: +46 (0)31 474356 Fax: +46 (0)31 493833 support@frozenriver.com |
Publisher Coriolis http://www.coriolis.com |