CML Explorer
|
|
|
Well, I suppose you might call CML Explorer the Swiss army texture maker. You can compose an abstract pattern based on 12 different mathematical functions, 14 different ways of composing those functions and 10 arrangement variations. As if that wasn't enough, you can also set 10 control parameters. Now, if you think this is a lot...that's just the choice of settings for the Hue values of this plug-in. You also have those options for Saturation and Value, as well as a variety of additional options. Writing full documentation for this plug-in would be too extensive for this manual, but we'll give you a few guidelines. |
|
|
|
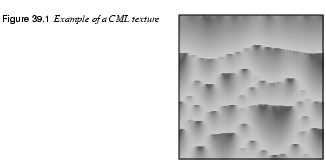
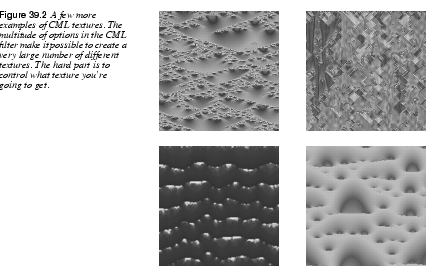
General SettingsFunctions· The first function type is called Keep Image's Value. This means that the Hue, Saturation or Value of the image you opened this plug-in from will stay unchanged, so if you have chosen this function, there's no point in changing any of the other settings in that tab. · Keep First Value doesn't have anything to do with your image -- it just sets the initial colors to standard cyan "shower curtain" with a little spilloff from the surrounding colors in the HSV color circle (Saturation and Value also get a standard curtain). · Fill with parameter K, sets a quite smooth surface, which is controlled by the K slide bar. The other functions that contain K are variations of the function, but they create very interesting brocade-like patterns when you raise the K-value (see the example to the top/right of Figure 39.2), though high values always end up with colored noise. · Delta creates similar patterns. The Sinus function creates wavelike shapes (with the right setting), like northern light or curtain folds, as in Figure 39.1. Composition And ArrangementYou can experiment with Composition/Misc. Arrangement as you like, but the effect varies so much with the other parameters that you can compare it to Forrest Gump's chocolates: You never know what you're gonna get.... Still, it is often the case that Composition functions starting with Max produce denser, darker patterns than Min functions. Random Arrangement usually results in striped patterns, and Gradient Arrangement causes shifts or blends from one side of the pattern to the other, so you can't use a gradient arrangement for tileable patterns. The Slide BarsThe slide bar settings are equally hard to predict, but this is generally true: · Moderation Rate goes from vertical stripes to rounder shapes. · Environment Sensitivity has a similar effect, but breaks up the pattern more. · Diffusion distance changes the sense of size and direction. · Number of Subranges increases complexity in the pattern. · Parameter K and Parameter P affect functions containing those values. · Low Range and High Range control the Value ranges of each HSV tab. |
|
|
|
Advanced SettingsThe Advanced settings tab allows you to experiment with Channel sensitivity and Mutations for random seed. Use it with care, or you'll just end up with colored noise. Other OptionsThis tab lets you set a channel independent initial value for the pattern you want to create. Note that this option often locks the pattern in a horizontal direction. You can also Zoom or Offset your pattern in this folder. Miscellaneous OptionsThese options include the possibility to copy and change the settings from one channel to another. You have probably seen that you can save and load patterns you have created in CML explorer. Here's an option to just load the settings of a certain channel instead of the whole pattern. |
|

|
Tip: You'll often get a better looking pattern by changing it to grayscale, and then back to RGB. After that, you can set any color you like with the Image/Color controls. |
Checkerboard
|
|
|
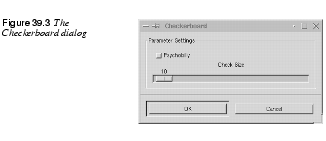
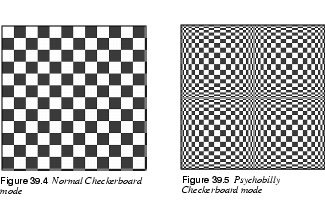
The Checkerboard plug-in creates Checkerboards -- what else? The Size slide controls the size of the checkers in pixels (X x Y pixels). If you check Psychobilly, you'll get tiled 3-D "pouting" checkerboards (see Figure 39.5). Size now represents the biggest check in a tile. Say that you set Size to 4 pixels, then the middle check (which is always the biggest one) will be 4x4, the next check will be one pixel thinner, until you get to the outer check which is always one pixel wide. The check size follows this algorithm: 1,2,3,... "check size"...,3,2,1. From this you can determine that each Psychobilly tile will be 16x16 (because 4x4=16). |
|
|
|
|
If, for example, you choose 12 as check size, for an image that is 288x288, you will end up with four Psychobilly tiles, because 12x12 gives you tiles that are 144x144 pixels big, and there can only be four such tiles in a 288x288 image. |
|
|
|
Diffraction Patterns
|
|
|
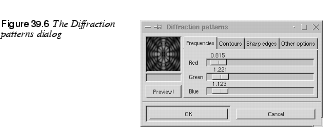
Diffraction Patterns lets you make diffraction or wave interference textures. You can change the Frequency, Contours and Sharp Edges for each of the RGB channels. You can also set Brightness, Scattering and Polarization of the texture. There is no automatic preview, so you must press the preview button to update. This is a very useful filter if you want to create intricate patterns. It's perfect for making psychedelic, batik-like textures, or for imitating patterns in stained glass (as in a church window). |
|
|
|
Dynamic Text
|
|

|
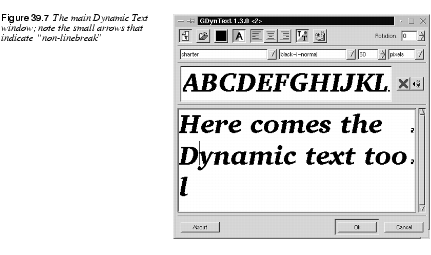
If you want to add a text string that consists of more than a few characters to your image, we recommend that you use the Dynamic Text plug-in. Dynamic Text is much more powerful than Gimp's ordinary text tool. When you add text to an image with the Text tool in the toolbox, you can't edit it once you have applied the text to the image. For example, if you want to change "Hi" to "Hello" you have to erase the old floating text selection and reenter the new text. With Dynamic Text, you don't have to worry about such things. It's easy to edit text; you can change "Hi" to "Hello" without any erasing or reentering operations. You can even write text in a separate text file, import it into Gimp and still be able to edit the text within Gimp. And of course, Dynamic Text has multi-line capability. The core Gimp text tool only handles single text lines. When you first open Dynamic Text, it will create a special GDyn Text layer; otherwise, it will not be able to manage the text processing. Just press Dismiss and carry on. The Main WindowThe main Dynamic Text window will appear, showing a large Text field. This is where you type the text that you want to render into Gimp. You will also find several icon buttons and drop-down menus. Let's quickly define the names of these options. Starting at the top-left corner you'll find the following icons: · Layer · Load · Color · Antialias · Left · Center · Right, · Preview · Special Character Directly above the Text field, there is an alphabetic Font Preview field. You can select a font in the drop-down menu, and view the new font in the Font Preview field (and in the Text field if you have written something there). Style And SizeAbove the Font Preview field, you'll find drop-down menus for Style and Size. |
|
|
|
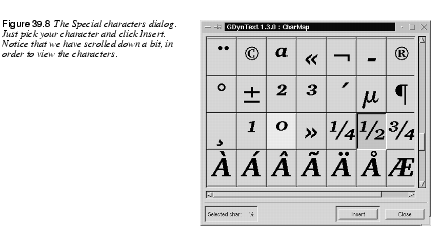
Style describes the three basic properties of the font variations. The first part of the style string describes the weight or thickness of the characters, such as bold, demi or light. The next part, which represents the slant or posture of the characters, is described by a single letter: i for italics, r for roman and o for oblique. The third and last part of the style string describes spacing, such as normal or condensed. Size can be measured in either points or pixels. One point is always 1/72 of an inch (72 points per inch), and one pixel in Dynamic Text represents one pixel in your Gimp image. If you set this option to points instead of pixels, you will see a difference if you're using a high-resolution monitor. For more information on fonts, read "How To Get Fonts To Gimp" starting on page 759, and "Text And Fonts" starting on page 165. The Text FieldType a sentence in the Text field. If the sentence is longer than the width of the window, Dynamic Text will display a small curved arrow in the right side of the window. The arrow means that there is no line break. To create a real line break, press Enter, as you would in a normal text editor. If you select another font, the text will automatically be updated to show the new font. However, you can only use one style (font, size, justification, etc.) for text strings created with Dynamic Text. Special CharactersIf you want to include special characters, such as ©, Ò or , you have to invoke the Special Character option by clicking on the "Abc" icon. This will bring up a window containing all characters and symbols present in the selected font. Choose a special character or symbol, and press Insert. Don't get confused if you don't see any special characters right away when you open the dialog. Drag the slider down, and you will find the symbols a bit further down in the character list. |
|
|
|
OptionsThere are several advanced options in the Dynamic Text dialog. If you are writing an entire text block, you may wish to set the justification of the text. The justification options allow you to set straight margins to the left or right or to align each line break to the center. This is done by enabling the left, right or center icon. You can control antialiasing by enabling/disabling the antialiasing icon (the A icon). Antialiasing is enabled by default in Dynamic Text, and we recommend you always keep this button checked to prevent the letters from looking jaggy and ugly. (There is one exception to this rule, and that is when the font size is very small.) You can also rotate the text by setting another rotation angle other than 0 in the Rotation field. You can specify the color of the rendered text with the Dynamic Text tool. Pressing the color icon will bring up a color dialog where you can select a color. After you have pressed OK, the color icon will display the new color. Because you can only choose one color for your text, you may want to change the color later within the dynamic text layer. If you change the color in the layer, you can, for example, select a certain word and fill it with red, or you could use a gradient as fill "color." Still, keep in mind that any changes made within the layer will be erased the instant you open Dynamic Text again to re-edit the text. Re-editing Dynamic TextWhat's so great about Dynamic Text is that it allows you to re-edit rendered text. To change your text, make the dynamic text layer active and invoke the filter. Your text will now appear in the Text field (notice that this time, there is no message about layer creation). Edit the text as usual and/or set new text options. Press OK and the changed text will appear in the text layer. If you'd like to keep the old text layer, then enable the Layer icon. With the Layer button checked, the modified text will be placed in a new layer, and the original text layer will be preserved. This procedure is very useful if you want to try out a variety of different text layouts or designs before deciding which one to use. Loading Text From A Text FileIf you want to render large amounts of text into Gimp, it may be convenient to edit the text in a normal text editor, such as Emacs or VI, and import it into Dynamic Text. To import text from a text file, press the Load button. A file browser will appear where you can specify which file to import. The imported text will be displayed in the Text field, and you can alter it just as you would text that you typed in the Text field. | |
Figures
|
|

|
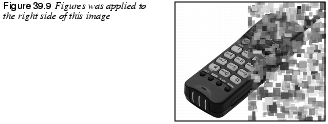
The Figures plug-in adds a random number of rectangles of different size and color to your image. You can constrain the average rectangle size to Min/Max Width and Height. Density controls the number of rectangles. A low density value results in a low number of rectangles, and a high value produces a whole lot of them. This plug-in can also be used as a texture maker. |
|
|
Flame
|
|
|
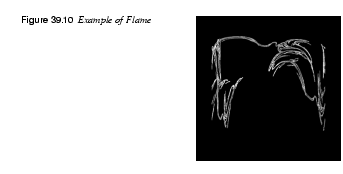
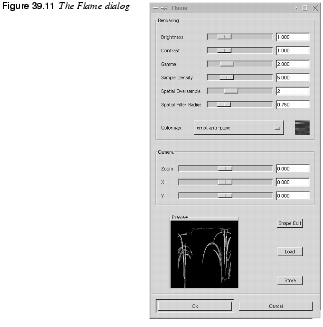
With the Flame filter, you can create stunning, randomly generated fractal patterns. You can't control the fractals as you can with the Ifs Compose filter, but you can steer the random generator in a certain direction, and choose from variations of a theme you like. Main InterfaceIn the main window, you can set Rendering and Camera parameters. The first three parameters in the Render display are Brightness, Contrast and Gamma. The result of these options is visible in the Preview window, but it's generally better to stick to the default values, and correct the rendered image later with Image/Colors. |
|
|
|
|
|
|
|
|
|
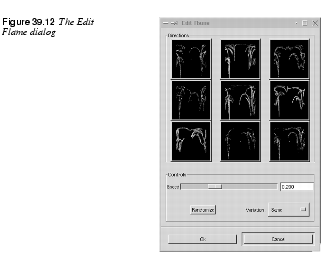
The other three parameters affect the rendering process and don't show in the preview window. Sample Density, which controls the resolution of the rendered pattern, is the most important of these. A high sample density results in soft and smooth rendering (like a spider's web), whereas low density rendering resembles spray or particle clouds. The Camera parameters allow you to zoom and offset the flame pattern, until you're happy with what you see in the preview window. Flame also offers the possibility to store and load your favorite patterns. The Colormap controls the color blend in the flame pattern. You can set Colormap to: · The current gradient from the Gradient Editor. · A number of preset colormaps. · The colors from images that are presently open in Gimp. You can use the Smooth Palette filter in the Filters/Colors menu to create suitable colormaps from your images. The Edit DialogPressing the Shape Edit button switches to the Edit Dialog. The Edit dialog shows nine different windows. The pattern displayed in the center is the current pattern, and the eight windows surrounding it are random variations of that pattern. |
|
|
|
|
Clicking on the central image creates eight new variations, which can be adjusted with the Speed control. You select a variation by clicking on it, and it instantly replaces the image in the middle. To pick a certain character or theme for the variations, you can choose from nine different themes in the Variations menu. You can also use Randomize, which replaces the current pattern with a new random pattern. | |
Fractal Explorer
|
|

|
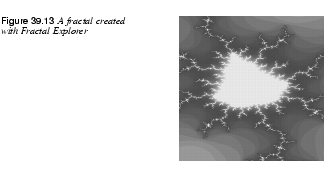
We will try to explain this fractal generator in a non-mathematical way, so that people who are unfamiliar with advanced mathematics will understand what it does. These fractal images can be used as patterns and textures, or simply as interesting images. |
|
|
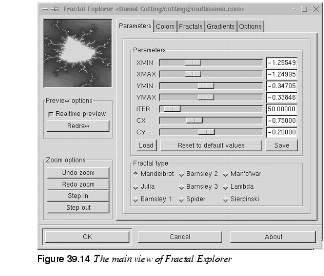
Tabs· Parameters is the first tab, where you select a fractal type and set its parameters. In this description we will focus on the Mandelbrot fractal. · Colors is the tab where you set color functions and parameters. · Fractals is the tab where you can select a custom fractal with predefined settings. · Gradients is an option for mapping a gradient over your fractal. · Options allows you to specify the interface language: English, German or French. The preview window allows you to zoom an interesting part of the fractal. To zoom in, choose an area with the cross hair mouse cursor (as with the toolbox Zoom tool) or use the Step in button. To zoom out, press Step out. You can also undo and redo zooms. |
|
|
|
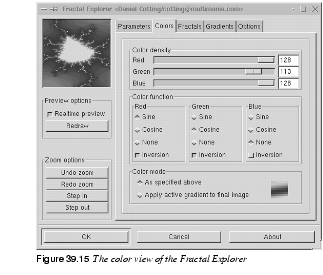
ParametersXMIN And XMAXXMIN controls how much the fractal will stretch to the left, and XMAX controls the stretch to the right. YMIN And YMAXYMIN controls how much the fractal will stretch upward (positive Y values in a coordinate system) and YMAX controls how much it will stretch downward (negative Y values). ITERITER stands for iterations, which control the level of detail in the fractal. Many iterations will calculate more detail, which will take more time. It's not always best to have a high level of detail. Often a fractal will get more interesting when created with lower values. We have found that in the range between 16 and 70 you will find some very nice fractal patterns. CX And CYCX and CY have no impact on Mandelbrot and Sierpinski fractals. CX values between -5 and 0 control the horizontal distance of the two fractal parts. Low values (-5) take them apart totally, and high values (0) merge them totally. Values between 0 and +5 will do the same, but in a vertical direction. CY has a similar control mechanism, but not in a horizontal/vertical direction. CY works in a 45/225 and 135/315 degree direction. Load, Reset And SaveThese buttons let you load a specific setting from your personal fractal directory, or save a nice setting that you have made. Reset will reset the values to the default values. Fractal TypeHere, you can choose between well-known fractal types like Mandelbrot, Julia or Sierpinsky, but you'll also find more exotic fractal types like Man o' war and Spider. ColorsA fractal consists of three parts. An outer part, an inner part and the "fractal" border between them. Color FunctionThe Sine function controls the color of the inner and outer parts, while the Cosine function controls the fractal part. None means that you'll use linear instead of trigonometrical mapping for a certain color channel. By checking and unchecking the three color functions you can choose suitable colors for the different parts of your fractal. The Inversion button will invert low color values to high color values and vice versa. For example, checking Inversion in the green channel will make areas that were previously low on green full of strong green color. To fully understand it, take a quick look at the Channels tab in the Layers & Channels dialog ( |
|
|
|
Color DensityYou can also set the intensity of the color channels with the slides in Color density. This makes it possible to set any color you want to your fractal. Color ModeEither you use the color mode you have specified with the other Color options, which is what you see in the preview window, or you can use a gradient from the gradient folder. This option will map the gradient over your fractal. You can achieve quite fantastic-looking fractals this way. FractalsHere, you'll find some nice predefined fractals that you can use straight off, or use as a backbone or point of departure for your own experiments. GradientsHere, you specify the gradient to use in the Colors tab. A tip is to bring up the gradient editor so you can take a look at the gradients. | |
Genetic
|
|

|
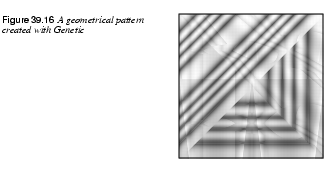
The Genetic filter generates random textures, much like the KPT Texture Explorer. The generated outcome of these filters is usually a geometrical pattern. If you want more variation in the random patterns, try the Qbist plug-in; see Qbist. |
|
|
|
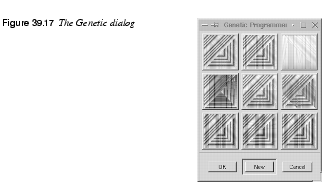
The original texture is displayed in the middle square, and different variations surround it. If you like one of the alternative textures, click on it. The chosen texture now turns up in the middle, and variations on that specific theme are displayed around it. When you have found the texture you want, click on it and then click OK. The texture will now appear on your drawable. |
|
|
|
Gfig
|
|
|
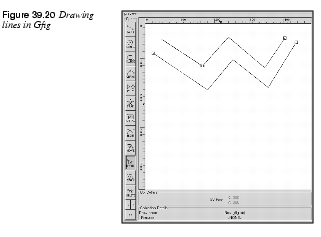
This awesome plug-in adds basic drawing capabilities to Gimp. You can draw circles, lines, curves, ellipses, X-sided polygons (X >=3), stars, spirals and Bezier curves. The drawing can then be rendered into your image. The drawing objects have control points that can be moved/edited to adjust the shape of the object. There is also a Selection option in this plug-in, which transforms a Gfig drawing to a selection in your Gimp image, and a Select+Fill option, which enables you to fill a selection directly from Gfig. User InterfaceThe user interface is divided into a Preview area with a drawing area and user tools, a Settings area with object manipulation options, Grid settings to control grids and a few tabs to control paint options. Preview AreaIn Ops you'll find all the drawing tools. You can draw, delete, move, edit and copy objects. LinesTo draw a straight line, simply click on the spot where you want your line to begin, and drag and release the mouse button where you want it to end. If you want a crooked line (built of several control points) hold Shift; this will make the control points attach to each other. For example, hold Shift, click on the first point, move, click on a second point, move, click on a third point, release Shift, move, and click to get the final point. |
|
|
|
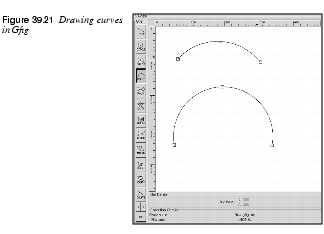
CircleDraws a circle. The start click becomes the center of the new circle. EllipseDraws an ellipse. The start click becomes the center of the new ellipse. CurveDraws an arch or a semicircle. The object has three points (two end points and a middle point). To clear things up, follow this example: Start by drawing a curve where the curve points are placed in a horizontal row. This will result in a straight line; you can compare this to a tiny segment of a huge circle. Now, if you raise the middle point a bit, the curve will become a low arch. It now represents a larger part of the imaginary circle. Finally, reduce the distance between the two end points and you will find that the curve gets even more circular. |
|
|
|
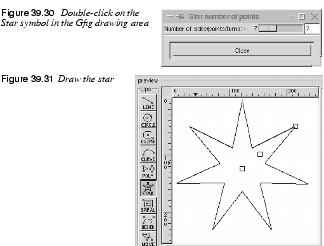
Poly(gon)The default polygon is a triangle, but you can change this by double-clicking on the icon. This brings up a dialog where you can choose how many sides you want for your polygon. StarThe default star has three spikes, but as with Poly, you can double-click to adjust the number of spikes. There are three controls points for further modification with MvPnt. The central control point allows you to change the relative position of the star by rotating it around the outer control point. The outer control point controls the external radius of the star, and the middle control point controls the size of the core radius, which determine the relative length and sharpness of the spikes. SpiralThis draws a spiral. You can set the number of twists by double-clicking on the spiral icon. This brings up a dialog where you can also set the direction to clockwise or counterclockwise. BezierThis lets you draw bezier curves. They're not as easy to modify as the Bezier curves in the toolbox because there are no handles to pull, but it works quite nicely for simple drawings. You'll have to practice a bit to learn how to control them. As usual, you end the curve with a Shift+click. MoveThis moves a single object or all objects in a drawing. To move a single object, just click at a control point and drag. To move all objects, hold Shift, click somewhere in the drawing area and drag. This will cause all objects in the drawing area to move. MvPNTMvPNT lets you move a single control point. This function lets you alter the shape of an object by stretching and moving the lines that it's made of. As you may have noticed, you can't change the shape of a circle -- you can only make it smaller or move it. A way around this problem is to use polygons. If you use a polygon with a lot of sides, you will get something very close to a circle. If you simply choose the MvPNT tool, you'll only change it the usual way, but if you hold Shift and then click at a control point with the MvPNT tool active, you'll break up the polygon into a lot of lines. Now, you can drag at the "circle" control points any way you like. CopyThis will copy an object. To use it, click and hold an object's control point, then drag the copy to where you want it. DeleteThis deletes an object (the entire object, not just a control point). Miscellaneous<, > and == let you browse your drawing as if every line of your drawing was a frame in a movie; < means backward, > means forward and == shows all lines in the drawing. SettingsObjectsOne of the nicest things about Gfig is that you can save a whole bunch of drawings on disk. This makes it possible to create standard figures for your special needs. |
|

|
|
|
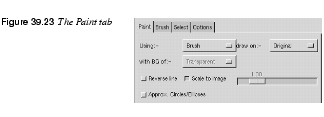
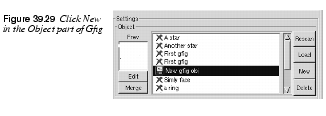
To create a new drawing, just click New and name it in the naming dialog, and an empty drawing area will appear. The new drawing name is highlighted in blue, and there is a little floppy symbol at the left side of the name, indicating that the drawing hasn't been saved yet. If you want to rename your drawing, just double-click its name. If you right-click at a name, you'll get a menu where you can Save, Save as, Copy and Edit the drawing. To edit a drawing, choose the name and either right-click and select edit or press the Edit button. If you got some Gfig drawings from the Internet or from a friend, you can copy them to the gfig directory ( The possibility to merge Gfig drawings is a very nice option. To do so, select a drawing and press Edit, then highlight the drawing that you want it to be merged with, and press Merge. The selected drawing will now merge with the highlighted drawing. Only the Edit drawing will be altered -- the highlighted drawing will not be changed. Command BarThere's also a command bar at the bottom of Gfig. Done is for when you want to exit Gfig after you're finished with it. Paint executes your command, that is, it paints your Gfig drawing into a Gimp image according to your settings. Save saves a Gfig drawing. Clear will erase everything in the drawing area. Undo will undo your last operation. Cancel lets you exit Gfig, and drop all that you have done. GridGrid controls the support grids in the Gfig drawing. If you have selected Grid Type: Rectangle in the Options tab, you can set the grid size in X*X pixels with the Grid spacing slide. You can also choose to Display the grid, and to make your objects Snap to the grid. Snap to grid is an excellent tool if you work with precision drawings. If you move objects with Snap, the anchor point you drag at will snap to the grid. If you move all your objects with Snap enabled, an invisible middle point will be calculated and that point will snap to the grid system. The TabsPaintThe Using menu controls where paint is, or can be, applied. Use Brush to paint the outline of the drawing, Selection if you want to transform the drawing to a selection or Selection+Fill if you want to make a selection and then fill it with a color or pattern (see Select). |
|
|
|
|
Draw on determines where the drawing is placed. Original puts the drawing on the original image, new creates a new layer for the drawing and Multiple creates a new layer for each object in your drawing. If you select New or Multiple, you can also set what type of background you want for the new layer. There are four options: Transparent, Background (fills with the current background color in the toolbox), White and Copy (copies the original image to the new layer). If you choose Multiple, the previous layer will be copied to the new layer. | |
 |
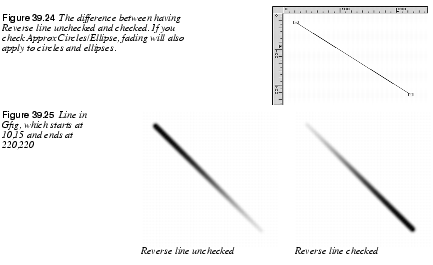
Example:· Input image · Background: Julius · Layer 0: The first draw object · Layer 1: The second draw object · Layer 2: The third draw object. · Input image · Background: Julius · Layer 0: Julius plus object 1 · Layer 1: Julius plus objects 1 and 2 · Layer 2: Julius plus objects 1, 2 and 3. This obviously fits like a glove when you want to make GIF animations (see "Animation Filters" starting on page 369). With the Reverse line option, you can control the direction of brush strokes. Normally, the rendering of your stroke goes from the first control point to the last one. If you set brush fade out to 20 in the Brush tab, the stroke will fade out after 20 pixels (counted from the first control point). If you check Reverse line it will fade out from the last control point instead of the first. This option works with lines, curves and polygons. When it come to polygons, fading goes clockwise from the first control point if Reverse line is unchecked. |
|
|
|
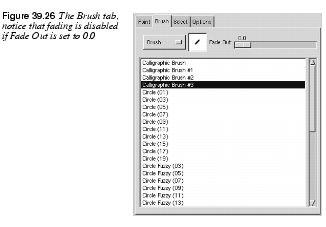
If you check Approx. Circles/Ellipse, fading also applies to circles and ellipses. The fading goes clockwise from the first control point. For example, if your first control point is at 5 o'clock, then the non-faded part will start at 5 o'clock and continue to fade so that your line fades out at 10 o'clock. Using Scale to image, the drawings can be set to fit the image, or just get bigger or smaller. Just uncheck and drag the slider to scale up/down. This is a nice option that makes it easy to magnify your drawings and work with small details. When you're done, check Scale to image to zoom out. BrushIn this tab you choose a suitable paint brush. A tip is to bring up the Select brush dialog so you can set the spacing and opacity of the brush; otherwise, Gfig will use the default values of the brush you select. To select a brush, highlight it, and it will be displayed in the preview. You can choose from four different types of brushes. Brush is an ordinary brush, with a Fade Out control that controls where the stroke will start to fade out (If Fade Out is set to 0.0, there will be no fading). Airbrush is like a spray can with pressure control, Pencil is like a brush with hard edges, and Pattern allows you to paint with a pattern (much like the Clone tool does). |
|
|
|
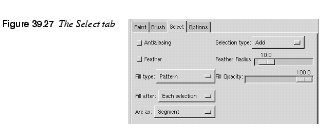
SelectThis folder is only enabled when painting with Select or Select+Fill. In order to understand the different Selection types, you have to have a fairly good grasp of basic selection (see "Selection Tools" starting on page 109). |
|
|
|
 |
An ExampleSuppose that you have made two (overlapping) star objects, and you have selected Paint with Select in the Paint folder. If you now choose Add as Selection type, you'll get a selection that is a combination of the two objects (a merged double star). If you choose Sub, you'll get nothing (because there is no selection to subtract from), but if there had been a previous selection, the shape of the twin stars would be cut from this selection. If you choose Replace, the previous selection will be replaced with the star that you painted last in the drawing area. Intersect means that the intersection of the two star objects will become a selection. You can fill the selection with a pattern, foreground or background color (Fill Opacity controls the transparency of the fill). You must bring up the Pattern dialog to set a pattern; otherwise, the last or default pattern will be used. The Fill after button controls the fill order; e.g., if you choose All selections and Replace as the selection type, only the last drawing object will be filled. If you had chosen Each selection, then all objects would get filled. Feather controls the gradual transparency or edge softness of the selection. Arc as determines how curved objects will be treated. If you set this parameter to Sector, curves will be treated as circle sectors (pie slices), and if you set it to Segment, they are filled as circle segments (half-moons). The last option is Antialiasing, which is generally good to enable. OptionsThis folder contains various options, like the possibility to make an image appear in the preview drawing area, or to reload it after applying a drawing. You can also hide the center points in drawing objects, get tool tips, set a different level of undo, or change the color and shape of the grid system. You can also choose to show the X/Y position of the mouse in the Obj Details window. If you want to achieve a high level of precision, this option is very useful. |

|
|
 |
ExampleIn order to understand this nice plug-in, we will give you a simple example: How to make a star with sparkles around it and a gradient fill. 1. Bring up a new (black) image, invoke Gfig and choose New Object. |
|
|
|
2. Choose the star object, set it to seven spikes and draw it. |
|
|
|
|
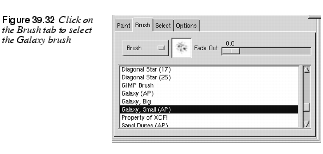
3. Choose Paint with Brush and a Brush/Small Galaxy brush. |
|
|
|
|
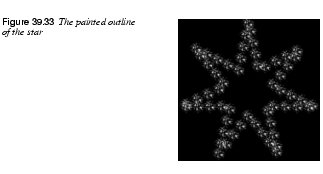
4. Press Paint to paint the sparkling outline of your star. |
|
|
|
|
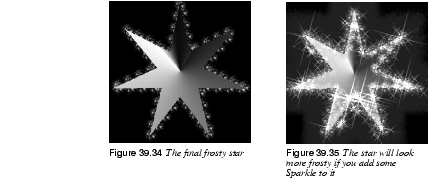
5. Now switch to Paint with Selection. 6. Press Paint, which will produce a star-shaped selection. 7. Now, bring up the Gradient Editor and choose Cold_Steel as a gradient. 8. Double-click on the Blend tool (in the toolbox) and set Blend to Custom and Gradient to Conical (asymmetric) in the dialog. 9. Set the Blend tool in the center of the star and blend. You will now have a frosty star. 10. We have added a little extra glamour to the star by applying the |
|
|
|
Grid
|
|
|
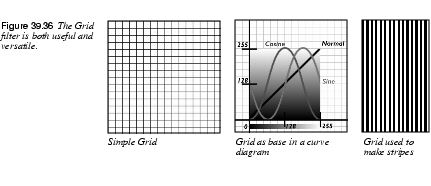
With the Grid filter you can easily create a grid system. The Size parameter controls the size and proportions of the grid squares, measured in pixels. Offset controls where (in pixels) the first unbroken square will be drawn. |
|
|
|
HFG
|
|

|
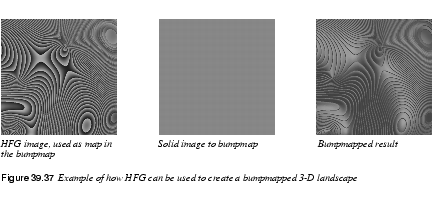
HFG creates height fields just like in a map, except that a map is real and HFG generates its height fields randomly. HFG can produce very interesting results if it's used together with the BumpMap filter. If you use an HFG, generated image as a map with the |

|
A warning is needed here. If the Color button is not checked, the rendered image may turn out black. The HFG Interface· The Points value sets the number of major hills. · Area of Effect controls the "rockiness" of the landscape. Values can be set to between 0.01 and 0.99. Low values will produce a very rocky landscape. Useful values tend to lie around 0.5. · Mass Displacement controls how many small hills, or peaks, will be rendered. It's a relative value and should be between 1 and the specified number of Points. A low value tends to give you a large number of small hills. · Seed controls the randomization value. It can either be a fixed value or it can be set to the current time by checking the time button. |
|
|
Harmonic Colors
|
|

|
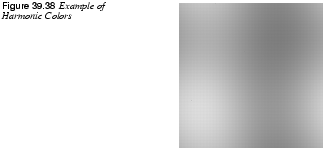
The Harmonic Colors filter creates softly blurred diamond-shaped color clouds. A sine function controls the color distribution. Changing the phase values in a certain color channel means that the amount of that color and its complimentary (inverted) color will be adjusted. As you might expect, Y phase values affect the horizontal scale and X the vertical scale. Low or high values produce weaker colors and middle values produce the strongest colors. You can set negative values or values exceeding 1.00, but that is not recommendable. To avoid strange banding, stick to the value range from 0 to 0.99. |
|
|
IFS Compose
|
|
|
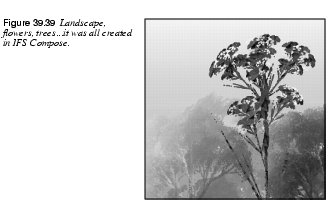
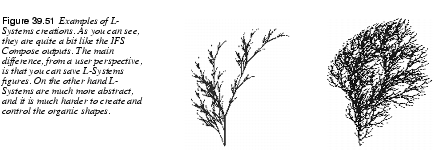
This fractal-based plug-in is truly wonderful! With this versatile instrument, you can create amazingly naturalistic organic shapes, like leaves, flowers, branches, or even whole trees. |
|
|
|
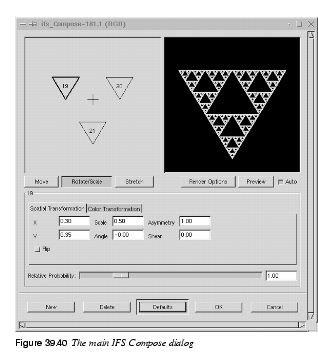
How To Use IFS ComposeThe key to using this plug-in lies in making very small and precise movements in fractal space. The outcome is always hard to predict, and you have to be extremely gentle when you change the pattern. If you make a fractal triangle too big, or if you move it too far (even ever so slightly), the preview screen will black out, or more commonly, you'll get stuck with a big shapeless particle cloud. A word of advice: When you have found a pattern you want to work with, make only small changes, and stick to variations of that pattern. It's all too easy to lose a good thing. Contrary to what you might believe, it's really much easier to create a leaf or a tree with IFS Compose than to make a defined geometrical pattern (where you actually know what you're doing, and end up with the pattern you had in mind). The Main InterfaceThe plug-in interface consists of the compose area to the left, a preview screen to the right, and some tabs and option buttons at the bottom of the dialog. The Default setting (in the preview window) is three equilateral triangles. To create a new pattern, you Move, Rotate/Scale and Stretch these triangles. You either use the three buttons under the compose area, or press the right mouse button to access a popup menu. |
|
|
|
 |
ExampleThis is a rather complex plug-in, so to help you understand it, we'll guide you through an example where you'll create a leaf or branch. |
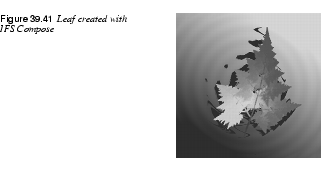
|
|
|
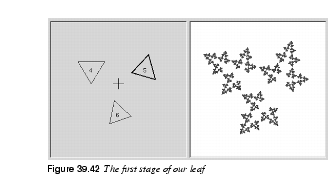
Many forms of life, and especially plants, are built like mathematical fractals, i.e., a shape that reproduces or repeats itself indefinitely into the smallest detail. You can easily reproduce the shape of a leaf or a branch by using four (or more) fractals. Three fractals make up the tip and sides of the leaf, and the fourth represents the stem. 1. Before invoking the filter: Select 2. Open IFS Compose. Start by rotating the right and bottom triangles, so that they point upward. You'll now be able to see the outline of what's going to be the tip and sides of the leaf. |
|
|
|
|
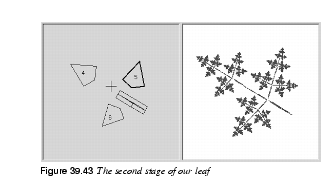
3. To make the leaf symmetrical, adjust the bottom triangle to point slightly to the left, and the right triangle to point slightly to the right. 4. Press New to add a fractal to the composition. This is going to be the stem of the leaf, so we need to make it long and thin. Press Stretch, and drag to stretch the new triangle. Don't be alarmed if this messes up the image, just use Scale to adjust the size of the overlong triangle. You'll probably also have to move and rotate the new fractal to make it look convincing. |
|
|
|
|
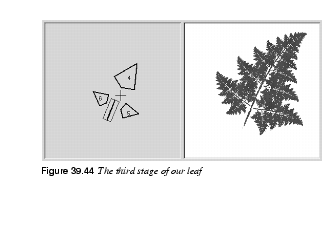
5. You still have to make it look more leaf-like. Increase the size of the top triangle, until you think it's thick and leafy enough. Adjust all fractals until you're happy with the shape. Right-click to get the popup menu, and choose Select all. Now all fractals are selected, and you can scale and rotate the entire leaf. |
|
|
|
|
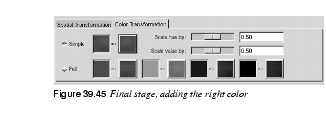
6. The final step is to adjust color. Click on the Color Transformation tab, and choose a different color for each fractal. To do this, check Simple and press the right color square. A color circle appears, where you can click or select to choose a color. |
|
|
|
|
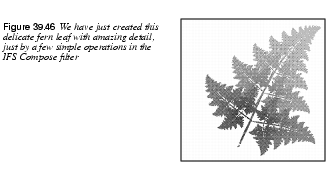
7. Press OK to apply the image, and voilà, you've just made a perfect fractal leaf! Now, when you've got the hang of it, you'll just have to experiment and make your own designs. All plant-imitating fractals (be they oak trees, ferns or straws) are more or less made in this fashion, which is leaves around a stem (or several stems). You just have to twist another way, stretch and turn a little or add a few more fractals to get a totally different plant. |
|
|
|
Main Options· Relative Probability: Determines influence or total impact of a certain fractal. · Spatial Transformation: Gives you information on the active fractal, and allows you to type a value instead of changing it manually. Changing parameters with the mouse isn't very accurate, so this is a useful option when you need to be exact. · Simple color transformation: Changes the current fractal color (which is the foreground color in the toolbox) to a color of your choice. · Scale Hue/Value: When you have many fractals with different colors, the colors bleed into each other. So even if you set "pure red" for a fractal, it might actually be quite blue in some places, while another "red" fractal might have a lot of yellow in it. Scale Hue/Value changes the color strength of the active fractal, or how influential that fractal's color should be. · Full color transformation: Changes color influence from the other (inactive) fractals. You can, for example, in the red fractal, set Full color transformation to red in all of the swatches, and you won't get any influence at all in that part of the fractal composition. Render Options· Spot Radius: Determines the density of the "brushstrokes" in the rendered image. A low spot radius is good for thin particle clouds or spray, while a high spot radius produces thick, solid color strokes much like watercolor painting (see Figure 39.47 at the bottom right). Be careful not to use too much spot radius -- it takes a lot of time to render. · Subdivide: Controls the level of detail. · Iterations: Determines how many times the fractal will repeat itself. (A high value for Subdivide and Iterations is for obvious reasons a waste of process time unless your image is very large.) · Max. Memory: Enables you to speed up rendering time. This is especially useful when working with a large spot radius; just remember to use even multiples of the default value: 4,096, 8,192, 16,384... | |
Jigsaw
|
|

|
The Jigsaw filter will create a jigsaw puzzle of your image. Jigsaw puzzles and puzzle pieces can be nice gadgets for web pages. Example |

|
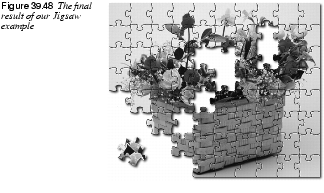
In the following example we will make a half-finished jigsaw puzzle. 1. Start by opening an image that will make a nice puzzle. Open the Layers & Channel dialog ( 2. Bucket Fill the original image layer (Background) with an appropriate background color (we used a plain white background). 3. Make the Puzzle layer active. Apply the Jigsaw filter and press OK (we will explain the parameters later on). 4. Create a new layer with a white fill type (the width and height must be the same as in the background layer). Name this layer White Puzzle and make sure that it is the top layer. Select this layer and run the Jigsaw filter once again with the same values ( 5. Apply 6. In the White Puzzle layer, select the pieces that should be missing from the puzzle with the Fuzzy Selection tool. Select the first piece, then hold down Ctrl and select the next piece, and so on, until you have selected all pieces. 7. Select the Puzzle layer and toggle off the eye icon from the White Puzzle layer. 8. Move the selection (still with the Fuzzy selection tool enabled) and you will get a floating selection. Double-click on the Floating Selection bar in the Layers & Channels dialog, and name the layer Missing Pieces. 9. Select the Puzzle layer and run 10. Select the Missing Pieces layer. Select a puzzle piece with the Bezier tool. Carefully adjust the Bezier curve so that you'll only select one piece. When you have turned the Bezier curve into a selection, run 11. Double-click on the Floating selection bar in the Layers & Channels dialog, and name the layer Single Piece. Now, you can move your piece to an appropriate place and maybe rotate it a bit. Run the Drop Shadow script on this piece, and use the same values as before. 12. Toggle on the eye icon for all layers except the White Puzzle layer and the Missing Pieces layer, and you will have a nice jigsaw puzzle image. |
|
|
Parameter SettingsThe Jigsaw filter has a few parameters. · The Number of Tiles sliders control the number of tiles rendered vertically and horizontally. · The Bevel width slider controls the slope of the edges of the puzzle pieces (a hard wooden puzzle would require a low Bevel width value, and a soft cardboard puzzle would require a higher value). · The Highlight slider controls the strength of the highlight that will appear on the edges of each piece. You may compare it to the "glossiness" of the material the puzzle is made of. Highlight width is relative to the Bevel width. As a rule of thumb, the more pieces you add to the puzzle, the lower Bevel and Highlight values you should use, and vice versa. The default values are suitable for a 500x500 pixel image. · The Jigsaw Style radio buttons control the shape of the puzzle pieces. We used Curved pieces for the example image. | |
L-Systems
|
|

|
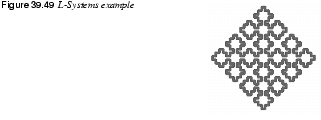
Lindenmayer Systems, called L-Systems, is a mathematical formalism designed primarily for concise description of natural shapes of plants. You can find out more about the history of L-Systems in the publications mentioned at the end of this description. |
|
|
|
The whole concept of L-Systems consists of two main parts: · Preparing the L-Systems description. · Applying this formula to render a graphic representation. During the preparation stage, the program iteratively applies a set of rewriting rules onto a string. The process starts with an initial string (called axiom) and for every iteration this string grows longer. The preparation is finished when the given number of iterations have been completed. | |
 |
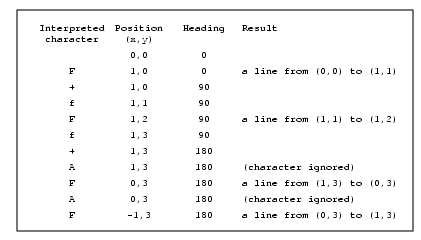
A Simple ExampleTo clarify this description, let's take a look at a simple example: Axiom = A Rules = A -> BA and B -> A What does it mean? It means that we start with a string of length 1 that contains the letter A. For each iteration, we replace every A with a string BA and every B with string A. This is how it goes: Iteration 0 A Note that we can use many different letters in both the axiom and the rules. If a string should contain a letter for which no rule has been defined, it will be ignored and passed to the resulting string. For example: Axiom = A Rules = A -> BA B -> AC Iteration 0 A Iteration 1 BA Iteration 2 ACBA Iteration 3 BACACBA As you can see, by using a small and concise description we can obtain quite complex and long character strings. This is the first important lesson about L-Systems. You need only define the seed and rules that govern growth to generate large and complicated, yet interesting, data. Graphic RepresentationTo convert the string generated during the first phase of the process into its graphical representation, we must come to an agreement on some assumptions. You can compare the rendering process to an imaginary turtle that draws a line while wandering over our image. What the turtle does is to "eat" consecutive characters, and then it decides what to do next based on that information. Any character that has no meaning for the turtle is simply ignored. The following three characters have fixed meanings: · The F character means go forward one step, drawing a line. · The f character means jump forward one step. · The ( and ) characters will cause our turtle to save its state (position, heading, parameters of its drawing tool), decrease the step length by a given factor and to draw a subsystem until it encounters a matching closing brace. · Traditionally, the characters + and - mean turn left and turn right, but in this plug-in they are defined as so-called special rules. Users are encouraged to keep the original meaning of these two signs for the sake of readability. As an illustration for the render process, walk through the following example: String to be rendered: F+fFf+AFAF. Let's assume that the initial position of the turtle is (0,0), initial heading is 0 degrees (the turtle is "looking" to the right), step length is 1 and the turn angle associated with the + and - characters is equal to 90 degrees. |
|
|
|
It's when you combine the possibilities offered by a concise description of long strings, by rewriting the rules with a drawing turtle that lets the characters describe its way, that you get a really powerful tool. This idea is called L-Systems. Take a look at the final example before we move on to some implementation details. This is Koch's curve. Below, you have its definition as an L-System; first three iterations, and a picture drawn on the basis of the third string. Axiom = F Rules = F -> F-F++F-F Iteration 0 F Iteration 1 F-F++F-F Iteration 2 F-F++F-F-F-F++F-F++F-F++F-F-F-F++F-F ... As you can tell from the picture, the angle added to the current turtle heading by + and - characters equals 60 degrees. |
|

|
|
Using The L-Systems Plug-inWhat can you do with the L-Systems Plug-in? · You can create a new L-System and give it a unique name and a unique file name in which the definition will be stored. You can also use an existing L-System as a base of a newly defined one, but be sure not to forget to change the file name or you will lose either the new or the old one! All this is done within the top-left part of the plug-in's GUI. There is a list with all defined L-Systems and a set of buttons to perform various operations on them. · You can define your L-System by entering an axiom, a set of rules and the number of iterations that should be performed before rendering. Use the first page of the notebook at the bottom of the GUI. Adding rules is as simple as pressing the Add button and filling in the pop-up dialog window. The same goes for editing and removing rules. · You can define a set of additional rules applied once only after the last iteration. You'll learn more about such rules later. To manipulate the set of last rules you should switch to the second page of the notebook widget. · Once you've defined the L-System, you have to move on to the third page of the notebook at the bottom of the GUI, and specify the correct information about at least two special symbols: + and -. This is because the special rules for these characters are always included in the set of special rules. The only thing you will probably have to do is to provide correct information about the turn angles. · Here I should explain something. What does these magic special rules entries mean? That's quite simple, the rule: · In the end you can change various rendering parameters like initial position and heading, step length, turn and step randomness and others. Advanced FeaturesUsing BracesAs I explained before, you can introduce matched braces in both the axiom and in all rules. They are significant during the rendering process because they cause the turtle to draw part of the L-System in a separate context. The most common use of braced L-Systems is to draw plant-like shapes. You use braces to denote that after the turtle draws a branch, it should return to the position where the branch started and continue drawing the main trunk. You can change brush shapes, colors, spacing and so on while drawing the branch, but all of these changes will have no effect on the visualization of the trunk and, possibly, the consecutive branches. As an example, look carefully at the definition of L-Systems with names that start with "Plant/". The Purpose Of Last RulesAn additional set of rules applied once, just before rendering, serves several purposes. First, it can be used to translate abstract objects (with no turtle meaning) used in main rules into something visible. You often do this when designing plants or flowers. In this case, every character in main rules and the axiom would have a specific meaning, like root, trunk, leaf and so on. Every such abstract symbol should be transformed into something visible with a given color, brush shape and length. Secondly, you can use last rules to modify the generated shape to make it look more interesting. This is quite common when the L-System looks like a kind of grid. It would be more interesting if you could see the way the turtle has drawn the shape but that's impossible because many lines are connected in a single point. To avoid that, one should define a set of three simple last rules, which will make turns less sharp: + -> +F+ - -> -F- F -> FF
Effective Use Of Special RulesLast rules are not only turns! You can use them quite extensively to make your L-Systems look more lively and realistic. · First comes brushes, which will provide you with various textures and line styles. · Second is color. The purpose of using color in the image you are painting is something you probably know better than me! · Third is opacity. It works great in plants, where, for example leaves can be made somewhat translucent to make the picture more interesting. Painting with a semi-opaque paint can also produce nice effects when drawing patterns with intersecting lines. The final color of various parts of the image will then depend on how many times the pixel has been painted -- and with what color! · Fourth and last is spacing, which probably has only one use: to make the program draw just a single print of a brush instead of an awful line painted with a brush that was not designed for it. Where To Look For More InformationIf you are interested in the concept of L-Systems look for the following books/articles. For more references, look in Prusinkiewicz's book. · P. Prusinkiewicz, J. Hanan Lindenmayer Systems, Fractals and Plants in series "Lecture Notes in Biomathematics," Springer Verlag, 1989. · A. R. Smith "Plants, Fractals and Formal Languages" in ACM Computer Graphics, vol. 18, no 3, July 1984. |
|
|
|
Maze
|
|
|
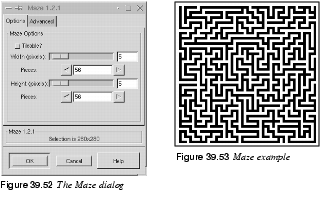
The Maze filter will generate a maze. If you want to use it in a pattern, you can make the maze tileable by checking the Tileable? checkbutton. The Width and Height sliders control how many pathways the maze should have. The lower the values for width and height, the more paths you will get. The same happens if you increase the number of pieces in the Width and Height Pieces fields. You can specify random Seed or use the current Time as randomizer. Using random seed means that the maze pattern will be different each time you invoke the filter. |
|
|
|
NCP
|
|

|
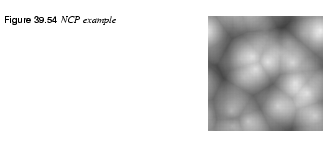
NCP generates random cloud formations. The rendered image is tileable, so you can use it as a seamless pattern. The amount of major clouds is controlled by the Point parameter. A high value will produce more major clouds. The number of minor clouds is controlled by the foo-point parameter. This is a value between 1 and the specified number of major clouds. You can control the randomization with the Seed value or check Time to use the current time as a randomization value. If you are interested in biology, you might like to run |
|
|
Plasma
|
|
|
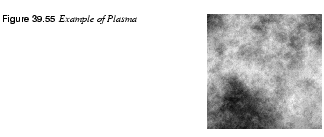
Plasma generates colorful clouds, which can be used for textures. However, the rendered plasma image is not tileable like the NCP filter. You control the turbulence in the plasma cloud with the Turbulence slide. High values give a hard feeling to the cloud (like an abstract oil painting or mineral grains), low values produce a softer cloud (like steam, mist or smoke). You can also generate Seed for random variations in the plasma cloud. Sometimes the strong colors may be distracting, and a more interesting surface will appear when you desaturate the image using |
|
|
|
Photo Mosaic
|
|

|
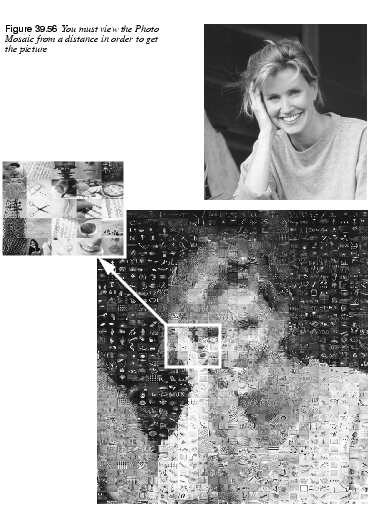
Photo Mosaic creates a mosaic of a target image, where the mosaic stones consists of a lot of small source images. This is not an unknown image manipulation technique. Last time I saw it was in the poster for the film The Truman Show with Jim Carrey. The poster cleverly built-up a portrait of Jim Carrey from of a lot of small pictures of TV-sets showing the actor in different situations. Image LibrariesTo make this filter produce a realistic photo mosaic, you'll need a huge image library. We are not talking about several hundred images. We mean several thousand images! Our image library comprises around 7,000 images. Luckily, the images don't have to be big. Photo Mosaic doesn't use the CD-ROM image library as it is. It creates a special Photo Mosaic library containing downscaled images of the real image library so the actual image library will be smaller. What you have to remember about the source images for the Photo Mosaic image library is that they must be of equal size. The exact size is not important, but they should all have the same height and width. When you invoke this filter, start by pressing the Help button. There you will find all the information that you need to create a Photo Mosaic image. The Photo Mosaic image in Figure 39.56 was created from 1,000 tiles, or source images. Notice that to view the portrait in the image, you must look at it from a distance. |
|
|
Image SizeWhen we created this image, it was essential to make it rather large: 1122x1234 pixels (the original was later downscaled to save print space). Using a small target image with lots of detail makes little sense, because you will never be able to see the source images; the tiles will be too small. The tiles used to render a small image will be downscaled to perhaps just one or two pixels in height and width. This will obviously make it impossible to see what kind of image it was originally. Images with too many small details will also not render well as Photo Mosaic images. | |
Random Path
|
|

|
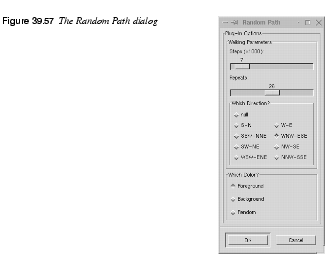
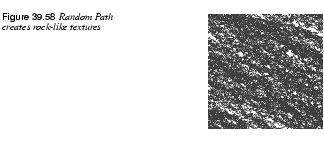
With the default settings, Random Path creates multi-colored splotches similar to mold or vegetation. If you change the preferences, the path shapes will turn into long fiber or vein-like formations. The density of the Random Path pattern is controlled by the Steps and Repeats slide bars, and the color can be set to foreground, background or randomly picked colors. |
|
|
|
This filter is especially effective for creating mineral surfaces like stone, raw metal or marble-like patterns. |
|
|
|
Qbist
|
|
|
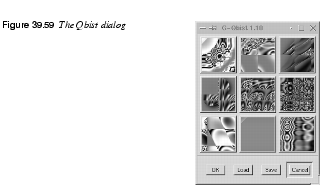
The Qbist filter generates random textures, much like KPT Texture Explorer. The original texture is displayed in the middle square, and different variations surround it. If you like one of the alternative textures, click on it. |
|
|
|
|
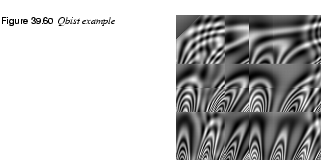
The chosen texture now turns up in the middle, and variations on that specific theme are displayed around it. When you have found the texture you want, click on it and then click OK. The texture will now appear on your drawable. You can save and load your textures. This is quite handy because it's almost impossible to re-create a good pattern by just clicking around. You may also want to check out Genetic, which creates more geometrical patterns, or see GAG, which is another pattern generator of the same type. |
|
|
|
Sinus
|
|
|
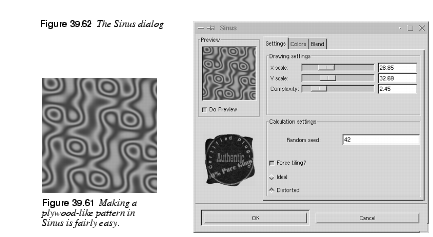
The Sinus filter lets you make sinusoidally based textures, which looks rather like watered silk or plywood. This plug-in works by using two different colors that you can define in the Colors tab. These two colors then create wave patterns based on a sine function. You can set the X and Y scales, which determine how stretched or packed the texture will be. You can also set the Complexity of the function; a high value creates more interference or repetition in the pattern. Random seed can be used to increase variation in the rendered patterns. |
|
|
|
FunctionsX/Y ScaleA low X/Y value will maximize the horizontal/vertical stretch of the texture, whereas a high value will compress it. Complexity And Random SeedComplexity controls how the two colors interact with each other (the amount of interplay or repetition). Random seed increases variation in the pattern. Force TilingIf you want to use the texture as a tiled background in a web page, this option creates better looking tiles (though not quite seamless). |
|
|
|
Tip: To get a perfect result, flip the tiles in the Make Seamless plug-in in the Filters/Map menu so that they mirror each other. Ideal/DistortedThis option gives additional control of the interaction between the two colors. Distorted creates a more distorted interference between the two colors than Ideal. The Color TabHere, you set the two colors that make up your texture. You can use Black and white or the foreground/background colors in the toolbox, or you can choose a color with the color icons. The Alpha channel controls the transparency of your texture; just remember that you need an alpha-enabled background or a layer. The Blend TabIn this folder you control the blend of the two colors. You can choose between three functions to set the blend: Linear, Bilinear and Sinusoidal. The Exponent controls which color is dominant. If you set the exponent to -7.5, the left color will dominate totally, and if you set it to +7.5 it will be the other way around. A zero value is neutral. |
Solid Noise
|
|
|
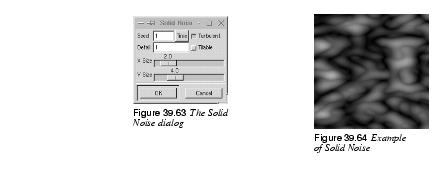
Solid Noise is a great texture maker. Note that this noise is always gray, even if you applied it to a very colorful image (it doesn't matter what the original image looks like -- this filter doesn't use background information). This is also the filter you use for creating displacement maps for the Warp plug-in (see Warp.) |
|
|
|
Parameter Settings· X and Y Size control size and proportion of the noise shapes in X and Y directions. · Seed generates a random variation in your texture. · Detail controls the amount of detail in the noise texture. Higher values give a higher level of detail, and the noise seems to be made of spray or small particles, which makes it feel hard. A low value makes it more soft and cloudy. · If you check Turbulent, you'll get very interesting effects, often something that looks much like oil on water (or living tissue). · If you check Tileable, you'll get a noise which can be used as tiles. For example, you can use it as a background in an HTML page, and the tile edges will be invisible (seamless). | |
| Frozenriver Digital Design http://www.frozenriver.nu Voice: +46 (0)31 474356 Fax: +46 (0)31 493833 support@frozenriver.com |
Publisher Coriolis http://www.coriolis.com |