Moving objects.
Only selected objects can be moved. You can use the keyboard or the mouse for moving objects.
Moving objects with the keyboard: Moving objects by using the Arrow keys helps
you position objects more precisely. Pressing an arrow key moves the object by one screen
pixel with each keystroke. For more precise positioning, use the zooming option. The more you zoom in on your drawing, the
greater the precision.
To move the object faster, use the arrows together with the Shift key.
Moving objects with the mouse: It may vary depending on the tool which is
currently on. When you see the pointer change into a black arrow:![]() over an object, it means that you may move the object.
over an object, it means that you may move the object.
![]()
![]()
![]()
![]()
![]()
![]()
With such tools as Select, Rotate, Rectangle, Ellipse, Text Box, Insert Vertex you can move an object by dragging either its body or the Alignment Box.
![]()
![]()
![]()
![]()
![]()
With such tools as Line, Sector, Arc, Spline, Connector you can move an object by dragging their alignment boxes.
When moving an object with the mouse you only see its outline. In case you'd like to see the whole object stop the mouse and wait for a second - the object will appear in full detail.
To constrain the movement of an object to strictly vertical or horizontal, hold down the Shift key while you drag the object, or use the Arrow keys.
Note: you can protect an object from being moved horizontally or vertically. This can be done from the Protect Dialog box. To access the dialog, click on Protection under the Format menu. In the dialog, check X Position for the horizontal movement and Y Position for the vertical. By checking both of them you lock the object against repositioning.
Sometimes you may want to position an object right in the centre of the page. To do this, first select the object and then perform the Centre Page command under the Tools menu. The commands Centre Vertically and Centre Horizontally let you position an object with respect to the verticall or horizontal axis of the page respectively.
The way objects behave when moved is also determined by whether the Snap tool is on or off. If snapping is on, the object you are moving jumps to the nearest snap locations (usually the grid nodes), instead of following the mouse directly. This functionality lets you easily align objects with the grid lines, guides and other elements. Please refer to the Snapping and glueing section for more extended description of this feature.
To align objects to one another the following tools are used: AlignFigures and DistributeFigures. Note, that these tools can be applied to 2D objects only.
This tool aligns the alignment boxes of two or more selected objects.
The object with the primary selection (the one that displays green handles) is the object
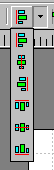
to which other objects align. There are 6 types of alignment: 3 types for the horizontal
(on the left sides ![]() , on the
centres
, on the
centres ![]() , on the right
sides
, on the right
sides ![]() ) and 3 for the vertical
(on the tops
) and 3 for the vertical
(on the tops ![]() , on the
centres
, on the
centres ![]() , on the bottoms
, on the bottoms ![]() ).
).
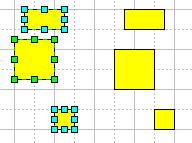
Here's an example of aligning objects on their left sides:
Use this tool to create an equal distance between the alignment boxes of three or more objects.
![]()
The objects are distributed with respect to the primary object (the one that displays green handles). There are 8 distribution options:
For horizontal distribution -
Distribute Horizontal Spacing ![]() (creates a uniform space between the alignment boxes),
(creates a uniform space between the alignment boxes),
Distribute Left ![]() (between the
left edges of the alignment boxes),
(between the
left edges of the alignment boxes),
Distribute Centre ![]() (between the centres of the objects),
(between the centres of the objects),
Distribute Right ![]() (between the
right edges of the alignment boxes);
(between the
right edges of the alignment boxes);
For vertical distribution -
Distribute Vertical Spacing ![]() (creates a uniform space between the alignment boxes),
(creates a uniform space between the alignment boxes),
Distribute Top ![]() (between the top
edges of the alignment boxes),
(between the top
edges of the alignment boxes),
Distribute Middle ![]() (between the
centres of the objects),
(between the
centres of the objects),
Distribute Bottom ![]() (between
the bottom edges of the alignment boxes).
(between
the bottom edges of the alignment boxes).
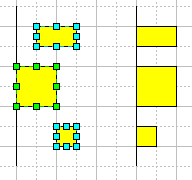
Here's an example of how the Distribute Vertical Spacing option works: