ConceptDraw supports working with object libraries. Library is a file that contains a collection of objects. These objects are usually grouped so that they represent a particular topic, for instance: flow chart, computer network, engineering, etc.
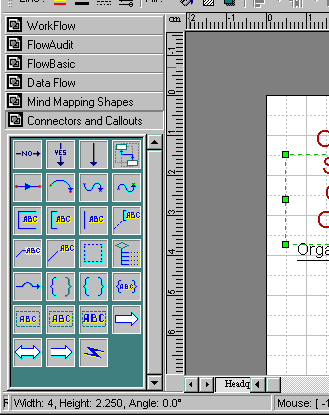
A special window, called the library window, is used to display open libraries. It usually appears on the left side of the program window.

The buttons with names on the top of the library window represent currently open libraries. The pressed button indicates the active library. Only one library at a time may be active. The context menu for each library button contains the following items:
New - creates a new library.
Open - opens an existing library.
Close - closes the active library.
Close All - closes all libraries.
----------------------------------------
Save - saves the active library.
Save As ... - saves the active library under a new name.
---------------------------------------
Properties - calls the Library Properties dialog.
---------------------------------------
View As Icon - displays only library object icons.
View As Text - displays only library object text.
Under the buttons list goes the contents of the active library. The objects can be displayed in the form of icons, or in the form of text. When you position the pointer over an object, its name appears in the status bar, if you pause the pointer over the object, it also displays a tip. The selected object shows a red border around its icon.
There are several ways of how the library window may appear:
*). Alongside the document window. By default, it's
positioned along the left side, but can be repositioned along
whatever side of the drawing page. Just grip the bar that
separates library title buttons from the list of objects, drag it
to the side you want to attach it to, and release the mouse
button.
When library window is positioned this way, you can alter its
width by moving its border adjoining the document window.
Position the pointer over the edge of the library window, so that
the pointer changes into a double-headed arrow, and drag the
border to adjust the window size.
The docking feature may be enabled/disabled in Option dialog,
Miscellaneous tab.
*). In floating state. This is the way in which windows
usually appear. To make library window float, grip the bar that
separates library title buttons from the list of objects, drag it
to the centre of the document window and release the mouse
button.
*). In minimized state. You can reduce floating library
window to its title bar, so that it takes minimum space and can
easily restore its previous size. To minimize the floating
library window, uncheck Libraries from the View menu, or press
F4. To bring the window back, check the menu item, or press F4
again.
All provided libraries are located in the Libraries folder of the program's root directory. The Library folder contains task-related subfolders. Library files themselves (*.cdl files for Windows) are located inside these folders.
As you create your own libraries, you may store their files anywhere you want, but we advise to create task-related subfolders inside the Library folder and place your library files there, to keep them in good order.
To open one or more libraries, click the Open Library tool ![]() or choose Open
Library from the File menu. The File Open dialog will come up.
All libraries supplied with ConceptDraw are located in
task-related folders.Select the folder (volume) you want in the
upper box and then one or more library files in the main box, and
click OK.
or choose Open
Library from the File menu. The File Open dialog will come up.
All libraries supplied with ConceptDraw are located in
task-related folders.Select the folder (volume) you want in the
upper box and then one or more library files in the main box, and
click OK.
The library window will open, including all chosen libraries.
![]() Both libraries and
document can be opened by dragging their file icons from Explorer
or My Computer windows, and dropping them onto the program
window. In this case you have to drag the file icon, position it
over the respective taskbar button, wait until the application
window opens, and then release the mouse button over the toolbar
or over the library window. As you release the button, the mouse
pointer must look like this:
Both libraries and
document can be opened by dragging their file icons from Explorer
or My Computer windows, and dropping them onto the program
window. In this case you have to drag the file icon, position it
over the respective taskbar button, wait until the application
window opens, and then release the mouse button over the toolbar
or over the library window. As you release the button, the mouse
pointer must look like this: ![]()
![]() Both libraries and
documents can be opened by dragging their file icons over the
application icon.
Both libraries and
documents can be opened by dragging their file icons over the
application icon.
Note: If you open a library that's already listed in the library window, by opening it again you'll make it active, not duplicate it.
You can create your custom object library, using the New Library command from the File menu. The empty library window will open. Now you can add objects there from documents or other libraries.
Note: Don't forget to save the library after you finished working with it.
To close a library, open its context menu and select Close Library menu item. If any changes were made after the library was last saved, the program suggests that you save changes before closing the library.
To close all open libraries, choose Close All from the context menu.
To save a library, open its context menu and choose Save from the menu.
If you need to save the library under another name, choose Save As. The Save dialog will come up, where you may specify the name for the library and choose where you want it to be stored.
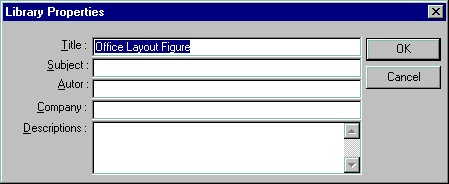
To set or modify properties of a library, call its context menu and choose Properties from the menu. This will bring up the Library Properties dialog box.

Title: the name of the library you see on its title
button.
Subject: a topic to which the library can be related.
Author: the author's name.
Company: the company name.
Description: a short description.
To save changes, click OK in the dialog and then save the library.
Displaying library objects as icon and as text.
There are two ways of viewing library objects: as icons or as text. To switch between the options, call the context menu for the library window and choose one of the following items: View As Icon or View As Text.
View As Icon.
A library object icon has the size of 29*29 pixel. When you
move an object into a library, the program creates its icon
automatically. However, you may substitute it with a custom icon.
Do the following:
*). Create a 29*29 pixel image in Windows Bitmap (.bmp) format,
which you want to assign as the icon. You can use any graphic
editor, MS Paint for one.
*). Call the context menu for the object, which icon you want to
change. From the menu, select Change Icon. In the File Open
dialog, find the file with the icon, select it and click OK.
View As Text.
In this mode, library objects look like small boxes with text inscriptions at their side. One of them can be selected.
Properties of library objects.
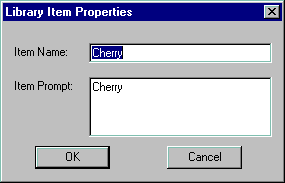
To assign and change a library object's properties, use the Library Item Properties dialog. To bring up the dialog, open the context menu of the library object you want and choose Item Properties from the menu.

Item Name - the text of the tip which appears when you pause
the pointer over the object.
Item Prompt - text which appears in the status bar when you
position the pointer over the object.
Inserting a library object into your document.
There are several methods for inserting a library object into your document:
By dragging and dropping.
Point to a library object, hold down the left mouse button
and drag the object from the library window to the document page.
Release the mouse button where you want a copy of the object to
be inserted.
By double-clicking the object.
If you double-click an object in the library window, its copy
will be inserted in the centre of the active document page.
By using Copy & Paste.
Open the context menu for the object, and select Copy from
the menu. The copy of the object will be placed on the Clipboard.
Then, in the document window, call the context menu again and
choose Paste from the menu. The contents of the Clipboard will be
inserted in the position of the pointer.
By using the Stamp tool.
In the Stamp mode, by clicking somewhere in the document you
insert there a copy of the selected library object. See the Stamp Tool section of this
Help for details.
Note: if the connector tool is on and there is a selected object in the document, the object you paste will be automatically connected to the selected object. The object you've just pasted becomes selected. So you can connect objects according to the order in which you insert them in the document.
Adding an object from the document to a library.
There are several ways of adding a new object to a library:
By dragging and dropping.
Point to a document object, hold down the mouse button and drag
the object from the document window to the library window.
Release the mouse button where you want a copy of the object to
be inserted.
Optionally you may use Shift+ for cutting object from document.
Using Copy & Paste.
Open the context menu for the object in the document, and
select Copy from the menu. The copy of the object will be placed
on the Clipboard. Then in the library window, call the context
menu for an object in the library, and perform Paste from the
menu. This will shift the object there, inserting the object on
the Clipboard in that place. The inserted object becomes
selected. To add an object to the end of the library, call the
context menu on an empty place in the library window and paste
the object there.
Inserting a selected object.
A selected object can be added to a library in an
alternative way. From the Edit menu, perform Put Into Library
command. This will place the selected object in the library,
shifting the selected object there. If there was no object
selected in the library, the object from the document will be
added to the end of the library.
As an object is inserted in the library, the program creates its library icon automatically. For how to change the library objet icon, see the Displaying library objects as icon and as text section.
Copying objects between and within libraries.
After you get acquainted with the libraries provided with ConceptDraw, you may want to create a compilation of the library objects you used most frequently. You can do this by using the copy/paste operations for the library objects.
Switch to the source library, select an object (it shows red border) and open its context menu. Select copy from the menu. Then switch to the target library (or create a new library), choose a place where you want the object to be inserted, call the context menu there and select Paste from the menu to insert the object.
Another method is dragging library objects with the mouse. To insert a copy of an object into some other library, drag it with the mouse, move over the target library title bar, wait until the library opens and release the mouse where you want the object to be inserted.
To reposition an object within a library simply drag it to the new location. If you hold down the Ctrl (Cmd) key while dragging, a copy of the object will be inserted.
Deleting an object from a library.
To delete an object from a library, open the context menu for the object and choose Remove from the menu. After you confirm deleting, the object will be deleted.
Another option is to use the Cut operation. This one first copies the object on the Clipboard, and then deletes it, so you may use the copy to insert it into some other place in the document, or in another library.
Replacing an object under the existing library icon.
When expanding your libraries, you may need to update a library object without changing its icon. To do so, use the Replace Library Object command under the Edit menu.
| Ctrl+Shift+i | Cmd+Shift+i |
Select the object in the library, then the updated object in the document and perform the command. You'll get a confirmation message when the operation is over.
![]()
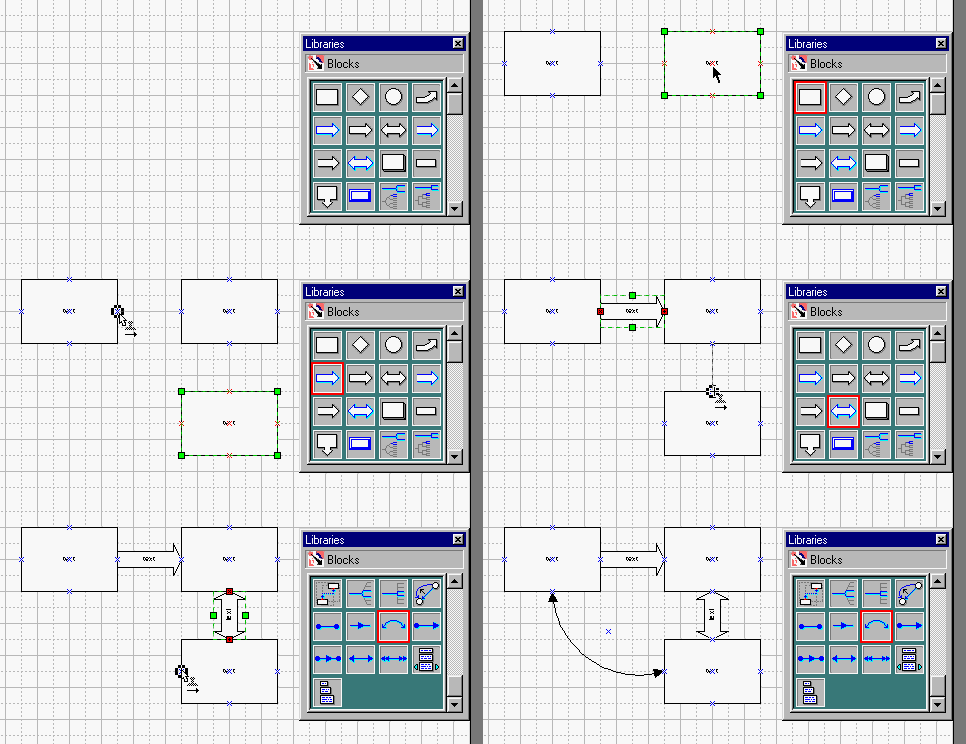
Stamp Tool lets use a library as a set of drawing tools.

If there's a library object selected, and the Stamp mode is on, clicking once in the document will insert there a copy of the object (stamp it).
You may resize the object immediately on creating it. Just drag the mouse to draw a rectangular area of the desired size, and release the mouse button. In fact, you copy the library object and resize it at the same time. For proportional resizing, hold down the Shift key.
Stamp Tool is the most convenient way to quickly link objects using library connectors. If there's a 1D object (connector) selected in the library, you can attach it to objects straight away, as you do with regular connectors. To invert direction of the connector, hold down the Shift key.
When in the Stamp mode, regular operations, such as selecting, repositioning, resizing are also available.
Note: If there's no object selected in the library, this tool will clone the selected object(s) in the document. If several objects are selected, their copies will be automatically grouped, allowing immediate resizing.