Thumbnails |
|
|
|
|
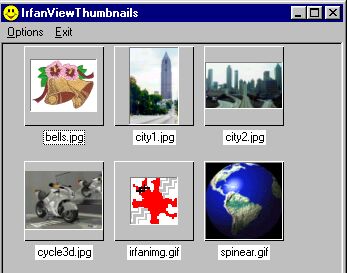
Open an image in the viewer from a directory of your choice. Click the File menu and select Thumbnails, or press the letter T on your keyboard. A dialog box (shown above) will open, and will fill with thumbnails representing the images in the directory. |
|
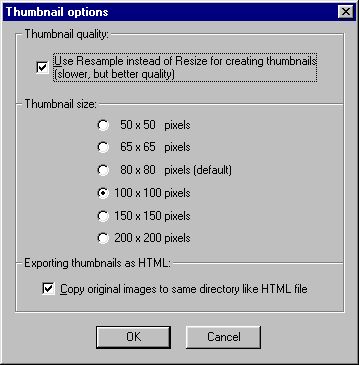
Double click any thumbnail to open that image in the viewer. If you change directories by opening another image file, the thumbnail dialog will change to display those images. The thumbnails can also be saved in a variety of ways. (See options, below.) For large images, you can minimize the thumbnail dialog. In the upper right corner of the dialog are three buttons; the third from right, looking much like an underline (_) character, is the minimize button. Click this to shrink the dialog to a small button at the lower left of the IrfanView window. Click the button to restore the dialog to its full size. You can also maximize the dialog to fill the entire screen. Click the middle button of the three in the upper right corner (the box shape.) Click the button again to restore the dialog to normal. To close the Thumbnails dialog, click the exit option on the dialog's menu bar. You can also click the X button in the upper right corner of the dialog. If the title bar of the dialog is blue, you can also press the ESC key on your keyboard. (If the bar is grey, and the bar of the main viewer window is blue, ESC will close the viewer, itself.) The options choice on the dialog's menu bar allows you to control the size and quality of the image thumbnails, and to save the thumbs. The first option is Select all. Click this to highlight all of the thumbs at the same time, for use with the other choices below. If you only want to select a few thumbs, hold down the CTRL key, and click each thumb you want selected. If you change your mind about one, click it again to de-select (still holding the CTRL key down.) The next choice is to Set thumbnail options. Click to open the dialog shown below. The first option is Use Resample instead of Resize for creating thumbnails. Click the check-box to have better quality thumbnails displayed. This option may take longer for the images to appear. Also in this dialog is the option to Copy original images to same directory like HTML file. Click this and each time you save the thumbs as an HTML file, the actual images will be copied into the same directory. This makes it very easy to build a quick page of images for the web (or a Tutorial :0) Thumbnail size: click one of the option buttons to set a size for the thumbnails. The default size is 80 pixels by 80 pixels. When done making your choices, click the OK button to exit the Options dialog. You can also exit by clicking the X button in the upper right corner of the dialog. If the titlebar of the dialog is blue (not grey,) another way to exit is to press the ESC key. Press the Cancel button to exit without making any changes. |
|
|
|
The next choice on the main Options menu is Save selected thumbs as an image. Click this to have a single image made from the thumbnails you chose. The Save As dialog opens, allowing you to give your new image a name, and select a file type (jpg, gif, etc.) This image can then be used just like any other. Next is Save selected thumbs as HTML file. Click this to create a page of thumbs suitable for use on the web, or in a web browser. A dialog opens to let you choose which directory (folder) on your drive will hold the new page. The page will be given the name: Thumbnails.html If you have chosen to copy the images along with the HTML (as explained above,) they will also be copied to the directory you have chosen. The next option is to Save selected thumbs as single images. Click to have each thumb made into a separate small image, and saved to a directory of your choice. A dialog opens to let you choose which directory. The images are given names like: imagename.jpg_t.jpg where "imagename" is the name of your image. Be careful with the doubled ".jpg" (or whatever type.) This could be a problem on the web - best to rename the files to get rid of one. (Leave the small "t" - that reminds you this is the thumbnail image.) The final option is Open with external viewer. This is much like the similar option on the file menu. Click it to have your chosen alternate viewer open, with image represented by the thumbnail displayed in it. To use this option, you must first set up an external viewer. |
|
|
| Copyright 1999 by S.E. Clark. All rights reserved. |