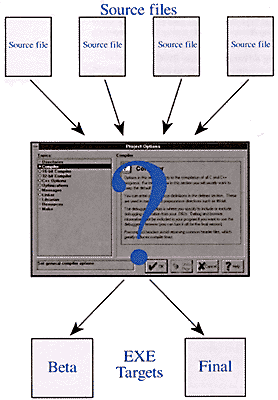
Figure A - Even for medium-sized projects, compiler options can become difficult to manage.

In the November 1994 issue of Borland C++ Developer's Journal, we showed how you can reuse a set of source files that are common to two applications by placing the source files in a source pool ("Dumping Code Into Source Pools" ). We then showed how you can use the source pool as a subnode of an executable target node and automatically use all the files from the source pool in the executable target.
In that article, we emphasized the benefits of a single source pool among multiple target nodes. However, if you create multiple source pools within a single project, you can take advantage of a source pool's ability to maintain compiler options for the source files it contains.
In large-scale projects, you'll typically build a series of successively debugged versions, or release candidates, of the product before actually releasing it. As the number of source files increases, managing the compiler options for the source files and the executables can become quite confusing, as illustrated in Figure A. In this article, we'll show how you can use source pools to manage compiler settings for the files in a large project and how you can use this ability as part of a development and debugging strategy.

Figure A - Even for medium-sized projects, compiler options can become difficult to manage.
If you're creating a simple application and working by yourself, managing the compiler options for a project is no big deal. For each source file you create, you can either use the Options dialog box in order to modify the compiler settings, or you can select an Options Style Sheet to specify the correct values.
For large projects, however, this isn't a realistic approach. If you customize the compiler settings for each file, you won't be able to easily determine how your settings differ among files. Are you optimizing all the files the same way? There's no easy way to tell. You can try to remedy this confusion by applying the compiler settings to the entire project. However, some files may require special settings, particularly during debugging.
If you begin using Borland C++ 4.0 for large projects, you may also find that you want to distinguish the files that you're developing from those that you've already debugged. While you're developing a given file, you'll probably want to let the compiler include debugging information in the object (OBJ) files, enable the ASSERT, TRACE, and WARN macros, and disable some or all optimization.
Once you've tested a given file and pronounced it finished, you'll probably want to turn off some or all of the debugging features and begin enabling some or all of the optimizations. (By the way, there are several valid approaches to developing and debugging code. We're not advocating a specific method here when we suggest that you turn off optimization during development; rather, we're trying to demonstrate one of your options.)
For large projects, it would be nice to be able to segregate the
files you're currently debugging from those that you've
finished working on. Source pools provide this ability and
allow you to set appropriate compiler options for each set.
To implement this strategy, you'll need to take several
steps. First, you'll create source pools for both the working
set of files and for already debugged source files. (We'll
call these input source pools, since they'll represent
input into an application.) For each of these source pools, you'll
want to assign a style sheet for the appropriate compiler options.
(To understand why you need to use a style sheet instead of setting
the options directly, see Style sheets versus source pools.)
Next, you'll want to create source pools for each test
version and for the final release version of your program. (We'll
call these output source pools, since they'll represent
the output of the project.) For each of these source pools, you'll
set the linker options to include or exclude debugging information
or to optimize the output executable as appropriate. (Since you
can't set linker options for a source pool directly, you'll
need to create an appropriate style sheet for each of the output
source pools and then specify the correct style sheet for each
source pool.)
Finally, you'll create an executable target that will use source files indirectly via the source pools. (In other words, you won't add source files directly to the targetsyou'll add them to the input source pools instead.) To accomplish this task, you'll reference-copy each of the source pools to become subnodes of the target.
Now, as you create source files for the project, you'll
add them to the working source pool. After you finish debugging
the file, you can move it from the working-file source pool to
the debugged-file source pool. To build a specific version of
the executable target (for example, Beta or Final), you'll
move the target within the project to make it a subnode of the
appropriate output source pool. Figure B
shows how this technique organizes the source files, source pools,
and targets.
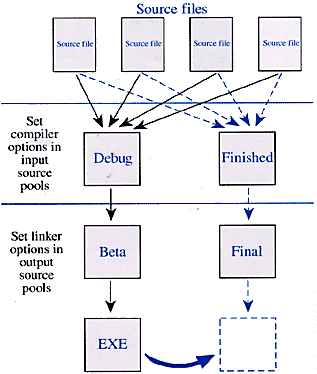
Figure B - Instead of applying compiler options directly to source files, you can use source pools to apply the options and segregate your files.
To see how you can use source pools to manage the source files and release candidates of your applications, let's create a template project that you can use as a model for new projects. Then, we'll step through the development process by using this technique.
First, launch the Borland C++ Integrated Development Environment (IDE). When the IDE's main window appears, choose New Project... from the Project menu.
In the New Project dialog box, enter \SP_TMPL\SP_TMPL.IDE in the Project Path and Name entry field and click OK. (It doesn't matter what target type you select, since we'll delete it anyway.) When the new project's window appears, right-click on the name sp_tmpl [.exe] and choose Delete Node from the pop-up menu. When the IDE prompts you to confirm this command, click Yes to delete the node.
Create an input source pool for debug files by choosing New Target... from the Project menu. In the Add Target dialog box, enter Debug in the Name entry field and select SourcePool from the Type combo box, as shown in Figure C . (If you're using version 4.0, you'll see slightly different labels for dialog boxes and options.) Click OK to create the new source pool.
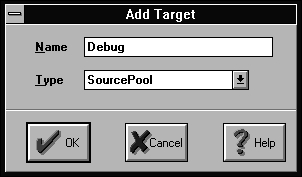
Figure C - You'll use the Add Target dialog box to add source pools to the template project.
To specify the appropriate debugging options for files that you'll place in this source pool, right-click on the name Debug [SourcePool] in the project window and choose Edit Node Attributes... from the pop-up menu.
When the Node Attributes For Debug dialog box appears, choose Debug Info And Diagnostics from the Style Sheet combo box, as shown in Figure D. Click OK to make this change.
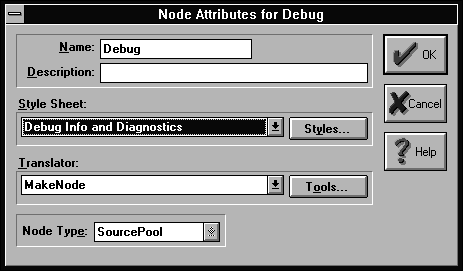
Figure D - You'll use the Node Attributes for Debug dialog box to specify a style sheet for a source pool.
When the Node Attributes For Debug dialog box disappears, choose New Target... again. In the Add Target dialog box, enter Finished, select SourcePool, and click OK. When the Finished [SourcePool] target appears in the project window, right-click on it and choose Edit Node Attributes... from the pop-up menu. Then, in the Node Attributes For Finished dialog box, choose Optimized (Speed) from the Style Sheet combo box. Click OK.
To create the output source pools, you'll use the same basic technique that you used to create the input source pools. To create an output source pool for beta versions of an application, choose New Target... from the Project menu. In the Add Target dialog box, enter Beta Output as the name of the source pool, choose SourcePool as the target type, and click OK.
Right-click on the new output source pool and choose Edit Node Attributes... from the pop-up menu. In the Node Attributes For Beta dialog box, click Styles... to display the Style Sheets dialog box. To create a new style sheet for the Beta Output source pool, click Create..., enter Beta Linker Options in the Create Style Sheet dialog box, and click OK to create the style sheet and return to the Style Sheets dialog box.
When the new style sheet appears in the Available Style Sheets list box, click Edit. In the Style Sheet: Beta Linker Options dialog box, double-click on Linker in the Topics list box, select the Map File subtopic from the same list, and then select the Detailed radio button in the Map File section. Click OK to save this style sheet.
To create a style sheet for the Final output source pool (which you're about to generate), click Create..., enter Final Linker Options in the Create Style Sheet dialog box, and click OK. When the Final Output style sheet appears in the Available Style Sheets list box, click Edit.
In the Style Sheet: Final Output dialog box, click on the Linker subtopic General, deselect the Include Debug Information check box in the General section, and click OK. Then, when the Style Sheets dialog box reappears, click Close. Finally, when the Node Attributes For Beta Output dialog box reappears, choose Beta Linker Options from the Styles combo box and click OK.
To create the output source pool for final versions of an application, choose New Target... from the Project menu. In the Add Target dialog box, enter Final Output as the name of the source pool, choose SourcePool as the target type, and click OK.
Right-click on the Final Output source pool and choose Edit Node Attributes from the pop-up menu. In the Node Attributes For Final Output dialog box, choose Final Linker Options from the Styles combo box. Click OK to save the new style-sheet setting.
Now you're ready to create an executable target for the project. To do so, choose New Target... from the Project menu. In the Add Target dialog box, enter test in the Name entry field, choose Standard from the Type combo box, and click OK.
When the Add Target dialog box disappears, you'll see the New Target dialog box. In this dialog box, select EasyWin [.exe] in the Target Type list box and click OK. Now, press [Alt], click on the Debug input source pool, hold the mouse button down, and move the mouse pointer over the test [.exe] target. Release the mouse button to reference-copy the Debug input source pool as a subnode of the executable target.
Repeat this process to reference-copy the Finished input source pool to the executable target. Finally, click on test [.exe], hold the mouse button down, and then move the mouse pointer over BetaOutput[SourcePool]. This process will make test [.exe] a subnode of BetaOutput[SourcePool]. When you finish, your project window should resemble the one that appears in Figure E.
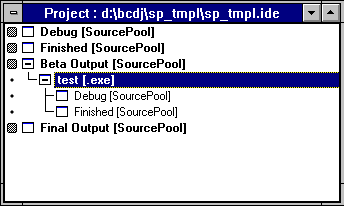
Figure E - In the project window, you can easily view the relationships between your source pools and executable targets.
At this point, you can close this project and use it as a template
for other projects. To do so, all you need to do is copy SP_TMPL.IDE
(the project file) to a new location, rename the project file,
open the file, and change the executable target as necessary.
To see how you can use this project to manage compiler and linker settings, let's create a simple application. For now, the executable target test [.exe] is sufficient, so we'll leave it alone.
Instead, we'll add a simple source file to the project and show how easy it is to build different versions of the executable. In order to add the source file, right-click on the original Debug input source pool and choose Add Node from the pop-up menu. In the Add To Project List dialog box, enter SOURCE.CPP in the File Name entry field and click OK.
When the name source [.cpp] appears in the project window,
double-click on the name. In the editing window that appears,
enter the following source code:
#include <iostream.h>
#include <checks.h>

int main( )
{
  TRACE("This is a debugging message!");
  cout << "This is only a test!" << endl;
  return 0;
}
When you're finished entering this code, choose Event Log from the View menu (which allows you to see debugging messages). When the Event Log window appears, right-click on the test [.exe] node that appears in the Beta Output source pool and choose Run from the View submenu.
After the compiler finishes building the application, the application
will run and display the message
This is only a test!
Double-click on the System menu icon for the output window to close it. When the IDE main window reappears, notice that the debugging message appears in the Event Log window, as you would expect.
Next, click on the source [.cpp] node in the Debug source pool and drag it to the Finished source pool. Right-click on the test [.exe] node again, and choose Build Node from the pop-up menu. When the compiler finishes building the application, run it again, close the output window, and confirm that the debugging message doesn't appear in the Event Log window.
If you're curious about the size of the beta version of this application, you can open up a DOS window and check the TEST.EXE file's size. (While you're checking the file size, you can also confirm that the Beta Output source pool forced the Linker to create a detailed map file for the executable target.)
To build the final release version of the project, click on the
test [.exe] reference node in the Beta Output source
pool and drag it to the Final Output source pool. Then, right-click
on test [.exe] and choose Build Node from the pop-up
menu. When the compiler finishes building the application, you
can open a DOS window to confirm that the final version of the
file is substantially smaller than the beta version (because it
doesn't contain debugging information anymore). To learn
more about how project files manage these compiler and linker
settings, see How projects pass options between nodes.
The compiler and linker option management technique we've
shown here is powerful. You can, however, go further in several
areas.
Once you become accustomed to using source pools, you may want
to create source pools that are subnodes of the input source pools.
You can use these nested source pools to specify sets of
compiler options.
When you specify linker settings in an output source pool's
style sheet, you may want to specify different output directories
for both the Beta Output source pool and the Final Output source
pool. Doing this will help keep different versions of the OBJ
files separate. In addition, you may want to set the precompiled
header file path to the appropriate BETA or FINAL directory. (See
Borland C++ 4.0 IDE - Using multiple precompiled header files in multi-target projects in the February 1995 issue, for more information
on segregating the precompiled header files this way.)
In its current form, you can reuse this project as a template for new development. However, with a few changes, you can make the project more flexible and even easier to reuse. For example, the existing technique doesn't lend itself to supporting multiple related applications within the same project.
To remedy this, you can add text file nodes that contain a brief
description of each application in the project, copying (not
reference-copying) the input source pools as subnodes of the text
files. You can then make the executable target a subnode of the
text file, too. This allows you to easily associate the appropriate
files with each application by collapsing or expanding the hierarchical
view of the text file nodes in the project window.
Obviously, if you're working as part of a development team,
you'll want to use a third-party product of some sort to
provide version control and tracking. The technique we've
shown here doesn't eliminate that need; you'll still
need a formal process for adding debugged source files to a common
repository. However, using source pools as we've shown
here, you can develop a consistent approach to setting compiler
and linker options for various stages of development and code
release.
Copyright (c) 1996 The Cobb Group, a division of Ziff-Davis Publishing Company. All rights reserved. Reproduction in whole or in part in any form or medium without express written permission of Ziff-Davis Publishing Company is prohibited. The Cobb Group and The Cobb Group logo are trademarks of Ziff-Davis Publishing Company.