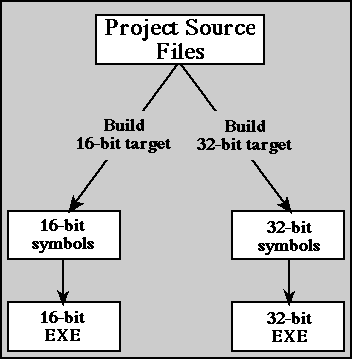
Figure A - You can specify a separate symbol file for each target in your project.

You'll save time if you enable the Precompiled Headers option for your Borland C++ 4.0 projects. This option allows the compiler to storein a special precompiled header file (called a symbol file)the symbols and definitions it generates when it processes header files. When the compiler needs the symbols or definitions from these header files again, it will reload the contents of the symbol file instead of reprocessing the headers.
To use precompiled headers efficiently across multiple source files, you should be aware of a few things. You must make sure that you arrange the #include directives for each header file in the same order and that you don't change any #define values or constants that will affect how the compiler scans the header files. If the compiler detects any differences in the symbol environment, the compiler will add all the symbols for each new source file to the symbol fileeven if the source files use the same set of header files.
This situation is most obvious if you're building multiple targets from the same set of source files. Each time you build a target that uses a different header file environment (such as the EXE target type), the compiler will have to completely rebuild the symbol file from scratch.
Instead of allowing the compiler to rebuild the symbol file each
time, you can tell the compiler to use a specific symbol file
for a particular set of header files or compiler options, as shown
in Figure A. In this article, we'll show how you can
use multiple symbol files in a multi-target project that has source
files with differing header file requirements.

Figure A - You can specify a separate symbol file for each target in your project.
By default, the Borland C++ Integrated Development Environment (IDE) creates for a project a symbol file that consists of the project's name followed by a CSM extension. For example, if you use pre-compiled headers with a project named MYPROJ.IDE, the symbol file's name will be MYPROJ.CSM.
However, if you want you can specify a different name for the symbol file that the compiler will use to store the precompiled headers. If you're compiling from the DOS command line, you can specify the name of the symbol file by adding the -H=name parameter (where name is the name of the symbol file).
If you're using the IDE to build your projects, you can use the Project Options dialog box to specify the name of the symbol file. From this dialog box, you'll enter the symbol file name in the Precompiled Header Name entry field. (If you don't enter a name in this field or if you delete the current name, the IDE will create and use a symbol file with the name BCWDEF.CSM.)
If you're working with multiple targets in a single project
file, you'll need to either specify custom symbol file
names or specify unique paths for symbol files that have the
same name. To try this out, let's look at a quick example.
To begin, launch the Borland C++ 4.0 IDE. When the IDE's
main window appears, choose Open Project... from the
Project menu. As soon as the Open Project File dialog box appears,
enter
\BC4\EXAMPLES\IDE\MULTITRG\MULTITRG.IDE
in the Project Path And Name entry field and click OK.
Now, right-click on the multitrg [.exe] name that appears near the top of the project window and choose Edit Local Options... from the pop-up menu. When the Options dialog box appears, double-click on the word Compiler in the Topics list and then select the Precompiled Headers subtopic.
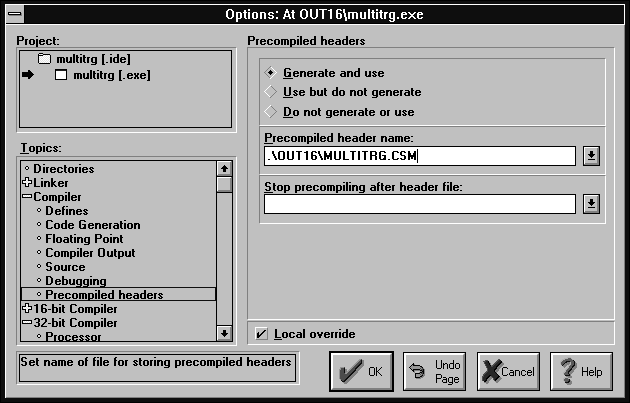
In the Precompiled Headers section in the right-hand side of the dialog box, select the Generate And Use check box. Then, enter .\OUT16\MULTITRG.CSM in the Pre-compiled Header Name entry field, as shown in Figure B. Click OK to save these changes.
Figure B - You'll set the precompiled header options from the Options dialog box for the EXE project nodes.

Right-click on the multitrg [.exe] name that appears near the bottom of the project window and choose Edit Local Options... from the pop-up menu. If necessary, double-click on the word Compiler in the Topics list again and then select the Precompiled Headers subtopic.
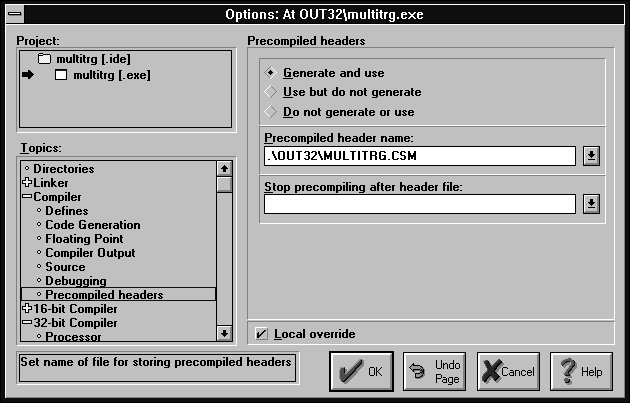
In the Precompiled Headers section, select the Generate And Use check box. Then, enter .\OUT32\MULTITRG.CSM in the Precompiled Header Name entry field, as shown in Figure C. Click OK to save these changes.
Figure C - To keep multiple targets from trying to use the same symbol file, you can specify a unique path and name for the precompiled header file.

Next, right-click on the upper EXE node and choose Make from the pop-up menu. When the compiler finishes building the 16-bit EXE file, click OK in the Compile Status dialog box.
Finally, right-click on the lower EXE node and choose Make from the pop-up menu. When the compiler finishes building the 32-bit EXE file, click OK in the Compile Status dialog box.
Activate the Windows Program Manager, then launch a DOS command
line by double-clicking on the MS-DOS Prompt icon in the Main
program group. When the DOS prompt appears, enter
dir \bc4\examples\ide\multitrg\*.csm /s
When the command executes, you'll see the following output:
Directory of C:\BC4\EXAMPLES\IDE\MULTITRG\OUT16
MULTITRG CSM    330325 2-4-95   8:33a
        1 file(s)     330325 bytes


Directory of C:\BC4\EXAMPLES\IDE\MULTITRG\OUT32


MULTITRG CSM   1557092 2-4-95   8:34a
        1 file(s)    1557092 bytes
As you can tell from examining the symbol file sizes, the 32-bit
version of the application adds much more information to the symbol
table than the 16-bit version.
Copyright (c) 1996 The Cobb Group, a division of Ziff-Davis Publishing Company. All rights reserved. Reproduction in whole or in part in any form or medium without express written permission of Ziff-Davis Publishing Company is prohibited. The Cobb Group and The Cobb Group logo are trademarks of Ziff-Davis Publishing Company.