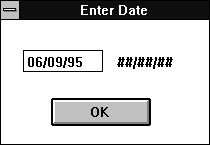
Figure A - As you enter characters in the entry field, the validator automatically inserts the literal characters into the picture string.

Whenever users are going to enter data into a dialog box edit control, you need to consider how your application will react if the users enter invalid data. For example, if you display a dialog box in which the user should enter a phone number, you may want to display an error message if the user enters a name or some other nonnumeric data.
Instead of reporting data entry errors after the user closes the
dialog box, you can check the validity of the data as the user
enters it by using a validator (a TValidator-derived
object). In this article, we'll show how you can take this
idea a step further by using the TPXPictureValidator
class to validate and automatically format data in edit
controls.
By using TPXPictureValidator objects to validate an edit control, you can provide complex interactive character validation. (To learn more about how validators work in general, see Validator review.) Before you can use it, you'll need to construct the TPXPictureValidator object with an initialization string known as a picture string.
Basically, the picture string identifies the types of characters you want the user to enter, along with the locations of those characters within the edit control. Table A summarizes the symbols you can use (in addition to literal characters) as part of a picture string.
Table A: Picture symbols
| Symbol | Description |
| # | The user must enter a digit. |
| ? | The user must enter a digit. |
| & | The user must enter a letter. The validator converts the input to uppercase. |
| @ | The user can enter any character. |
| ! | The user can enter any character. The validator converts letters to uppercase. |
| ;x | This symbol denotes as a literal the picture symbol following it. |
| *n | The user must enter the next character n number of times. If you don't include a specific number, the user can enter the next character any number of times. |
| [] | The user doesn't have to enter any characters that appear in brackets. |
| , | Commas separate alternative symbols. |
| {} | Braces group alternative symbols. |
For example, if you want to format the data in a phone number
edit control, you'd create the validator with
new TPXPictureValidator("(###) ###-####");
If, instead, you write
new TPXPictureValidator("[(###) ]###-####");
the area code prefix will be optional. However, if the user enters an area code, he or she will have to enclose it in parentheses.
After you create the validator, you'll need to assign it
to the TEdit object that corresponds to the appropriate
edit control by using the TEdit::SetValidator() member
function. Unless you need to query the validator after you've
created it (which would be an unusual case), you can in one statement
create the validator and assign it to the TEdit object
with
edit->SetValidator(new TPXPictureValidator("#"));
By the way, you don't need to worry about explicitly deleting the validator object. If a TEdit object has a validator assigned to it, it deletes the validator in the body of its destructor.
Finally, by enabling the autofill option, you can force a TPXPictureValidator object to automatically fill in literal characters (data that's constant in the entry field, such as the parentheses around the area code). When you do, the validator will enter the appropriate literal characters as you enter the data! To enable autofill for a TPXPictureValidator object, add the boolean value TRUE as a second parameter to the validator's constructor.
If you're using Borland C++ 4.0, the autofill option doesn't
work correctly with TPXPictureValidator objects. Next
month, we'll show how you can apply the corrections to
this 4.0 code that Borland incorporated into version 4.5.
To see how TPXPictureValidator objects interact with TEdit objects, let's build an ObjectWindows Library (OWL) 2.0 application that displays a dialog box for date entry and validates the entry before you can proceed. To begin, launch the Borland C++ 4.0 Integrated Development Environment (IDE).
When the IDE's main window appears, choose New Project... from the Project menu. In the New Project dialog box, enter \VAL_DATE\VAL_DATE.IDE in the Project Path And Name entry field, choose Application [.exe] from the Target Type list box, select Windows 3.x (16) from the Platform combo box, and then select the OWL check box in the Standard Libraries section. Click OK to create the new project.
When the Project window appears, double-click on the name VAL_DATE [.CPP]. When the editing window for this file appears, enter the code from Listing A.
Listing A: VAL_DATE.CPP
#include <owl\applicat.h>
#include <owl\framewin.h>
#include <owl\owlpch.h>
#include <owl\eventhan.h>
#include <owl\edit.h>
#include <owl\validate.h>

class TValDialog : public TDialog
{
  public:
	 TValDialog(TWindow* parent, int resID):
		TDialog(parent, resID), TWindow(parent)
	 {  TEdit* e = new TEdit(this, 1100, 20);
		 e->SetValidator(new
          TPXPictureValidator("##/##/##", TRUE));
	 }
};

class TValDateApp : public TApplication
{
  public:
  TValDateApp() {}
  ~TValDateApp() {}

  void InitMainWindow()
  { TFrameWindow* frame =
		new TFrameWindow(0, "Valid Date");
	 frame->AssignMenu(1);
	 SetMainWindow(frame); }

  void DisplayDialog()
  { char str[20];
	 str[0] = 0;
	 TValDialog* d =
		new TValDialog(GetMainWindow(), 1000);
	 d->SetTransferBuffer(str);
	 if(d->Execute() == IDOK)
		GetMainWindow()->MessageBox(str,
           "Date Entered");
	 d->Destroy();
  }

  DECLARE_RESPONSE_TABLE(TValDateApp);
};

DEFINE_RESPONSE_TABLE1(TValDateApp, TApplication)
  EV_COMMAND(101, DisplayDialog),
END_RESPONSE_TABLE;

int OwlMain(int, char**)
{ return TValDateApp().Run(); }
To build and run the application, choose Run from the Debug menu. When the VAL_DATE.EXE window appears, choose Enter Data from the Command menu.
When the dialog box appears, enter 06 in the dialog box's entry field. Notice that as soon as you type the 6, the validator automatically fills in the literal character / (a slash).
Now, complete the entry by typing 0995. Once again, you'll notice that the validator has inserted a slash between the month and year entries, as shown in Figure A.

Figure A - As you enter characters in the entry field, the validator automatically inserts the literal characters into the picture string.
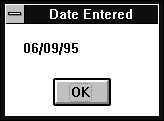
Click OK to dismiss the dialog box, then review the formatted
date string. When the message box that displays the date string
appears, confirm that it matches the one shown in Figure B.

Figure B - When you click OK in the Enter Date dialog box, you'll see the formatted date string appear in a message box.
To close VAL_DATE.EXE, double-click on its System menu icon. To
close the IDE, choose Exit from the File menu.
Checking input data for validity after the user enters it can be a troublesome chore. In addition, reporting those errors after the user dismisses the dialog box can be both confusing and annoying.
By using TPXPictureValidator objects to validate user
input in an edit control, you can limit the potential for error
and give the user prompt feedback when an error occurs. If you
turn on the autofill option, the TPXPictureValidator
object will automatically enter the necessary literal characters
for the user.
Copyright (c) 1996 The Cobb Group, a division of Ziff-Davis Publishing Company. All rights reserved. Reproduction in whole or in part in any form or medium without express written permission of Ziff-Davis Publishing Company is prohibited. The Cobb Group and The Cobb Group logo are trademarks of Ziff-Davis Publishing Company.