Main Form
Description
The Main form has the following menu items:
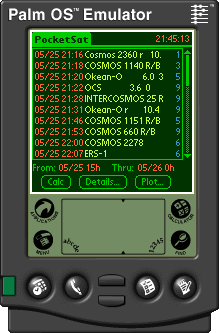
Calculating PassesPressing the 'Calc' button on the Main form brings up a series of dialogs allowing you to specify the start and end dates and times for the calculation. Passes will be calculated for the currently selected set of satellites (see Satellites form.) While calculation is in progress, PocketSat still responds to user input, but will seem very sluggish. You can view pass details or a pass plot without interrupting the calculation process (it will pause) but any other actions will stop it.
AlarmsIn order to set an alarm that will alert you when a pass happens, touch in the space just to the left of the "Goodness" value for the pass. A dialog will appear to allow you to choose when the alarm should occur, up to 15 minutes before or after the rise time for the pass. A small clock icon will appear in the space to indicate the alarm has been set. To clear the alarm, just touch the clock icon. Alternatively, you can choose the "Clear Alarms" menu item to clear all alarms.
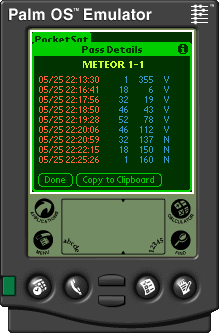
Pass Details
Pass Plot
The plot itself consists of three concentric circles representing the sky. The circles represent, from outer to inner, elevations of 0, 30, and 60 degrees above the horizon. The satellite's track is plotted on top of this as a solid line when it is visible and a dotted one when it isn't, along with the times for the satellite's rise, maximum altitude and set. If the satellite is currently above the horizon, it will be shown as a small blinking square. In addition, the satellite's current elevation and azimuth are displayed in the lower-right corner of the screen. The idea is that you hold the Palm Pilot out in front of you, facing the direction indicated at the bottom of the plot. You can rotate the plot to the left and right, respectively with the 'Address Book' and 'To Do' buttons on the case until the desired direction is at the bottom. The plot then shows the current direction and elevation of the satellite. If you have trouble getting the concept, imagine holding the Palm Pilot directly overhead with the direction markings pointed the right way. The center of the plot represents straight up, and the outer ring represents the horizon. While still in the Plot Form, you can also scroll to the previous or next pass by pressing the 'up' or 'down' button on the case.
| ||||||||||||||||||||||||||||||||||||||||||||||
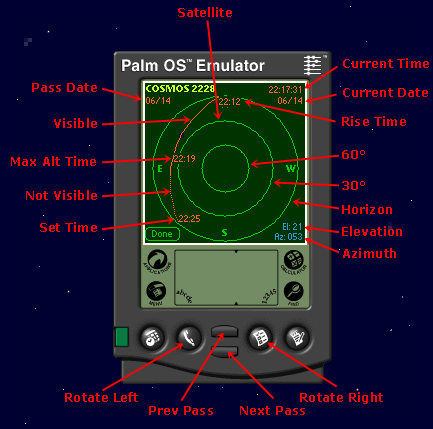 Pressing the 'Plot' button on the Main form brings up this form, which shows a plot of the sky
including the satellite's path. At the upper left are the satellite name and the date on which
the pass will occur. At the upper right are the current time and date.
Pressing the 'Plot' button on the Main form brings up this form, which shows a plot of the sky
including the satellite's path. At the upper left are the satellite name and the date on which
the pass will occur. At the upper right are the current time and date.