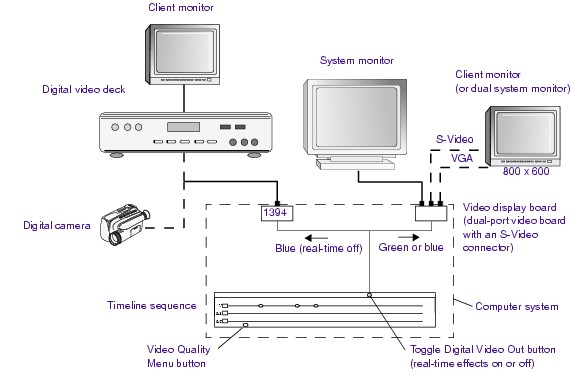
| You turn real-time effects on or off by clicking the Toggle Digital Video Out button in the Timeline. Real-time effects are on when the button is green and off when the button is blue. |
| When real-time effects are on (green), the desktop display shows the sequence with the unrendered effects precalculated. |
| When real-time effects are off (blue), the desktop display shows the sequence displayed with a full-resolution signal without the digital effects. |
 | You might see a difference with real-time effects turned on or off depending on what video quality mode is selected with the Video Quality Menu button. For more information, see Viewing Video Quality. |
| If you have real-time effects on (green), the desktop display shows the sequence with unrendered effects precalculated in Full Quality or Draft quality. |
| If you have real-time effects off (blue), the desktop display shows the sequence displayed with a full-resolution signal without the digital effects. The signal is sent out through the 1394 port connection to the Client monitor attached to a digital video deck or to the digital camera acting as a Client monitor. |
| You need a dual-port video display board installed in your Avid editing system to use a second system monitor as a Client monitor. |

|
(Windows) In the Windows Display Properties dialog box, select the Setting tab and click the Advanced button to look for the clone setting. The location of these settings varies depending on the video display board you have installed in your Avid editing system. You cannot have the extended desktop mode selected in the Windows Display Properties dialog box; you must select the clone setting. |
|
|
(Macintosh) In the monitor you want to use as a Client monitor, click System Preferences > Display and select a video resolution of 800 x 600 or lower. That monitor becomes the Client monitor. Select a resolution greater than 800 x 600 and the monitor becomes an extended desktop. |
| When using a Client monitor connected to the video display board, you can drag the position bar and have the video in the Client monitor simultaneously reposition (called scrubbing) when real-time effects are on (green). If real-time effects are off (blue), you can play and stop the sequence, but dragging the position bar does not simultaneously reposition the video in the Client monitor. |