Making a Correction with the Color Match Control
To make a correction using the Color Match control:
| 1. | |
In the Color Correction tool, click the tab that includes the Color
Match control with which you want to work.
|
| 2. | |
(Option) If necessary, select either of the following options in the
Correction Mode Settings dialog box:
|
| – |
|
Eyedropper 3 x 3 Averaging
|
When you select "Eyedropper 3 x 3 Averaging," the system
calculates the color value to pick by averaging the values of a 3 x 3
sample of pixels centered on the eyedropper's position. This is
often useful for picking up a color accurately by sight because it
compensates for shifts in color value from one pixel to another.
When this option is deselected, the system selects the color value
of the exact pixel at the eyedropper's position.
| – |
|
Eyedropper Picks from Anywhere in Application
|
When you select "Eyedropper Picks from Anywhere in
Application," you can pick colors from anywhere in the
application using the Color Match eyedroppers. For example, you
can pick a target color for a Color Match correction, such as a
desirable skin tone, from the swatch that appears beside a custom
color saved in a bin or from one of the ChromaWheels.
| 3. | |
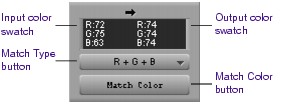
Select the input color (the color to be replaced):
|
| a. | |
Move the pointer over the input color swatch.
|
| b. | |
Press and hold the mouse button, and then drag the eyedropper to
the area of the image in the monitor from which you want to select
an input value.
|
| c. | |
Release the mouse button to complete the selection.
|
 | |
If the "Eyedropper Picks from Anywhere in Application" option is selected
in the Correction Mode Settings dialog box, you can select an input color
from another location in your Avid application using the eyedropper. Also,
you can pick from the Windows Color dialog box or the Macintosh Color
Picker by double-clicking the input color swatch. However, you will
usually want to select your input color from the current segment.
|
| 4. | |
Select the output color:
|
| a. | |
Move the pointer over the output color swatch.
|
| b. | |
Press and hold the mouse button, and then drag the eyedropper to
the area of the image in the monitor from which you want to select
an output value.
|
| c. | |
Release the mouse button to complete the selection.
|
| |
Your output color will usually be selected from an image other than the
current segment, such as the next segment or a reference frame. If the
"Eyedropper Picks from Anywhere in Application" option is selected in the
Correction Mode Settings dialog box, you can select an input color from
another location in your Avid application, such as a custom color swatch
in a bin, using the eyedropper. You can also double-click the output color
swatch and select a color from the Windows Color dialog box or the
Macintosh Color Picker. These alternatives are useful for selecting a saved
"ideal" replacement color such as a completely neutral gray or an optimal
skin tone. For more information on using the Windows Color dialog box or
the Macintosh Color Picker, see Using the Windows Color Dialog Box or
Using the Macintosh Color Picker.
|
| 5. | |
Click the Match Type button, and select a Match Type to determine the
exact nature of the match the system makes.
|
The options available in the Match Type pop-up menu depend on the
group in which you are working. For more information on Match Type
options, see
Selecting Match Type Options.
| 6. | |
Click the Match Color button to make the correction.
|
The system adjusts the current segment and resets the group controls to
reflect the adjustment. The corrected image displays in the monitor
that contains the current segment.