Understanding the ChromaWheel Controls
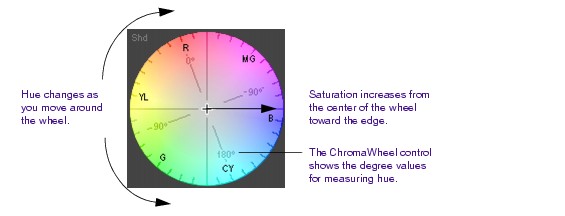
The ChromaWheel controls in the Hue Offsets tab show outlines that resemble the design of a vectorscope monitor, overlaid on full-color depictions that show the color represented by each area of the wheel. Each ChromaWheel is a circular graph that represents hue and saturation values. Hue values are mapped around the circumference of the wheel, with colors in the same positions that they occupy on a vectorscope. Red is at the 0° point on the wheel, and cyan is at the 180° point.
As you move around the wheel counterclockwise from red to cyan, you move through positive degree values. For example, green is at +120°. As you move around the wheel clockwise from red to cyan, you move through negative degree values. For example, blue is at –120°.
Saturation values are mapped along the radius of the wheel. The center point of the wheel represents zero saturation (neutral gray); the edge of the wheel represents maximum saturation. As you move out from the center of the wheel, you shift from less to more saturation. Saturation values are measured on a scale from 0 (zero saturation) to 100 (maximum saturation).
By picking a specific point on the wheel, you select an exact combination of hue and color intensity to add to your image. You can select a gray with a slight yellow tinge near the center of the wheel, for example, or an intensely saturated blue at the outer edge.
When you use the ChromaWheel controls to correct a color cast, you use a basic principle of color theory: you can cancel out one color in an image by adding an equal amount of the opposite color on the wheel. For example, to remove a red cast, add some cyan. To remove a yellow cast, add some blue. You do not even need to remember which colors are opposite when you have the ChromaWheel as a control. Simply add some color from the opposite side of the wheel from the color you want to remove, and then fine-tune your adjustment until you are satisfied with the result.
 | |
The Hue Offsets ChromaWheel controls are designed to create a familiar
environment for users by duplicating the general appearance of a
vectorscope monitor. Their representation of hue and saturation values, as
described above, does not exactly match the calibration of a true
vectorscope monitor.
|