DV digital cut offset affects the timing of the DV data sent to the DV device for a digital cut. Increasing the digital cut offset causes the sequence stream to be to delayed when it is sent to the DV device when digital cut begins. While the system is waiting for this delay, the first frame of the sequence is continually sent to the DV device.
There are several components to this setting.
Before setting this offset, you should perform several digital cuts to determine the frame-accuracy behavior of the recording device. Begin with the DV digital cut offset set to 0 frames. If the digital cut frame accuracy of the device is inconsistent, the results of using the offset are also inconsistent. If the sequence is missing frames at the beginning of the digital cut on the tape, increase the offset. If the first frame of the sequence is repeated, decrease the DV digital cut offset. The starting frame of the sequence should change according to your offset.
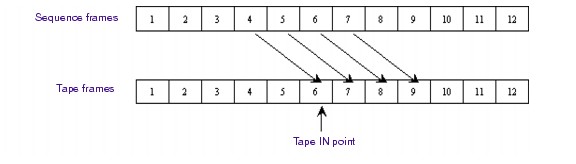
For example, suppose the DV digital cut offset is set to 0 frames. The digital cut is expected to begin with the first frame of the sequence being recorded on the IN point designated on the tape. In this example, the IN point is set to frame number 6. This is where the recording would begin on the tape. However, due to the behavior of the particular DV device, the digital cut does not perform as expected. The first frame of the sequence recorded on the tape is actually the fourth frame. See
Digital Cut with No Offset.
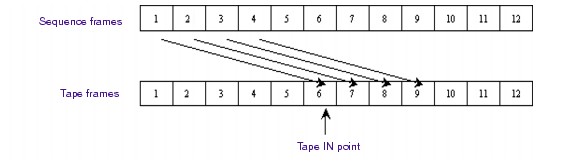
To correct this, the DV digital cut offset should be increased to have the Avid application delay sending the sequence to the device. If the DV digital cut offset is set to three frames, this should cause recording on the tape to begin with the correct sequence frame. See
Digital Cut with Offset.
The Deck Preferences dialog box opens.
The offset is reflected in the DV Offset box in the Digital Cut tool.