Create or select an object. > Quad menu > Transform quadrant > Convert To sub-menu > Convert to Editable Poly
Editable Poly is an editable object. It's similar to the way the Edit Mesh modifier provides controls for manipulating an object as a triangular mesh object, except that the poly object has an additional vertex making it polygonal. There are five sub-object levels: vertex, edge, border, face, and element. For open spline objects, only vertices are available, because open splines have no polygons or edges when converted to polymeshes.
Note: Because the functionality of the Edit Mesh modifier is almost identical to that of Editable Poly, features described in the Editable Poly topics also apply to objects with Edit Mesh applied, except as noted.
To make a sub-object selection on a non-editable poly object (for example, a primitive) for passing up the stack to a modifier, use the Poly Select modifier.
Once you make a selection with Editable Poly, you have these options:
Use the options supplied on the Edit Geometry rollout to modify the selection. Later topics discuss these options for each of the polymesh components.
Transform or Shift-Clone the selection, as with any object.
Pass the selection to a later modifier in the stack. You can apply one or more standard modifiers to the selection.
Use the options on the Surface Properties rollout to alter the surface characteristics of selected polymesh components.
Note: You can exit most Editable Poly command modes, such as Extrude, by right-clicking in the active viewport.
Procedure
To produce an editable poly object:
First select the object, and then do one of the following:
In the Modify panel, right-click in the modifier stack display and choose Editable Poly from the Convert To list on the pop-up menu.
Right-click the object and choose Convert To Editable Poly from the Convert To sub-menu in the Transform quadrant of the quad menu.
Apply a modifier to a parametric object that turns the object into a poly object in the stack display, and then collapse the stack. (For example, you can apply a Poly Select modifier.)
Converting an object to an editable poly removes all parametric controls, including the creation parameters. For example, you can no longer increase the number of segments in a box, slice a circular primitive, or change the number of sides on a cylinder. Any modifiers you apply to an object are collapsed as well. After conversion, the only entry left on the stack is "Editable Poly."
To maintain an object's creation parameters:
As described in the previous procedure, you can convert an existing object to an editable poly, which replaces the creation parameters in the stack with "Editable Poly." The creation parameters are no longer accessible or animatable. If you want to maintain the creation parameters, you can use the following modifiers:
Interface
Stack Display
For more information on the Stack Display, see Modifier Stack.
Show End Result: Normally, if you apply a modifier such as Twist to an editable-polymesh object and then return to the Editable Poly stack entry, you cannot see the effect of the modifier on the object's geometry. But if you turn on Show End Result while in sub-object level, you can see the final object as a white mesh, the original sub-object selection as a yellow mesh, and the original editable polymesh as an orange mesh.

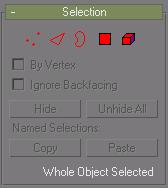
The Selection rollout provides buttons for turning different sub-object levels on and off, working with named selections and handles, display settings, and information about selected entities.
When you first access the Modify panel with an editable poly selected, you're at the Object level, with access to several functions available as described in Editable Poly (Object). You can toggle the various sub-object levels, and access relevant functions, by clicking the buttons at the top of the Selection rollout.
Clicking a button here is the same as selecting a sub-object type in the Stack View. Click the button again to turn it off and return to the Object selection level.
 Vertex: Turns on Vertex sub-object level, which lets you select a vertex beneath the cursor; region selection selects vertices within the region.
 Edge: Turns on Edge sub-object level, which lets you select a polygon edge beneath the cursor; region selection selects multiple edges within the region. When Edge sub-object level is on, hidden edges are displayed as dashed lines, allowing for more precise selection.
 Border: Turns on Border sub-object level, which lets you select an area on a mesh that can generally be described as a hole. Areas like this are usually sequences of edges with faces on only one side. For example, a box doesn't have a border, but the teapot object has a couple of them: on the lid, on the body, on the spout, and two on the handle. If you create a cylinder, then delete the top face, the top row of edges forms a border.
When Border sub-object level is active, you can't select edges which aren't on borders. Clicking on a single edge on a border selects that whole border.
Borders can be capped (either in Editable Poly or by applying the Cap Holes modifier). They can also be connected to another object (compound object connect).
 Polygon: Turns on Polygon sub-object level, which lets you select all coplanar polygons beneath the cursor. Region selection selects multiple polygons within the region.
 Element: Turns on Element sub-object level, which lets you select all contiguous polygons in an object. Region selection lets you select multiple elements.
By Vertex: When you click a vertex, any edge that uses that vertex, depending on the current sub-object level, is also selected. Also works with Region Select.
Note: When By Vertex is on, you can select sub-objects only by clicking a vertex, or by using region selection.
Ignore Backfacing: When on, selection of sub-objects selects only those sub-objects whose normals are visible in the viewport. When off (the default), selection includes all sub-objects, regardless of the direction of their normals.
Note: The state of the Backface Cull setting in the Display panel does not affect sub-object selection. Thus, if Ignore Backfacing is off, you can still select sub-objects, even if you can't see them.
Hide: Hides any selected sub-objects. Edges and entire objects cannot be hidden.
Note: The Select Invert command on the gmax Edit menu is useful for selecting faces to hide. Select the polygons you want to focus on, choose Edit > Select Invert, then click the Hide button.
Unhide All: Restores any hidden objects to visibility. Hidden vertices can be unhidden only when in Vertex sub-object level.
Named Selections
Copy: Places a named selection into the copy buffer.
Paste: Pastes a named selection from the copy buffer.
For more information, see Named Selection Sets.
Selection Information
At the bottom of the Selection rollout is a text display giving information about the current selection. If 0 or more than one sub-object is selected, the text gives the number and type selected. If one sub-object is selected, the text gives the identification number and type of the selected item.
Soft Selection rollout
Soft Selection controls affect the action of sub-object Move, Rotate, and Scale functions. When these are on, gmax applies a spline curve deformation to unselected vertices surrounding the transformed selected sub-object. This provides a magnet-like effect with a sphere of influence around the transformation.
For more information, see Soft Selection Rollout.
Edit Geometry rollout
The Edit Geometry rollout provides various functions for editing an editable poly object and its sub-objects. For specific information, click any of the links below: