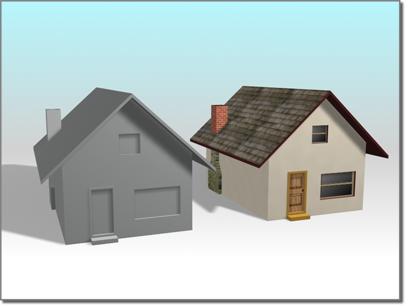
Materials make objects more convincing.
Left: A house with default shading
Right: The house with multiple materials applied
Materials "paint" objects. They add color and detail to your 3D model. They control shininess and transparency, as well as texture and bumpiness. Materials can apply bitmap files to the surface of objects, or these files can be used in any of the other map channels. Material values can be animated so the material changes over time.
The topics mentioned in the Workflow Outline give you an overview of using the Material Editor to design materials.
In general, when you create a new material and apply it to an object, you follow these steps:
 Open the gmax Material Editor.
 Click New.
Enter a name for the material you are about to design.
Enter settings for the various material components: diffuse color, shininess, opacity, and so on.
Note: Lights and Shading describes how lights affect the appearance of a material. Choosing Colors for Realism gives guidelines on getting good results from unmapped materials.
Assign maps to the components you want to map.
 Apply the material to the object.
If necessary, adjust the UV mapping coordinates in order to orient maps with objects correctly.
Note: While a material is in the Material Editor or applied to an object, it is part of the scene, and is saved with the scene.