|
The interesting part of building this chair is that you get to use two powerful tools: the Stretch tool and the Model tool. You will appreciate knowing how to use these tools when you are making your own complex models. |
|
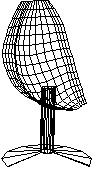
The seat
Þ Step 1: Base construction drawing (1)
q Tool: Drawing tool, Rectangle
1. Face view (key 2).
q See the detailed explanations in the chapter: User Manual/Tools/Construction/Drawing/ Rectangle |
|
Þ Step 2: Base construction drawing (2)
q Tool: Smooth
User Manual/Tools/Modeling/Smooth |
|
Þ Step 3: Flatten the upper and lower edges
q Tool: Scale
1. Select the points of the upper edge.
q See the detailed explanations in the chapter: User Manual/Tools/Assembly/Scale |
|
Þ Step 4: Generate a mesh
q Tool: Hull Coons
User Manual/Tools/Construction/Surfaces/Coons Surfaces |
|
Þ Step 5: Give a 3D shape to the seat
q Tool: Bend
1. Side view (key 4).
q See the detailed explanations in the chapter: User Manual/Tools/Modeling/Bend |
|
Þ Step 6: Adjust the back
q Tool: Stretch
1. Select the points of the upper edge of the back.
q See the detailed explanations in the chapter: User Manual/Tools/Modeling/Stretch |
|
Þ Step 7: Mold the seat
q Tool: Metanurbs
1. Select the Metanurbs tool.
q See the detailed explanations in the chapter: User Manual/Tools/Modeling/MetaNURBS |
|
The foot
Þ Step 1: Draw the foot section
q Tool: Drawing tool, Circle
1. Face view (key 2).
q See the detailed explanations in the chapter: User Manual/Tools/Drawing/Circle |
|
Þ Step 2: Extruding the foot
q Tool: Extrusion
1. Side view (key 4).
q See the detailed explanations in the chapter: User Manual/Tools/Construction/Extrusion |
|
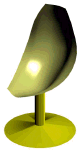
The whole chair
Þ Step 1: Adjust the height of the seat
q Tool: Move
1. Move the seat toward the top with a vertical constraint to adjust the height of the seat.
q See the detailed explanations in the chapter: User Manual/Tools/Assembly/Move |
Þ Step 2: Boolean operation between the seat and the foot
q Tool: Boolean
1. Perform a Boolean operation between the seat and the foot.
q See the detailed explanations in the chapter: User Manual/Tools/Modeling/Cut/Boolean |
|
Þ Step 3: Texture it!
q Tool: Material editor
1. Open the model Faut07.
q See the detailed explanations in the chapter: User Manual/Rendering/Rendering Parameters/Material editor |
|