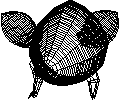
This example places an easy-to-draw object, the cheese, and a more complex object, the mouse, together in a scene.
|
|
The cheese (the recipe...)
Þ Step 1: Shape the cheese
q Tool: Extrusion
1. Start with the closed curve which is the cheese section and extrude it 4 or 5 cm with the Extrusion tool (and horizontal constraint).
q See the detailed explanations in the chapter: User Manual/Tools/Construction/Extrusion,
|
|
Þ Step 2: Create the holes
q Tool: Boolean
1. Perform a Boolean operation between the block of cheese and the group of spheres.
q See the detailed explanations in the chapter: User Manual/Tools/Modeling/Cut/Boolean |
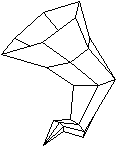
The mouse
Þ Step 1: The mouse’s body
q Tool: Double Profile
1. Select the circle which corresponds to the section.
q See the detailed explanations in the chapter: User Manual/Tools/Construction/Sweeping |
|
Þ Step 2: An ear
q Tool: Double Profile
1. To work more easily, hide the body of the mouse and zoom in on the three curves which define the shape of the ear.
q See the detailed explanations in the chapter: User Manual/Tools/Control Panel/Hide, Unhide,
|
|
Þ Step 3: The 2nd ear
q Tool: Mirror 3D
1. After making the first ear, unhide the body.
q See the detailed explanations in the chapter: User Manual/Tools/Control Panel/Hide, Unhide,
|
|
Þ Step 4: A front leg
q Tool: Double Profile
To make the mouse’s legs, proceed as for the ears:
q See the detailed explanations in the chapter: User Manual/Tools/Construction/Sweeping |
|
Þ Step 5: The 2nd front leg
q Tool: Mirror 3D
We always mirror from the body center of the mouse.
q See the detailed explanations in the chapter: User Manual/Tools/Assembly/Symmetry |
|
Þ Step 6: The rear legs
q Do it: Repeat the two previous steps for the rear legs. |
The mouse on the cheese
|
You will notice that the legs have only one toe. You can try to add more toes as shown in the final model... (Souris3). Next, you should add the eyes and whiskers (Souris2) and give the piece of cheese to the little mouse. |
|