The Chamfer tool is used to replace the edges of a surface, a volume, or points of a curve by bevels. The tool will create internal or external bevels, depending on the orientation of the edges. You will be able to create bevels of variable radius. The Chamfer tool can also be used to easily round the angles of a polyline. |
|
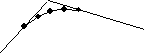
![]()
The Chamfer tool does not work on NURBS objects. However, you can transform a NURBS object into a polygonal one using the Information tool of the Control Panel. (See chapter User Manual/Tools/Control Panel/Get info.) Keep in mind that once a NURBS model is transformed into a polygonal model, it cannot be transformed back into a NURBS object.
Usage:
1. Selecting the element or part of the element you want to apply the chamfer to.
Þ Click on the object using the Wand. It becomes the current object.
Þ You can limit the tool action to part of an object using the Lasso or the Bullseye. (On PC: Right mouse button click. On Mac: Press the Option key and simultaneously click the mouse button.)
2. Selecting the Chamfer tool.
Click on the icon depicting the Chamfer tool in the Tools Palette.
Amapi 3D displays a preview of the chamfer on the selected part of the object (highlighted in red).
|
|
|
Chamfer applied to a curve Chamfer applied to a volume
3. Modifying the radius of the chamfer.
Edit the radius of the chamfer. You can:
Þ Use the “+” and “-” keys of the numeric keypad.
Þ Use the “+” and “–” buttons of the Assistant Palette.
Þ Press the Tab key and enter a precise chamfer radius.
4. Modifying the chamfer value.
Press the Tab key twice to enter a precise value. Press the Return key to validate the entry.
|
|
|
|
No chamfer |
Chamfer value 0 |
Chamfer value 1 |
Chamfer value 2 |
5. Previewing the object with the chamfer applied.
Click on the mouse button to display a preview of the object with the chamfer applied to it.
![]() It is only a preview; the chamfer is still not applied to the object!
It is only a preview; the chamfer is still not applied to the object!
6. The chamfer radius is uniform along the object. However, you can specify a different radius for part of the object.
To assign a different radius to part of the selection, you first need to specify this area:
|
|
7. Validating the chamfer.
Press the Return key to validate the chamfer.
Amapi 3D displays the object with the chamfer applied to the whole object or only to the part of the object selected.
![]() If you do not validate the process, the chamfer will not be applied.
If you do not validate the process, the chamfer will not be applied.
8. Ending the tool action.
Put the tool aside to end the action (depending on the interface). See chapter User Manual/Tools/Generic use of a tool/How do you end a tool action?
|
Practical exercises:
|