The Smooth tool is used to control the number of facets defining a surface and the number of points defining a curve.
A more defined mesh generated by a Bezier interpolation replaces the original facets.
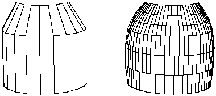
Example of use of the Smooth tool |
|
![]()
The Smooth tool is used on NURBS objects to increase the number of control points of the Control Box.
![]()
The Smooth tool can be very useful for subdividing a segment into N sub-segments of equal size. You simply create a single segment (with only two points: a starting point and an ending point) with the Polyline tool, then use the Smooth tool to subdivide it.
q General use
Following the principles described below, you will be able to smooth surfaces, curves, and polylines.
1. Selecting the element or part of the element you want to smooth.
Þ Click on the element you want to smooth using the Wand. It becomes the current object.
Þ You can restrain the tool action to part of the element using the Lasso or Bullseye selection tool (right mouse button click on PC; Option key + mouse button click on Mac).
2. Selecting the Smooth tool.
Click on the icon depicting the tool in the Tools Palette.
Amapi 3D displays a preview of the smoothing (in red), of the object.
A red preview of the smoothing is displayed on part of the object.
|
|
|
Smoothing a surface |
Smoothing a straight line |
3. Excluding an area of the object from the smoothing operation.
Select either the Lasso or the Bullseye selection tool in the Assistant Palette or through the mouse (on PC: Click the right mouse button, on Mac: Option-click). Use this tool to specify the area of the object you do not want to smooth.
4. Specifying the smoothing value.
You can specify the number of facets (if the current object is a surface) or of segments (if the current object is a curve). It is the smoothing value that defines the number of facets or segments. You can modify it through:
Þ The “+” and “-” keys of the numeric keypad.
Þ The “+” and “–” buttons of the Assistant Palette.
Þ The Data Window: Press the Tab key and enter a precise smoothing value.
![]()
When smoothing a NURBS object, you can define the smoothing value in two directions (“U” and “V”). “U” designates the direction in which the element was created (usually the horizontal plane). “V” designates the direction perpendicular to the direction of creation (usually the vertical plane). You will modify the smoothing value as you would for a polygonal model:
Þ Press the “+” and “-” keys of the numeric keypad. You will edit the “U” and “V” separately, pressing the spacebar.
Þ Click on the “+” and “–” buttons of the Assistant Palette. You will edit the “U” and “V” separately, pressing the spacebar.
Þ Press the Tab key to enter a smoothing value for the “U” directly. Press Tab again to edit the smoothing value for the “V”. Press the Return key to validate.
![]()
When you change the viewpoint, the smoothing disappears. But Amapi 3D remembers the smoothing information.
5. Permanent display of the smoothing on the object (optional).
Press the Return key to display the smoothing permanently.
|
|
6. Ending the tool action.
Put the tool aside to end the action (depending on the interface). See chapter User Manual/Tools/Generic use of a tool/How do you end a tool action?
![]()
If you did not ask for a permanent display of the smoothing (step 5), the smoothing information will be kept in memory. Even though the object is displayed as un-smoothed, it will be smoothed when rendered and exported.
![]()
Launch a quick render to check that the object is indeed smoothed.
|
Practical exercises:
|
q Sharp edges and smoothing angles
Smoothing transforms straight elements into rounds ones. This means that the generated facets will create a continuous geometry connecting the original facets of the non-smoothed element. However, sometimes you may want to keep sharp edges.
You can edit two parameters:
¨ Define sharp edges
¨ Set the smoothing angle
You can combine those two parameters to define which parts of the model will be smoothed and which will not.
¨ Defining sharp edges
Sharp edge selection is done just after selecting the Smooth tool using the Lasso or the Bullseye.

1. Selecting sharp edges:
You will use one of the selection utilities (Lasso and Bullseye)
Þ On PC: Click the right mouse button.
Or
Þ On Mac: Press the Option key and simultaneously click the mouse button. The cursor switches to the Lasso.
Þ Do it again; the cursor is transformed into the Bullseye.
Use it to select the edges you want to leave sharp.
2. Validating the selection.
Press the Return key to validate. The selected edges are displayed in white.
3. Go back to step 3 of the generic use of the Smooth tool to continue the process.
¨ Setting the smoothing angle (for a surface only)
The smoothing angle is the angular value below which an angle will not be smoothed; i.e. it will stay sharp.

1. Specifying the smoothing angle value.
Þ On PC: Click the right mouse button.
Or
Þ On Mac: Press the Option key and simultaneously click the mouse button.
You can see that the dialog displayed in the Data Window now shows the smoothing angle value.
2. Modifying the smoothing angle value.
To modify the smoothing angle value, you can:
Þ Use the “+” and “-” keys of the numeric keypad.
Þ Use the “+” and “–” buttons of the Assistant Palette.
Þ Press the Tab key and enter a precise smoothing angle value in the Data Window.
Edges with an angle value below the smoothing angle value are displayed in white.
3. Go back to step 3 of the generic use of the Smooth tool to continue the process.
¨ Setting the smoothing angle (for a curve or a polyline only)
The smoothing angle is the angular value below which an angle will not be smoothed and rounded; i.e. the angle drawn by the two segments will stay sharp.
1. Modifying the value of the smoothing angle.
Press the Tab twice and key in a precise numerical value.
Segments that are joined with an angle with a value below the smoothing angle value are displayed in white.
2. Go back to step 3 of the generic use of the tool to continue the process.