The Stretch tool is used to move single vertices or a group of vertices, thus distorting the object. |
| |
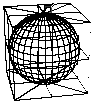
The Stretch tool applied to a NURBS object |
The Stretch tool applied to polygons | |
![]()
The Stretch tool operates the same way on NURBS objects as on polygonal objects.
However, in the case of NURBS objects, you manipulate the control points of the NURBS Control Box instead of working directly on the object itself. The object will be distorted according to the offset applied to the control points. You will also be able to edit the tangents of the NURBS curves. Instead of editing the control points of the NURBS envelope directly, you will edit the tangents to those points.
q Use of the tool
1. Selecting the element to work on.
Click on the object using the Wand to designate it as the current object.
2. Selecting the Stretch tool.
Click on the icon depicting the Stretch tool in the Tools Palette.
The Wand cursor switches to a Claw.
3. Pulling a point or a group of points.
By default, the tool pulls a single point. However you can select a group of points to pull using the Lasso or Bullseye selection tools.
· Pulling a single point: Click on the point on the current object.
![]()
Amapi 3D will select the nearest point to the cursor.

Go to the next step (step 4)
· Selecting a group of points using the Lasso:
There are two ways to do this:
1st method: Clicking on the Lasso icon button in the Assistant Palette.
2nd method: Using the mouse:
Þ On PC: Click the right mouse button
Þ On Mac: Press the Option key and simultaneously click the mouse button.
The Claw cursor is transformed into the Lasso. Use it to surround the points you wish to pull. Press the Return key to validate the selection.

The cursor switches back to the Claw. Use it to pull the points selected. Then go to step 4.
· Selecting points using the Bullseye.
There are two ways to do this:
1st method: Clicking on the Bullseye icon button in the Assistant Palette.
2nd method: Using the mouse:
Þ On PC: Click the right mouse button
Þ On Mac: Press the Option key and simultaneously click the mouse button.
The Claw cursor is transformed into to the Bullseye. Use it to individually select the points you wish to pull. If you mistakenly deselect a point, click on it once again to reselect it. Press the Return key to validate the selection.

The cursor switches back to the Claw. Click on one of the points selected to pull them. Go to step 4.
4. Moving the selection.
Two perpendicular axes originating from the selected point are displayed as soon as you grab the point. The point can be moved only along the working plane defined by the axes.
You can modify the axes’ step size to control the increment of cursor movement along the axes.
To do so, you can either:
Þ Use the “+” and “-” keys of the numeric keypad.
Þ Use the “+” and “-” buttons of the Assistant Palette.
Þ Use the Remote Control to fine-tune the graduation remotely: Ctrl+Shift+Arrow. (See chapter User Manual/Tools/Data Window/Numerical data/Modifying a numerical value/Distant interaction/The Remote Control).
Þ Or press the Tab key and enter the step size numerically.
You can constrain the cursor movements to a single axis, either:
Þ Using the keyboard: The spacebar will toggle between the horizontal axis, the vertical axis, or the plane.
Þ Clicking on the constraint setting icons in the Assistant Palette.
You can tune precisely the position of the cursor using the Remote Control (Ctrl+Shift+arrow keys; see chapter User Manual/Tools/The Data Window/Numerical data/Modifying a numerical value/Distant Interaction/The Remote Control).
You can apply other movement constraints to the cursor:
¨ To a point of the current object or of another object (Shift key)
¨ To a point along a segment
¨ Along lines of constraint
(See chapter User Manual/Tools/Assistant Palette/Cursor movement and positioning constraints.)
5. Validating the point’s new position.
There are three methods:
¨ Clicking:
Þ Drag the cursor to the new position.
Þ Click when you reach it.
¨ Entering precise numerical coordinates:
Þ Press the Tab key.
Þ Enter a value for the X-axis.
Þ Press Tab.
Þ Enter a value for the Y-axis.
Þ Press the Return key to validate the entry.
¨ Using the Remote Control:
The Remote Control is used to remotely fine-tune the action of a tool.
Þ Press Ctrl+Shift+Arrow key. (See chapter User Manual/Tools/Data Window/Numerical data/Modifying a numerical value/Distant Interaction/The Remote Control.)
Þ Press the Return key to validate the operation.
6. You can pull other points, starting again from step 3.
7. Ending the tool action.
Put the tool aside to end the action (depending on the interface). See chapter User Manual/Tools/Generic use of a tool/How do you end a tool action?
![]()
The Stretch tool is one of the tools that allows you to change the current object while using the tool.
To change the current object while within the tool:
Þ Press Shift+ESC. The cursor switches to the Wand.
Click on another object: it becomes the current object.
|
Practical exercises:
|
q Editing the tangents of a NURBS curve
You can edit the tangents of a NURBS curve using the Stretch tool. Instead of editing the control points of the NURBS envelope directly, you will edit the tangents to those points
1. Selecting the Stretch tool.
First, make sure that the current object is a NURBS curve. Then, click on the icon depicting the Stretch tool in the Tools Palette.
2. The polygon of control is displayed. You can pull those points along the work plane.
3. Editing the tangents of a NURBS curve.
If the current object is a NURBS curve, Amapi 3D will display an icon in the Mode area. Click on its tangents (or use the hotkey: Ctrl+Spacebar) to display the tangents to the points instead of the NURBS envelope. The control polygon disappears.
4. Manipulating the tangents of a NURBS curve.
Click on a point of the curve. You will manipulate the tangent to this point. This allows you to control the shape of the curve in a more flexible way.