The Sphere tool is used to create spheres anywhere in the work space.
|
|
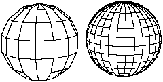
A NURBS sphere is represented using curved facets and is in fact made up of two NURBS hemispheres. A NURBS sphere looks smoother than a polygonal one.
Usage:
1. Selecting the Sphere tool.
Click on the icon depicting the Sphere tool in the Tools Palette.
2. Positioning the origin of the reference axes.
Þ The origin of the reference axes will automatically be positioned at the center of the workbench if the scene is empty.
Þ If the scene already contains objects, you will need to specify the location of the origin of the reference axes. It will necessarily be located at one of the points already existing in the scene. Click on a point to designate it as the reference point for all the operations performed with the tool. (If you click in an empty area of the scene, Amapi 3D will automatically select the nearest point of the nearest object).
1. Specifying the mode: NURBS or polygonal.
|
The Assistant Palette includes a “Modes” area displaying two buttons used to switch from one drawing mode to another. Make sure that the correct mode button is selected. Otherwise, click on it or use the hotkeys: PC: Ctrl+B, Mac: Command+B. |
3. Specifying the construction reference point.
The reference point will be either the top or bottom point of the sphere.
There are two ways to specify it:
Þ Drag the cursor and click.
Or
Þ Press the Tab key and enter the point’s coordinates. Press the Return key to validate the entry.
4. Drawing the sphere.
There are, here again, two ways:
|
|
5. Setting the number of points defining the sphere
Once the sphere is created, the “+/-” Tuner is displayed. Use it to make your sphere smoother or rougher. To tune, do any of the following: |
|
Þ Press the “+” and “-” keys of the numeric keypad.
Þ Click on the “+” or “-” icons of the Assistant Palette.
Þ Press the Tab key and enter a precise numerical value.
6. Ending the action.
Validate or put the tool aside to end the tool action (depending on the interface). See chapter User Manual/Generic use of a tool/How do you end a tool action?
|
Practical exercises:
|
q Cube
The Cube tool is used to create cubes anywhere in the work space.
|
|
The cube tool can create any rectangular 3D shape defined by its numerical dimensions along the X, Y and Z axes.
A NURBS cube is displayed with grid lines to differentiate it from a polygonal cube.
You will need to specify the drawing mode before creating the cube.
Polygonal cube |
NURBS cube |
Usage:
1. Selecting the Cube tool.
Click on the icon depicting the Cube tool in the Tools Palette.
2. Positioning the origin of the reference axes.
Þ The origin of the reference axes will automatically be positioned at the center of the workbench if the scene is empty.
Þ If the scene already contains objects, you will need to specify the location of the origin of the reference axes. It will necessarily be located at one of the points already existing in the scene. Click on a point to designate it as the reference point for all the operations performed with the tool. (If you click in an empty area of the scene, Amapi 3D will automatically select the nearest point of the nearest object).
3. Specifying the mode: NURBS or polygonal.
|
The Assistant Palette includes a “Modes” area displaying two buttons used to switch from one drawing mode to another. Make sure that the correct mode button is selected. Otherwise, click on it or use the hotkeys: PC: Ctrl+B, Mac: Command+B. |
4. Positioning the center of the base of the cube.
There are two ways to do this:
Þ Click on the desired location.
Or
Þ Enter numerical coordinates using the Tab key.
5. Creating the cube.
There are two ways to do this:
|
|
6. Ending the tool action.
![]() The tool is automatically put aside and the Wand reappears.
The tool is automatically put aside and the Wand reappears.
|
Practical exercises:
|
Use the Grid tool to create a flat mesh. Then modify it using the modeling tools.
|
| |
|
| |
Usage:
1. Selecting the Grid tool.
Click on the icon depicting the Grid tool in the Tools Palette.
2. Positioning the origin of the reference axes.
Þ The origin of the reference axes will automatically be positioned at the center of the workbench if the scene is empty.
Þ If the scene already contains objects, you will need to specify the location of the origin of the reference axes. It will necessarily be located on one of the points already existing in the scene. Click on a point to designate it as the reference point for all the operations performed with the tool. (If you click in an empty area of the scene, Amapi 3D will automatically select the nearest point of the nearest object).
3. Specifying the mode: NURBS or polygonal.
|
The Assistant Palette includes a “Modes” area displaying two buttons used to switch from one drawing mode to another. Make sure that the correct mode button is selected. Otherwise, click on it or use the hotkeys: PC: Ctrl+B, Mac: Command+B. |
4. Specifying a corner of the grid.
There are two ways to do this:
Þ Drag the cursor to the desired location and click.
Or
Þ Press the Tab key and enter the coordinates of the point. Press the Return key to validate the entry.
5. Setting the size of the facets of the mesh.
There are two ways to do this:
Þ Drag the cursor and click when the facet has the desired size.
Or
Þ Press the Tab key and enter the length and the height of the facet. Press the Return key to validate the entry.
6. Setting the length and height of the grid.
There are two ways to do this:
Þ Move the cursor and click when you reach the desired size.
Or
Þ Press the Tab key and enter a value for U (number of horizontal facets) and V (the number of vertical facets).
|
|
7. Ending the tool action.
![]() The tool is automatically put aside and the Wand cursor reappears.
The tool is automatically put aside and the Wand cursor reappears.
|
Practical exercises:
|
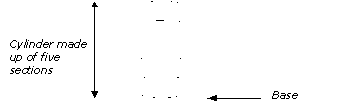
The Cylinder tool is used to create a cylindrical 3D object quickly.
|
|
The Cone tool is used to create a cone quickly.
|
|
1. Selecting the Cone tool.
Click on the icon depicting the Cone tool in the Tools Palette.
2. Positioning the origin of the reference axes.
Þ The origin of the reference axes will automatically be positioned at the center of the workbench if the scene is empty.
Þ If the scene already contains objects, you will need to specify the location of the origin of the reference axes. It will necessarily be located on one of the points already existing in the scene. Click on a point to designate it as the reference point for all the operations performed with the tool. (If you click in an empty area of the scene, Amapi 3D will automatically select the nearest point of the nearest object).
3. Selecting a mode: NURBS or polygonal.
|
Two buttons, displayed in the “Mode” area of the Assistant Palette, are used to switch mode. Check that the correct mode is selected. If not, click on the corresponding icon button or use the hotkeys: PC: Ctrl+B, Mac: Command+B. |
4. Specifying the cone orientation.
The orientation of the cone depends on the viewpoint selected at this stage. (See chapter User Manual/Control Panel/Views.)
Viewpoint selected at the creation stage of the cone


Orientation of the cone in Front view
5. Specifying the center of the base.
The cursor switches to the Bullseye. Use it to specify the center of the base of the cone.
There are two ways to do this:
Þ Drag the cursor to the desired location and click.
Or
Þ Press the Tab key and key in the numerical coordinates. Press the Return key to validate the entry.
6. Specifying the radius of the base.
There are two ways to specify the radius:
Þ Move the cursor and click when the circle reaches the desired size.
Or
Þ Press the Tab key and enter the precise radius of the circle. Press the Return key to validate the entry.
7. Specifying the height and the number of sections.
By default, the cone is defined by five sections. However, you can specify a different number of sections.
¨ If you only need to set the height, you can either:
Þ Drag the cursor vertically and click when the cone reaches the desired height.
Or
Þ Press the Tab key and enter the height numerically. Press the Return key to validate the entry.
¨ If you also need to set the number of sections, you can:
Þ Press the Tab key and enter the height numerically.
Þ Press the Tab key again and enter the number of sections. Press the Return key to validate the entry.
8. Specifying the number of points defining the base.
Once the basic cone is created, the “+/-” Tuner is displayed, allowing you to modify the number of points defining the base. To do so, you can:
Þ Press the “+” and “-” keys of the numeric keypad.
Þ Click on the “+” or “–” buttons of the Assistant Palette.
Þ Press the Tab key and enter a precise number of points. Press the Return key to validate the entry.
9. Capping the base (optional).
By default, the base of the cone is open (it is highlighted in red).
Go to the next step if you want to leave it open.
Click on it if you want to cap it.
10. Ending the tool action.
Validate or put the tool aside to end the tool action (depending on the interface). See chapter User Manual/Generic use of a tool/How do you end a tool action?