
In this lesson, you will create a takeout menu. The format is a landscape letter page folded in thirds. This tri-fold brochure format is flexible because it is economical to produce and provides a flexible layout. You can spread objects across the folds, or use each panel as a separate page.
The easiest way to lay out a tri-fold brochure is to create pages divided into folds by guides. You cannot simply divide the page into thirds because a page cannot be easily folded into three equal segments. Brochures are normally folded by machines which require a substantial gap on the third panel in order to correctly fold the brochure.
We will use picas instead of inches in this lesson. A landscape (horizontal) letter-size page is 66 picas wide (11" x 6 picas / inch = 66). Good panel sizes to use, looking at the outside of the brochure, are 21p, 22p6 and 22p6 from left to right. This will provide sufficient space for error when the brochure is folded.
Picas are a traditional measurement system popular in desktop publishing. There are six picas in an inch. Picas are abbreviated in PageStream as the letter p after the number. For example, 3p is 3 picas.
Fractional picas are usually measured in points instead of tenths of a pica. There are twelve points in a pica. Fractional picas are abbreviated as points after the letter p. For example, 3p6 is 3 picas and 6 points, or 3.5 picas.
PageStream supports decimal notation as well as traditional notation, so you can enter 3.5 into a text box instead of 3p6. You can enter values in any measurement system by including the appropriate abbreviation with the value, but you should normally set PageStream's measurement system for simplicity.
1. Start PageStream3.
Double-click on the PageStream3 icon in the PageStream3 folder. When the PageStream Navigator appears, you're ready to start.
2. Choose Prefs in the Navigator.
The Preferences dialog box will appear. Click on the Measure tab to display the Measurement Preferences panel.
Choose Picas from the Horizontal pop-up menu. If the Vertical pop-up menu is not set to Same as Horizontal, change it now. PageStream allows you to set vertical measurement system separately, but it should be the same as the horizontal system for this lesson.
3. Click Use.
The Use button will use the preferences for this session, but they will not be remembered if you quit PageStream. If you want to change your preferences for future use, you should click on the Save button.
This document will be double-sided because guides are associated with master page sides in PageStream. The front and back of the menu must have different guide positions to accommodate the folds. Making the document double-sided allows you to set different guide positions for the sides of the menu.
The document must also be landscape orientation; wider than it is tall.
1. Click New in the Navigator.
The New Document dialog box will appear.
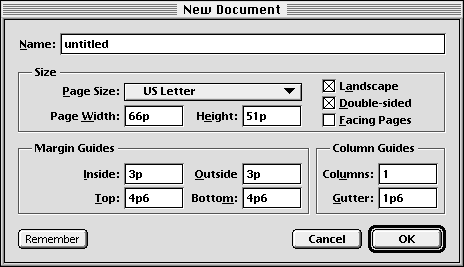
Change each option in the New Document dialog box to match the picture shown above.
This lesson is designed for North American letter-size pages. European users should choose the same page size. (US Letter pages can be printed on A4 paper.) All readers should use picas for this lesson.
2. Click OK.
A document window will appear. If the rulers are not visible, display them now by choosing Show Rulers from the Layout menu.
In this exercise, you will create the guides that will divide the page into the menu panels. Unlike the Column and Margin guides which can be set when you create a new document, Master Page Guides are individual guides which can be placed anywhere on a master page.
Each PageStream page is based on a master page, so the guides for a master page will be visible on pages that use it. In a double-sided document such as this, master pages have left and right sides for the facing pages of the document. You will create the front of the menu on the first page, which is the right side, and the back of the menu on the second page, the left side.
Choose Show Full Page from the View pop-up menu if the entire page is not already visible.
1. Choose Set Page Guides from the Layout menu.
The Set Page Guides dialog box will appear. Note that you don't have to view the master page for a page in order to create guides on it. If you create master guides while viewing a page, the guides will be created on its master page, and thus will be shown on any page based on the master page.
2. Create the right side's guides.

Click on the horizontal ruler at the 21p mark to create a guide. The guide's position will be shown in the Position text box.
Create the second guide by clicking on the horizontal ruler at 43p6. You will have to scroll the ruler to the right with the right arrow control to see this part of it. Note that the new guide is now shown by a black mark and the first guide by a gray mark. The black mark indicates the active guide. You can switch active guides by clicking on the gray mark of a guide.
3. Create the left side's guides.
Choose Left from the Side pop-up menu to create guides on the left side of the master page. Because you choose Set Master Guides when a right page was displayed, this pop-up menu defaulted to the right page.
The Center side option in this pop-up menu is used for page spreads only.

Create guides at 22p6 and 43p.
4. Click OK.
If you clicked in the wrong spot, you can correct the position now by dragging the mark below the ruler to the correct position, or by editing the number in the Position text box. If you accidentially create an extra guide, you can remove it by selecting it and then clicking Remove.
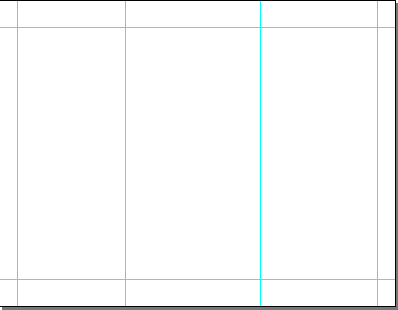
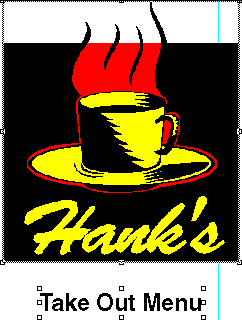
The outside of the brochure is made up of three panels. The front will have a logo.
You will now place a graphic on the front panel.
1. Choose the File/Place Graphic command.
This will open the Place Graphic file selector. Select Lessons.ILUS file from the Graphics folder in the PageStream3 directory and click on Open..
2. Click on Place in the Place Graphic requester.
This will import the drawing with the default options; the drawing will be placed at the center of the window if Place Graphic in Center is selected in the Files panel in Preferences.
3. Resize the drawing to the appropriate size.
The drawing to be imported is larger than the space you need to fill. Make sure that proportional scale is on in the Edit Palette before resizing the drawing. Using the Object tool, proportionally resize the drawing so that its coordinates are approximately W:19p6, H:21p6.
![]()
4. Drag the drawing into position.
Drag the drawing with the Object tool so that its top left coordinates are approximately X1:45p, Y1:7p6.
This is a good time to save your work. Choose the Project/Save command to open a file requestor. Name your document file and click on Save.

For this lesson you type the words Take Out Menu onto the front panel. Creating a frameless text object is the best way to enter a short block of text such as this. Before you create the text object, you should change to a larger view magnification. Choose Window/View/Actual Size or click on the Custom Scale button in the toolbar and select Actual Size.
1. Choose the Text tool from the toolbox.
The mouse pointer will change to a text cursor shape.
2. Click to create the frameless text object.
Click on a blank area of the page below the logo to create the text object. A small vertical bar will appear where you clickedthis is the text insertion point and shows where text will appear when you type. You may need to scroll the view to display the proper part of the page.
3. Enter the text.
Type the type "Take Out Menu" into the frameless text object.
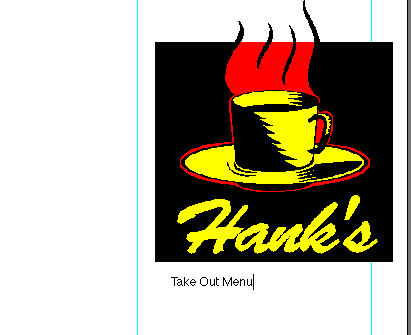
The text you typed is 12 point Helvetica (AmigaOS: Triumvirate, Windows: Ariel); this is PageStream's default font and size. You will change the text to Helvetica Bold 24 point now.
1. Choose the Edit/Select All command.
The text in the text object will be selected.
2. Change the font.
Press and hold the mouse button on the Font popup in the Edit palette. (If the Font popup is not visible, click on the C button at the far left of the Edit palette to switch to Character view.) Scroll down the list until you find Helvetica-Bold. Release the mouse button when it is highlighted in the popup list. The selected text will be changed to Helvetica Bold. (AmigaOS: Triumvirate-Bold, Windows: Ariel-Bold)
You can also change the font and type style with the font and size menu items in the Type menu. It is usually faster to use the Edit palette to change text attributes.
3. Change the size.
Press and hold the mouse button on the Size popup in the Edit palette. Scroll until you find 24 point. Release the mouse button. The selected text will be changed to 24 point.
![]()
Click the mouse anywhere in the text object to deselect the text when you are done.

You will now move the frameless text object you created in step 2 to align it with the logo.
1. Select the frameless text object.
Choose the Object tool and select the frameless text object, if not already selected. When the object is selected, its coordinates will be shown in the Edit palette.
2. Position the text object.
Drag the text object so that its position is approximately X:48p, Y:31p6.
3. Selecting mutliple objects.
With the text object still selected, click on the logo while holding down the shift key.
4. Aligning multiple objects.
While the objects are both selected, choose Align from the Object menu. The Align dialog box will open. Click on the Center Horizontal button. This will center both objects horizontally. Click OK.

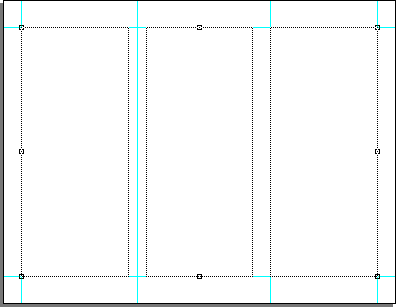
The guides you need to create this menu are already created. The margin guides define the edges of the layout, and column guides which divide the layout into a columnar grid.
In this step, you will create a three text column text frames. Go to page 2, using the next page button. Choose Show Full Page from the View pop-up menu if the entire page is not already visible.
1. Choose the Layout/Create Text Frames command.
The Create Text Frames dialog box will open.
2. Set the column options.
Change the column options using the example below.
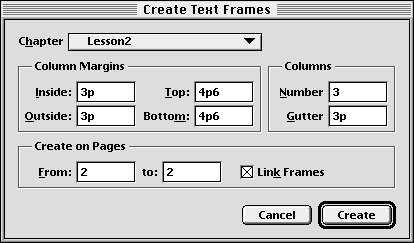
Column Guides:
Column Guides:
Pages:
Click on Create to create the text column.
You can also create a 1, 2, or 3 text column layout with the column tool in the toolbox.
Step 9: Importing Text
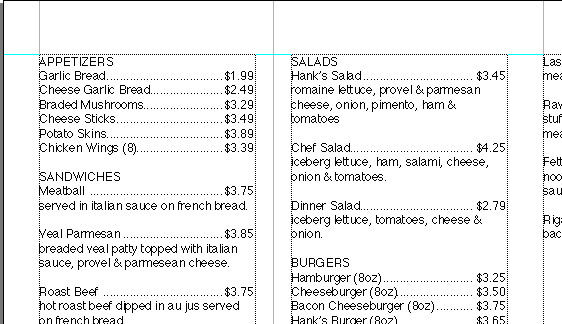
Now you will import a text file into the new columns. Importing text into PageStream is similar to placing a graphic, which you practiced in Step 4.
1. Choose the Text tool and click anywhere in the leftmost column.
The insertion point will be placed in the top left corner of the text columns.
2. Choose the File/Insert Text command.
This will open the Insert Text file selector. Select the Lesson2.ascii file in the PageStream3:Text directory and click on Open.
3. Accept the default Insert Text dialog box options.

Click on Insert to use the default ASCII text import options. This will import the text and flow it into the columns.

The three columns you created earlier contains text that will use dot leaders (rows of dots between the left and right text blocks.)
PageStream's Tab features allows you to insert aligned rows of dots. Instead of manually pressing the period key (which are to closely spaced and which can not be aligned without a monospaced font), PageStream's dot leader feature does it all for you.
1. Choose the Edit/Select All command.
The text in the columns will be selected.
2. Set the dot leader tab.
Choose Tabs from the Type menu. Click on the ruler at 16p6 to create a tab at 16p6. If you click on the wrong location, you can click drag the tab or enter in a position of 16p6. Choose US Decimal from the Type popup and click a "." into the Fill gadget. This will cause tabbed text to align to the decimal and be filled will aligned rows of "."'s.

3. Click OK.
Click anywhere in the text frame to deselect the text when you are done. You may wish to choose View Actual Size to better see the changes made.
Before you print the menu, you should save your work. Choose the Project/Save command to save the document with the current name.
If you have not already configured your printer setup in PageStream you should do so now. Refer to the Installation Guide for instructions. When you have selected a printer driver with the File/Print Setup command, you are ready to print your document.
1. Choose the File/Print command.
The Print dialog box will appear.

2. Choose the print options.
PageStream defaults to printing all the pages in a document. If this is what you want, you do not need to change any options in the dialog box.
If you want to print the current page only, choose Page from the Pages pop-up menu. If you want to print a specific page, or a range of pages, choose Range from the Pages pop-up menu and then enter the page numbers into the text box below it; separate ranges with dashes. i.e., 2 for page 2 only, or 24 for pages 2 to 4.
3. Print the document.
Click on Print to print the document. A print status dialog box will appear to keep you informed of the progress of the print job. If you have any problems while printing, check your printer connection and verify that you have correctly set up your printer. If you cannot resolve your problem, refer to the Installation Guide to ensure you have correctly chosen your printer driver, and to the troubleshooting section of the online Help system.
Congratulations! You have finished the lessons section of this manual.