PageStream's guides and grid are non-printing lines which help you place objects on pages. You can use them to create your layout grid and to maintain a uniform layout across pages. Objects can be visually aligned with the guides and grid, or they can be snapped to the nearest guide line or grid point.
There are three kinds of guides. Margin guides represent the area in which you place your objects. Column guides show the default positions for text frames. Margin and column guides are created automatically when you create a new document or master page. Page guides are created with the Set Page Guides command, and can be placed on the left, center and right sides of master pages.
Choose Show Guides from the Layout menu to display guides if they are not visible. Choose Preferences from the File menu and click on the View tab to set the guide colors and whether they are displayed in front of or behind objects displayed in the window.
Margin and column guides are created for the default master page when you create a new document, and for new master pages when they are created. These can be changed at any time with the Master Page Setup command.
Margin guides are normally positioned so that all objects and text on the page will be placed inside of them. The number of column guides you create is dependent on the number of columns you will use in your document. Column guides are only shown when you specify two or more columns.
If a master page is double-sided, it will have inside and outside margin guides instead of left and right guides. Left pages have their inside margin on the right edge while right pages have their inside margin on the left. Center pages of spreads have inside margins on both the left and right edges of the page.
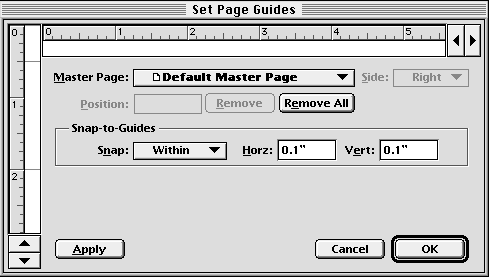
Horizontal and vertical page guides can be placed anywhere on a master page. To create, move and delete page guides, choose Set Page Guides from the Layout menu to display the Set Page Guides dialog box.
To create page guides: Click inside the horizontal or vertical ruler in the Set Page Guides dialog box. The position of the new guide will be shown by a black mark below the horizontal ruler or to the right of the vertical ruler. Its coordinates will be shown in the Position text box.
To select a guide to change or delete it: Click on the guide mark. The selected guide's mark will be black; other guide marks will be gray.
To move a page guide: Drag the guide mark, or select it and enter a new position in the Position text box.
To delete a page guide: Select a guide and click Remove.
Objects can be snapped to the guides to ensure that all objects are aligned to your layout grid. PageStream snaps the edges of objects closest to a guide or edge of the page whenever objects are drawn, moved or scaled and the Snap-to-Guides command is selected.
To set the guide snap strength: The Snap popup sets whether objects will always snap to the closest guide or when within a certain range. When Within is selected, you can enter a range into the text gadget. Note this option affects how objects snap to any type of guide.
PageStream's grid is the equivalent of graph paper. It is shown as rows and columns of non-printing dots. It allows you to align objects to its points.
The grid is part of the master page, so its settings will be identical on all pages based on a specific master page. This will help you maintain a uniform appearance for your document. Unlike page guides, the grid is the same for the left, center and right sides of a master page.
Choose Show Grid from the Layout menu to display the gird if it is not visible. Choose Preferences from the File menu and click on the View tab to set the grid color and whether they are displayed in front of or behind objects displayed in the window.
If you cannot see the grid on screen and have chosen Show Grid, the grid is too dense to be displayed. Increase the display interval with the Set Grid command.
You can vary the grid spacing and display interval. The grid coarseness determines how finely objects can be spaced. The display interval sets how many dots will be shown on screen. When the interval is set to 1, every grid point will be shown. If the grid spacing is very tight, the grid display can clutter the screen. When the display interval is set to 2, every second grid point will be shown. Objects will still snap to all points.
To set the grid spacing and display interval: Choose Set Grid from the Layout menu to display the Set Grid dialog box.

Objects can be snapped to the grid. PageStream snaps the edges of objects closest to a grid point whenever objects are drawn, moved or scaled and the Snap-to-Grid command is selected.
To set the grid snap strength: The Snap popup sets whether objects will always snap to the closest grid point or only when within a certain a certain range. When Within is selected, you can specify a range.