
HTML Author is a WYSIWYG editor for producing HTML files, built on top of Microsoft Word for Windows version 6. It makes the creation of HTML documents for the World Wide Web extremely simple, especially if they consist of many linked HTML files.
Microsoft and Word for Windows are trademarks of Microsoft Corporation.
Netscape is a trademark of Netscape Communications Corporation.
Code (<code>), Emphasis (<em>), Fixed Width (<tt>), Strong (<strong>), Variable (<var>), (<blink>), Bold (<b>), Italic (<i>), and Bold Italic (<b><i>).The editor is provided in the form of a Microsoft Word for Windows document template containing appropriate paragraph styles and macros for editing HTML documents and for generating HTML files from them. The whole package consists of the document template (HTMLAUTH.DOT) and this manual, along with the associated GIF image files. The manual has itself been produced using HTML Author and may either be printed as a Word for Windows document or generated as an HTML page. A complete list of files is provided below.
HTML Author does not work in native HTML format. Your documents are produced and maintained as Word for Windows (.DOC) documents (referred to here as HTML source documents) containing hidden fields that are used by the various macros to maintain HTML related information and to generate the HTML files when required. This process is actually very transparent, and you should never need to edit the HTML code directly.
Although it is not necessary to be an expert on HTML to use HTML Author, it is useful to have some basic knowledge of the World Wide Web, and the structure of HTML documents. The following references provide useful background information:
This manual assumes a basic knowledge of HTML and WWW terminology, and a working knowledge of word processing in Word for Windows.
Most people know that WYSIWYG means "What You See Is What You Get". However, strictly speaking, there can be no such thing as a WYSIWYG HTML authoring tool. This is because HTML is (almost) totally independent of format. The logical styles that are defined in the HTML document are turned into physical formats by the HTML viewer (such as Netscape), and these will be different depending on the viewer and the way it is configured. For the purpose of HTML Author, the formats used by default in Netscape have been used as the model for the styles you see when editing. For the main paragraph styles (headers, lists, etc.) and character styles, you may change the way these look using the normal Word for Windows facilities.
Title text does not appear in the main text window when viewing an HTML document using Netscape. (It appears as the window banner instead.) For this reason, title text in HTML Author is shown (by default) as white text on a grey background. (Note that title text may only appear as the first line in the document.)
To see samples taken from the screen of HTML Author whilst editing the manual, click on the items below:
To use HTML Author, simply copy the HTMLAUTH.DOT template into your Microsoft Word for Windows templates directory. (This will usually be the directory C:\WINWORD\TEMPLATE.) You may then create an HTML source document using the following steps:
You may now start creating your HTML Author source document. To generate the actual HTML from this document, see the section on Generating HTML.
The Options command in the HTML Author menu allows you to set up a number of optional parameters. These options are described elsewhere in the manual and are: the location of the HTMLAUTH.INI file (see below), the location of the bookmarks file, settings relating to character translation, and setting related to multi-file documents.
HTML Author keeps some information in the file HTMLAUTH.INI. If this file does not exist, HTML Author will create it when required. By default, the file will be placed in the Windows directory. Under normal circumstances, you do not need to worry about this as it is all taken care of automatically. If, however, you wish to place the initialization file in a different directory, you can specify a file pathname in the Options dialogue box.
Note. It is important that the directory you specify for the .INI file does exist.
You may set up HTML Author to run with a non-English version of Word by loading the document INTSETUP.DOC, and then double clicking the button that you will see in that document. This runs a macro that will re-define some of the style names, and some of the macro commands, to those used in your own version of Word. If you do not do this, the HTML generator and a number of other features will not work correctly. This must be done after you have copied the HTMLAUTH.DOT template to your Windows directory.
Acknowledgement: Thanks are due to Jan Frederik Solem of Oslo College in Norway and Stefan Kaes of Dresdner Bank AG in Germany, for their patience and considerable assistance in getting HTML Author to work with international versions of Word.
Version 3 makes some fundamental changes to the way character formats are handled. This makes for a much cleaner user interface and safer editing of documents. In addition, at version 2.1d, relative pathnames were adopted for the storage of all embedded graphical (.GIF) images. This is so that links will be maintained when source documents are moved to a different directory along with their .GIF files.
When you open an existing source document, produced by an earlier version of HTML Author, you will be asked whether you wish to convert the document for use with version 3.0. If you answer Yes to this, HTML Author will attempt to perform the required conversion. Under normal circumstances, this should proceed without any problem. The converter can run into difficulties, however, if you have applied more that one character format to a single piece of text (i.e. nested character formatting tags), or you have inserted hidden HTML codes yourself, which are not recognized by HTML Author. In these circumstances, you will be asked to make the necessary modifications yourself during the conversion.
Important. If you do not perform the conversion, the HTML Generator may fail, or produce incorrect results.
Text is entered in the normal way, using the paragraph styles provided in the template. These are available in the drop-down list box on the left of the HTML Author Toolbar. (The standard Word for Windows list box for selecting paragraph styles.) The paragraph styles are shown in bold type in the list box. It is essential that you use the paragraph styles provided, because HTML Author expects to see these when generating the HTML file. A good range of HTML styles is provided, and more will be added as the product develops.
You may also centre a paragraph using the standard Word For Windows Alignmnent buttons  , which have been made available in the HTML Author Toolbar. The paragraph alignment will be converted to the appropriate HTML attributes when the HTML is generated.
Line breaks may be inserted within a paragraph using the standard Word for Windows line break (obtained by pressing Shift&Return). This will be converted to an HTML line break tag (<B>) when the HTML file is generated.
Some paragraph styles may also be selected using the Paragraph Formats toolbar. This provides normal, list and heading paragraph styles. The backward and forward pointing arrow buttons  may be used to promote or demote a heading or list paragraph.
These are produced using the list styles: List, List 2, ... and Numbered List 1, Numbered List 2, ... The numbers relate to the level of nesting of the lists. E.g. if you want to put a list inside an item in another list, use List for the outer list, and List 2 for the contained list. You can mix list styles in a nested list structure.
For Descriptive Lists, these are always assumed to be at level 1. The Descriptive List Title style is used for the title of an item, and Descriptive List Text is used for the description. You may put as many description paragraphs as you like after an item title.
You may embed a list or a numbered list within a descriptive list text by using a list level of 2 or higher. A level 1 list will cause the descriptive list to be terminated.
List items may be promoted or demoted using the arrow buttons in the Paragraph Formats toolbar.
Character formatting codes may be inserted by highlighting the text to be formatted, then selecting the appropriate character formatting styles from the styles list in the HTML Author Toolbar. The styles can also be obtained from the Character Formatting toolbar if it is visible. (To select toolbars in Word for Windows, click the right mouse button over any toolbar and select the required toolbar from the list that appears.)
The character formatting styles are shown in standard (not bold) type. The character styles currently available are: Citation (<cite>), Code (<code>), Emphasis (<em>), Fixed Width (<tt>), Strong (<strong>), Variable (<var>), (<blink>), Bold (<b>), Italic (<i>), and Bold Italic (<b><i>). Default formats have been defined in HTML Author for these styles, based roughly on the formats rendered by Netscape, but you may change them using the standard Word For Windows Format Styles dialogue box if you wish. The Blink style appears as double underlined text by default.
You should not use the Microsoft Word formats for italic and bold text, because the HTML generator will ignore them. Styles have been provided in the list for these formats as well as the logical ones. Note, however, that the use of HTML physical formats should be discouraged. The Bold and Italic formats can be obtained in Netscape by using the Strong and Emphasis styles. It has not been possible to combine more than one physical format on one piece of text at this release of HTML Author.
You may find out the style of a piece of character formatted text by placing the edit cursor inside the text. The character style will then be displayed in the styles list box in the HTML Author Toolbar.
Note. When character formatting is applied to an existing anchor field, the format of the field text is modified along with all other text in the selection. This also causes hidden text in the field to become visible. When this happens, the field may be returned to its correct format by double-clicking on it to get the Anchors Dialogue box, then pressing the Insert button. This will re-insert field using the correct formats. In some cases, the hidden text will cause the field to be too long to fit on a single line. To obtain the Anchors Dialogue box in this situation, select the field by clicking on the error message displayed in the text, then press Alt+Shift+F9. (See the note on this in the section on anchors.)
Comments may be inserted into your document using the Comments style. By default, these are rendered as hidden text in the Word source document. You may reveal the hidden text by clicking the Show/Hide button  in the HTML Author toolbar (this is a Microsoft Word for Windows button). They will then appear in a small red character font. If you are looking at the Word source version of this manual, you can press the show/hide button now, and see the comment at the beginning of this section. Comments are converted into HTML comment tags when the HTML is generated.
Two types of anchor are supported by HTML Author. These are HREF anchors and NAME anchors, and correspond to the HTML "<A HREF=..." and "<A NAME=..." anchors respectively. Anchors are held in the source document as fields (a feature of Word for Windows). You may see what these fields look like "in the flesh" by clicking the View Field Codes button  and the Show/Hide button (the fields contain some hidden text) in the toolbar. (These are both Word for Windows buttons.) You should refrain from editing the fields directly in this mode unless you really know what you are doing.
Anchors may be created either by selecting "Create HREF" or "Create NAME" entries from the "HTML Author" menu, or clicking on the corresponding buttons  from the toolbar. If you wish to use some existing text as the text of the anchor, then you should select the required text in the document first (standard Microsoft Word for Windows select operation). You will then see a dialogue box with two fields labelled NAME (or HREF) and TEXT:
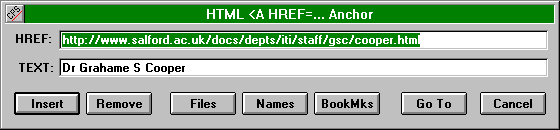
The text typed into these fields will be used to create the HTML anchor as follows:
<A HREF="NAME">TEXT</A>
The NAME field is the URL or local filename for the target in an HREF anchor, or is the target name in a NAME anchor. The TEXT field is the text that should appear on the screen in the document.
"HREF" anchors will appear in blue text underlined text in your source document, just like they do in Netscape. "NAME" anchors do not have a special text format in Netscape, so they are indicated by a dotted underline in your source document.
Once you are happy with the Name and Text fields, click the Insert button and your anchor field will be inserted in the document.
Note: The length of the anchor text must not cover more than one line of text on the Word for Windows editing screen. This is a limitation of Word for Windows fields. If you do specify anchor text covering more than one line, Word for Windows will display the error message: "DisplayText cannot span more than one line!" in place of the anchor text. If you see this message, you should select the field by clicking on the error message, then bring up the Anchors dialogue box by pressing Alt+Shift+F9. You can then either remove the field - leaving the text in the document - or edit the text to make it shorter.
When you are working on an HREF anchor in the Anchors dialogue box, you can obtain some types of HREF string by using pick lists.
If you wish to create a reference to an existing NAME anchor in the current document, you may pick this from a list that HTML Author will build when you click on the Names button. HTML Author will prefix the name with the # character as required by HTML.
If the required anchor is a relative reference to a local file, it may be selected from a directory listing by clicking on the Files button. You will then see the following dialogue box:
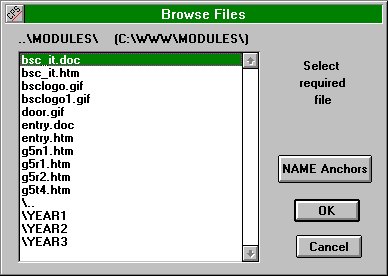
You may select any file from the list, but it should be one that can be handled by the HTML viewer or its helper applications. You can also select files with either the .DOC extension or the .HTM extension. In both cases, HTML Author will replace the filename extension with .HTML in the anchor name.
A NAME anchor in the target document may be appended to the HREF string by selecting the required file from the list and then clicking on the NAME Anchors button. HTML Author will build a list of all the NAME anchors appearing in the target file, from which you may select the required name. (Note. If the .DOC version of the file is available, the NAME list will be generated from this file in preference to the .HTM version.)
When the Browse Files dialogue first appears, it will show files in the same directory as the file you are editing. You may navigate around the directory structure to find a file in another directory by using the directory entires in the list. These begin with the "\" character. The entry "\.." allows you to move to the parent directory of the current one. The pathname of the directory you are looking at (relative to the current document) is shown at the top of the dialogue box. In all cases, relative pathnames will be created from this dialogue box startng from the directory containing the document you are currently editing. When working with relative pathnames in the source file, HTML Author uses DOS pathname conventions, i.e. a backslash character (\) separates directory names. However, when the HTML is generated, all backslash characters in anchor names are replaced with forward slashes (/).
NOTE: If you use this facility to create relative references to files in other directories, it is important that the local directory structure you are working with is identical to the structure on the World Wide Web server in which you intend to place you HTML files.
The BookMks button, available in the Anchors dialogue box when you are editing an HREF anchor, allows you to select a URL from a pick list generated from an HTML "bookmarks" file. This has been designed to work with Netscape's bookmarks file, providing access to all your Netscape bookmarks.
You may specify the location of the bookmarks file using the Options screen, which is available in the HTML Author menu. If you wish to use the Netscape bookmarks file, simply click on the Netscape button in the Options screen. HTML Author will attempt to locate the file path using Netscape's .INI file. (You must have netscape installed to use this option.)
To edit an anchor (or to see what it contains), double click the anchor text, or select the anchor field and press Alt+Shift+F9. This will bring up the Anchors dialogue box again. You may
Note. If the text contains embedded images of other fields, you will see the message: "<<< Can't edit (contains graphics or other fields) >>>". To edit the text, you will need to remove the anchor field by clicking the Remove button (which will leave the text in the document), make the required changes, and then create the anchor field again.
You may use the Anchors dialogue box to open an anchor's target file for editing if the target is a local file, or go to the appropriate position in the document if the target is a NAME anchor in the same document. To do this, double click the anchor text in the document to get the Anchors dialogue box, then click on the Go To button.
If the target is an HTML file, HTML Author will open its source (.DOC) file if it is available. If the .DOC file cannot be found, then HTML Author will open the HTML (.HTM) file itself as a text file. If the target filename has another extension (e.g. .GIF, .JPG, .WAV, .AVI, etc.), HTML Author will attempt to open it using the application that is registered for that filename extension in the WIN.INI file. (To register a filename extension, select Associate from the File menu in the Windows File Manager.)
Note. This option will only work if the anchor target is either: a reference to a NAME anchor in the file you are currently editing; or a relative reference to a file, relative to the directory containing the file you are currently editing.
If you are viewing a NAME anchor in the Anchors Dialogue box, you may search for references to that anchor in the current document by clicking on the Find HREFs button. This will find, in turn, each HREF anchor that references the current NAME anchor, starting from the top of the document. Once you have found the HREF anchor you are interested in, you may go to that position in the document.
Graphics (GIF images) can be embedded in the document using the Insert Image command in the HTML Author menu, or by clicking on the Image button  in the HTML Author toolbar. HTML Author will then display a list of all the files in the same directory as the document you are editing, using the Browse Files Dialogue Box. You should select the GIF image that you want to insert.
HTML Author stores relative pathnames for all images inserted by means of the Insert Image command or the Image button. (Relative to the path of the current file.) It is also possible to insert GIF images by using the Picture command from the Microsoft Word for Windows Insert menu. However if you do this, the absolute filename (relative to the root directory) will be stored and will be inserted into the HTML generated. You must also ensure in this case that the graphic is linked to a file, or it will not be referenced at all in the HTML file generated.
Note. You must avoid double clicking on embedded graphical images in the HTML source document (unless they appear in an anchor field). This causes Word for Windows to edit them, which breaks the link with the file. If you do this by accident, then close the picture, and immediately click on the Undo button  in the toolbar. (This is a Word for Windows button.)
To refresh embedded graphics fields, so that the source document shows the latest version of the image, use the Update Pictures command in the HTML Author menu. This command ensures that relative filenames for images are treated correctly. (The Word for Windows "Update Links" command will not guarantee this.)
HTML Author can automatically generate a hypertext table of contents similar to the one used near the beginning of this document. To do this, you must first create NAME Anchors for all the sections you want referenced in the table of contents. Next, move to the position at which you want the table of contents to appear, and select Build Table of Contents from the HTMLAuthor menu. HTML Author will build a table of contents from all the NAME anchor fields in the document that have a Heading style. If there are any entries that you do not want to include, you will need to delete them once the table has been generated. References to other files can then be added manually if required.
To insert page owner details, similar to those shown at the bottom of this page, place the cursor at the position you require the details to appear. Next, select Insert Owner Details from the HTML Author menu. You will see the following dialogue box:

Enter your details (you may leave some fields blank), then press the Insert Now button to insert them into the document. Access is also provided to the the text of the message so that it may be altered to another language if required. You may set up default values, which will appear automatically in the dialogue box in future, by filling in the form then pressing the Set Defaults button.
The Auto Insert options allow you to specify that the owner details should be inserted automatically at the bottom of the HTML file whenever it is generated. If you use this option, you should not insert the details manually (Insert Now) or the text will appear twice in the same document. For multi-section documents, you may specify that the details are placed either at the bottom of the top level file only, or at the bottom of all files generated. Remember to press the Set Defaults button after altering the Auto Insert setting.
The date format used is the default one defined in the WINWORD6.INI file. If you wish to change the format of the date, you may change it in there under the [Microsoft Word] heading. The entry in the WINWORD6.INI file that is used to get the date format shown above is:
DateFormat="dd MMMM yyyy"
(The format string may be different in non-English versions of Word for Windows.)
A horizontal rule may be inserted into the document using the Insert Rule command from the HTML Author menu, or the HRule button  in the HTML Author toolbar. HTML Author will ensure that the rule is on a separate line. You can remove the rule either by clicking it then pressing the delete key, or by double clicking it, then selecting Remove in the dialogue box.
When you are ready to create the actual HTML file (.HTM), select Generate HTML from the HTML Author menu or click on the Generate HTML button  in the HTML Author toolbar. By default, the name of the HTML file will be the same as that of the source file, but with the .DOC extension replaced by .HTM. HTML Author will give you a chance to change this if required. For multi-file documents, the name of the top level file is defined in this way.
If you cancel the Generate HTML macro by pressing the escape key whilst generation of HTML is in progress, you may be left in the window containing the partly converted HTML file. You may close this window in the normal way and return to the source document.
If invalid structures are encountered during the HTML generation, HTML Author will place a comment in the HTML file indicating the nature of the error. In these circumstances, a warning will appear after the generation has been completed.
(Note. For large documents, especially if you are using a 386 computer, please be patient. On my 25MHz 386SX portable, it takes 3 minutes to generate the HTML for this manual. It goes a lot quicker on a 486 DX2/50 mind you!)
Some special characters appearing in the normal text of the document (i.e. not hidden text) are converted to HTML escape sequences so that they will be reproduced literally by the HTML viewer. The characters that are currently handled are: & © < > à á â ã ä å ç è é ê ë ì í î ï ñ ò ó ô õ ö ù ú û ü À Á Â Ã Ä Å Ç È É Ê Ë Ì Í Î Ï Ñ Ò Ó Ô Õ Ö Ù Ú Û Ü. Text that is formatted with the As Is style will not be converted in this way. To save time during HTML generation, this option can be turned on or off, for a particular document, in the Options dialogue box. The default setting for new documents may also be specified in the same dialogue box.
HTML Author can convert simple Word for Windows tables into HTML 3 table tagging. In the current version of HTML Author, this facility is restricted to tables with straighforward rows and columns. Merging of cells across more than one row or column (the ROWSPAN and COLSPAN parameters in HTML) is not currently supported.
Column and row headers may be obtained by setting the appropriate cells to any Heading style. These cells will not be given a heading style in the HTML file, but will be tagged with the <th> HTML tag (table heading). Centred text in the Word table will be centred in the generated HTML file.
Captions are supported, and may appear either immediately above or immediately below the Word for Windows table. If the Word table has a caption above it, any caption appearing below will be ignored. If a caption is sandwiched directly between two tables, it will be interpreted as belonging to the table above it unless that table already has a caption above it. When the HTML is rendered by a suitable browser, the position of the caption will be determined by the browser.
Large HTML documents may take a long time to access over the World-Wide Web. For this reason, it is recommended that such documents are broken down into collections of smaller, linked HTML files that are retrieved as required. HTML Author supports the creation of such a multi-file document by allowing you to maintain it as a single source document that is divided into sections.
To break a document down into sections, place the cursor at the point where you wish to break the document, and select the New Section command from the HTML Author menu. This will cause the Section Details dialogue box to be displayed.
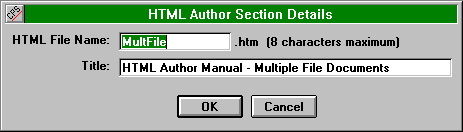
You should then fill in the form with the name and title of the section. When the HTML files are generated, the Name will be used to create the filename for the section, and the Title field will be used to define the title for the HTML file (shown as the window banner in Netscape). When the OK button is pressed, a section header will be inserted into the source document at the position of the cursor. This appears as a dark red banner with a shadow, containing the name and title details. You may create as many sections in your source file as you require, but each section must have a different name.
When the HTML is generated from a multi-file source document, HTML Author will generate separate files for all the sections, and link them together with HREF anchors labelled "[Previous] [Top] [Next]". These may be used to move up and down the document as a whole. All cross-references (HREF anchors) within the document will be converted so that they refer to the appropriate HTML file. If you have generated a table of contents for the whole document, this will contain anchors to the appropriate HTML files. This manual is an example of a multi-file document generated by HTML Author.
Once you have divided your source file into sections, HTML Author can use it to produce either a collection of linked HTML files or a single HTML file. This is selected using the checkbox labelled Generate Multiple HTML Files in the Options dialogue box, which is obtained using the Options command in the HTML Author menu. This dialogue box also provides check boxes for specifying whether the HTML generator should insert Navigation Buttons ("[Previous] [Top] [Next]") at the top and bottom of each file generated. If you choose to generate a single HTML file, HTML Author will separate the sections using horizontal rules.
NOTE: You are advised to keep a multi-file document in a separate directory to avoid possible name clashes between HTML files. HTML Author does not check before overwriting files below the top level one. In the current version of HTML Author, a multi-file document may contain a maximum of fifty sections and 300 NAME anchors.
The following list shows the files you should have.
The following bugs are known about, and will be removed when possible in future releases of HTML Author.
Please let me know at the E-Mail address shown below if you find any other bugs, or have any comments. (It would also be helpful if you could tell me what version you are using.)
I have put some effort into producing this package. If you find HTML Author useful, I ask only one tiny thing. Please let me know that you are using it, where you are using it, and what you are using it for, preferably providing your email address as well. I will endeavour to keep a mailing list of people who would like to be informed of new versions. Either send an email message to G.S.Cooper@iti.salford.ac.uk, or send a letter to:
Dr Grahame Cooper,NOTE The HTML Author software and this manual are Copyright © 1995 Grahame S Cooper. You may copy and use them provided you do not modify them (other than to change the paragraph styles). The HTML Author software is provided as seen, without warranty or guarantee. Neither Grahame S Cooper nor the University of Salford accept any liability for errors or faults in the software or any damage arising from the use of the software. If you wish to pass the software on to other users, please refer them to the original source at Salford so that they can get the most up-to-date version.