Note: As a reminder of the function of each toolbar button, Web Factory provides tool tips, which momentarily display the name of a toolbar button when your mouse cursor rests over the button.
The Standard Toolbar allows you to accomplish the following functions with a single click on the corresponding button: new file, open file, save file, print, spell check, cut, copy, paste, and undo last action.
The Standard Toolbar is available at all times. If it is not in view, choose Standard Toolbar from the View menu to display it. A check mark beside this menu option indicates the Toolbar is currently displayed.
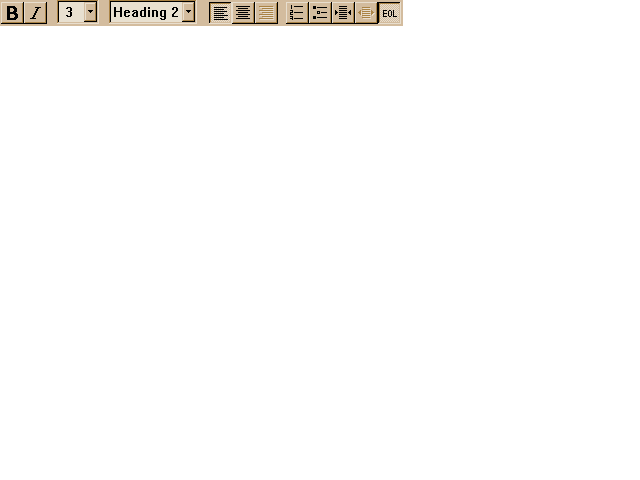
The Formatting Toolbar allows you to accomplish the following text and paragraph formatting by clicking on the corresponding button or drop-down list: bold, italic, font size, paragraph style, align paragraph left, align paragraph center, align paragraph right, ordered list, bulleted list, indent, unindent, and show format marks.
To apply bold or italic formatting or to change the size of the text, first select the text you want to affect, then use the toolbar.
To change the style of a paragraph from "normal" to a heading or other paragraph style, click the cursor anywhere within the paragraph then select the paragraph style. Likewise, to change the alignment of a paragraph, or to indent or unindent, first click the cursor within the paragraph, then click the desired alignment toolbar button. Internet Explorer does not support right alignment of paragraphs.
To add a list, first position the text cursor where you want the list to start, then click the toolbar button. You can also drag and drop ordered lists and bulleted lists from the toolbar to the desired spot on the Web page.
To display the Formatting Toolbar, choose Formatting Toolbar from the View menu. A check mark beside this menu option indicates the Toolbar is currently displayed.
The Elements Toolbar allows you to insert the following HTML elements into your Web page with a single click on the corresponding button: link to another Web page; link to anchor on this page; make anchor on this page; link to email address; image; image map; horizontal rule; new table; new cell; split cell; new row.
To add a link, first select the text you want to be the hypertext link, then click the toolbar button. When making an anchor, you can either select the word(s) to be the anchor, or just click to insert the anchor. Anchors are not marked for users to see.
To add an image, horizontal rule, new table or table element to the Web page, first click the cursor where you want to insert the element. Then click the toolbar button. You can also drag and drop images, image maps, horizontal rules, and new tables from the toolbar to the desired spot on the Web page.
To add an image map, first click on the image you want to add a map to, if it is already in the page. Then click the toolbar button. If no image is selected, the Open box will appear, allowing you to select an image. You can also drag and drop images, image maps, horizontal rules, and new tables from the toolbar to the desired spot on the Web page. See Insert menu, Image Map for further instructions on creating a client-side image map.
To display the Elements Toolbar, choose Elements Toolbar from the View menu. A check mark beside this menu option indicates the Toolbar is currently displayed.
The Forms Toolbar allows you to insert a form and any of the following form elements into your Web page by clicking on the corresponding button: new form, text area, selection, option, text field, password, check box, radio button, submit button, reset button.
To add a form or a form element, click the cursor where you want to insert the element, then click the toolbar button.
To display the Forms Toolbar, choose Forms Toolbar from the View menu. A check mark beside this menu option indicates the Toolbar is currently displayed.
The Test View Navigation Toolbar allows you to navigate among Web pages on your hard drive or network, in the test view window. Much like the buttons on a Web browser, they include the following options, from left to right:
The Area Toolbar allows you to select an area of the current image, using the following tools:
To display the Area Toolbar, choose Area toolbar from the View menu. A check mark beside this menu option indicates the Toolbar is currently displayed.
The Object Toolbar allows you to move and modify objects in the image window as follows:
The Filter Toolbar allows you to draw special effects, known as filters, on the current image. The Filter Toolbar provides you with the following tools:
To undo a portion of the filter you applied, immediately click or drag with the right mouse button on the portion you want to undo.
To display the Filter Toolbar, choose Filter Toolbar from the View menu. A check mark beside this menu option indicates the Toolbar is currently displayed.
The Paint Toolbar allows you to paint on the current image. The Paint Toolbar provides you with the following tools:
Notes:
Select the appropriate size and shape brush from the Shapes Toolbar when using the Paint tools.
If an area is selected, the Paint tools will apply only in
the selected area.
To display the Paint Toolbar, choose Paint Toolbar from the View menu. A check mark beside this menu option indicates the Toolbar is currently displayed.
The Shape Toolbar allows you to select just the right size and shape of brush for trimming objects or painting on images or applying filters. The brush shapes include eight sizes of round brushes and six sizes of square brushes, with the smallest square equaling one pixel in size.
To display the Brush Shape Toolbar, choose Brush Shape Toolbar from the View menu. A check mark beside this menu option indicates the Toolbar is currently displayed.