Quick-Start Tutorial for
Level Creation
Step
One: Starting A New Level 2
Step Two: Learning
the Camera and Movement In Battlecraft 1942 5
The Three Camera Views and Moving the Camera 5
Step Three: Terrain
Modification. 5
Introduction to the tools and their uses: 5
Accessing The Tools 6
Quickly creating playable terrain: 6
Step Four: Placing
Objects 7
The Object Cache 7
Placing Objects From The Cache 9
Manipulating Objects Once They’re Placed 9
Copying and Pasting Objects 11
Step Five: Placing
Control Points and Soldier Spawn Points 11
Control Points 11
Soldier Spawn Points 12
Step Six: Creating Object Spawn Templates and Using Them 12
Creating an Object Spawn Template: 12
Step Seven:
Painting Your Terrain 14
Generating Surface Maps 15
Step Eight: Finishing Up 15
Introduction:
This guide to level creation is
intended for the novice user. Of course,
there are probably some tips and tricks in here that could benefit even an
experienced user of Battlecraft.
NOTE - to make tips easier to spot, all tips and tricks will be italicized and off to
the right side:
I have done my best to be
completely consistent in my use of terminology; all tools will be referred to
using their tooltip name, and all tools referred to will be in Bold. I am not going to be explaining exactly how
to use tools in this guide; for a complete explanation of all tools and their
functions, read the Battlecraft 1942 User’s Manual.
§
NB: Control-L
is the shortcut key to test your level.
I advise you to frequently use this while creating your map, as the
appearance of things in Battlecraft 1942 is slightly different than in
Battlefield itself.
When
Battlecraft 1942 starts you will be presented with a screen asking you to
choose a mod or create a new one. You
can either choose one of the two default Mods: DesertCombat and GCMOD, or
create a new mod named BF1942, which will allow you to access the original
levels (as well as providing more functionality—see below) or name it something
else entirely. Note that in order to use
the shadow generators and/or use the Test This Level feature, the level
you are working on will have to be in the BF1942 Levels folder—the default of
which is:
C:\Program Files\EA
GAMES\Battlefield 1942\Mods\bf1942\Archives\bf1942\levels
Since it is possible to make
mistakes in level creation that will interfere with the running of Battlefield
1942, it is suggested that you make a backup copy of your Battlefield
installation.
If you choose to create a
new mod, you will be presented with an “Edit Mod Settings” screen. If you are working with a default Battlefield
1942 installation, just hit OK. If you
have it installed to a non-default location, modify the “Game Path” setting to
point to the directory where the BF1942.exe is located.
The
“object list” setting is only for working with a mod with non-standard
vehicles, such as Desert Combat. More
detailed instructions on how to configure Battlecraft 1942 to work with mods
such as Desert Combat are available in another document.

The “Edit Mod Settings” Screen
The first
thing to do when creating a new level is to determine the rough schematics of
the level: how big you want it, whether there will be water or not, which
theater to set it in, and which game rules will apply. These are the only variables that cannot be
changed after the level is created, so take some time to think about exactly
what you want before choosing them.

The “New Level” Screen
It’s
important to note that “Use Water In This Map”
starts off unchecked by default. So, if
you want rivers, lakes, etc. in the map, you must check “Use Water In This Map” here; you will not be able to change
this once the map is created.
After
setting up your level in this screen, you will either go straight to your newly
created level or, if you chose Random Map Generation (above), you will
be taken to the Random Map Generation menu. This can be done as often as you want while
making a level by clicking on “Tools” and selecting “Random Terrain Generator”
from the drop down menu.
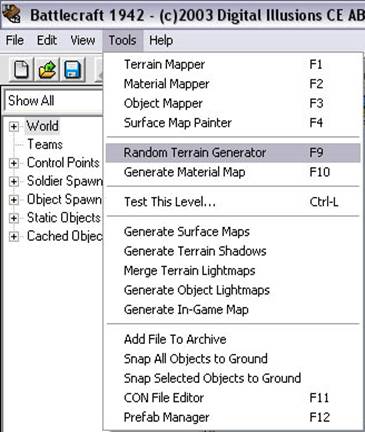
Accessing the Random Terrain Generator tool from the menu
- Choosing “Cancel” From The Random Map Generation Menu Doesn’t
Cancel the level creation, it just cancels the random
terrain. So, a new, flat
map is created with all the other settings in place.
When Battlecraft
1942 first opens a level or creates a new level, the camera defaults to Camera
Fly Mode. There are two other
camera modes; Camera On Terrain Mode, which
snaps the camera horizontal with the surface of the map, and Camera Top-Down
Mode, which provides a bird’s-eye view of the map. The keyboard shortcuts for these modes are O, for Camera on Terrain Mode; I, for Camera Fly Mode; and P, for Top Down
Mode. To move the camera around, use
the arrow keys or W-forward, A-left, S-back, D- right. In order to rotate the camera, hold down the
right mouse button and move the mouse.
In order to zoom in and out when in Camera Top-Down Mode, hold
down the right mouse button and move the mouse up and down.
Now
that you’ve got a level to play around with, it’s time to get the terrain
looking the way you want it to. Now, of
course you’ll want to make little tweaks later, especially to make the terrain
fit more exactly with buildings and other objects that you put down. It’s a
good idea to roughly map out your level’s terrain before you begin adding
anything else to it.
In general we have found that for the
beginning of a map, using the Point Manipulation Tool in conjunction
with the Smoothing Tool is the best way to create hills and
valleys. The Flatten Tool is the
best way to create level areas for bases, but is also the best way to create
rivers and roads. The Raising Tool and
Carving (lowering) Tool, while not as effective or precise as the Point
Manipulation Tool, can be a good way of making realistic-looking
hills. Finally, the Road Tool is
also a good tool for, er, creating roads—though only if the terrain isn’t too
steep to start. In case you just can’t
take the time to read the manual because you’re so gosh-darned excited about
making a level, here’s a brief overview.
The
terrain editing tools are always available through the keyboard shortcuts. Using any of these tool shortcuts will also
change Battlecraft 1942 into Terrain Mapper mode. The shortcuts are detailed at the end of this
section. Once in Terrain Mapper
mode, the shortcut icons for all the tools are available.

The Terrain Mapper and associated shortcut icons
Reading from left to right, these buttons the Point
Manipulation Tool, the Point Auto-Smoothing toggle, the size
modifier for the auto-smoothing, Carve (Lower) Terrain, Raise
Terrain, Smoothing Tool, Flatten Tool, Road tool, and tool size
modifier. The slider bar on the right is
the intensity modifier, which modifies how quickly terrain within the area of
effect is affected by the tool.
The Point Manipulation Tool is one of the trickier tools to master, but quite
useful. Basically, you click on various
points (the intersections of the gridlines in wireframe view) and adjust their
height by either pressing plus and minus or by holding the shift key and moving
the mouse up and down. Holding down the CTRL key allows you to “paint” control points wherever you drag the
mouse—useful for when you want to cover a large area quickly. After you do this to roughly map out high and
low terrain, you should switch to the Smoothing Tool (keyboard shortcut
“B”) to smooth out desired areas.
The
Flattening Tool should
then be used to create level areas for buildings, bases, and vehicles. To use it (keyboard shortcut N), place the mouse on a piece of terrain at the height you
wish to make a level area. Press control
and click on terrain with the desired height.(the
square will turn dark blue while ctrl is held.)
Afterwards, wherever you click will be leveled to that selected
height. This is also a good way of
creating roads.
Keep in mind the following:
- Unsmoothed
terrain causes problems in-game—it may cause soldiers and vehicles
passing over it to take damage, as well as causing problems for
soldiers attempting to crouch or go prone on it.
- The
Wireframe or Textured Wireframe View
is the best views to use when modifying terrain. Use J and L, respectively, to
get to these views.
- You
can use the numbers 1-9 to change the size of any of the terrain
modification tools.
- You
can change the intensity (the speed at which the tool operates)
with Shift + 1-0
- The following shortcuts change
which tool is being used: C
– carve. V-raise. B- smooth.
N—Flatten. M—road
tool. X—toggle
auto-smoothing.
- You can “ undo”
an action by pressing ctrl+Z. This will work in all Mapper Modes
except Surface Map Painter. There is No “Redo”
The
first step in placing objects is to add the objects to your object cache—this
is a list of objects in the level tree that represents all the types of objects
currently placed in the level, as well as all the types of objects that you
have added during your current session.
The object browser is the tool you use in order to add objects to
the cache.
 So once “add new object” is double-clicked on the level
tree (as shown to the left), the object browser opens.
So once “add new object” is double-clicked on the level
tree (as shown to the left), the object browser opens.
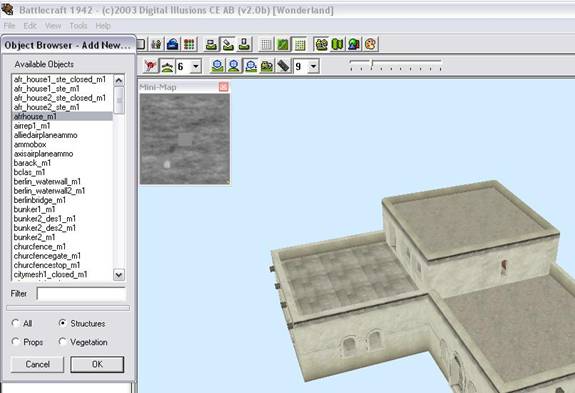
The Object Browser
As you
can see, the Object Browser contains a list of all the peaceable objects
in Battlecraft 1942. When an object is
selected, it gets added to the list of cached objects. The list in the object browser is
filterable—if you enter in “afr” in the filter, only
objects whose names contain the whole phrase “afr” in their names will be
displayed in the list. Likewise, if the
“structures” button is clicked, only structures will be shown in the list.

Example of a Cached Object
So after an object has been selected in the Object
Browser and “OK” has been clicked, the object is then added to the cached
objects list, as shown above.
Once you have objects in your
cache, placing them on the map is simple.
You just click on the specific object and drag it onto where you want to
place it on the map. The icon of the
mouse will change to a stylized house as this goes on. Once the object is placed on the map, it is
also added to the Static Objects list in the level tree. In addition, it will be permanently added to
the Cached Objects list—if you cache objects but don’t place them, they will be
cleared when you open or create a new level.
Battlecraft 1942 contains a very
large number of tools to allow you to modify objects once they’ve been
placed. As well as being able to move
objects, they can also be rotated along all three axes, raised and lowered, and
snapped to the ground. Refer to the
appropriate section in the manual, 8.G, to learn how to use these thoroughly—or
just read the brief summaries below and poke around with them. The main thing
to remember is that, like the terrain manipulation tools, moving the mouse up
and down while holding shift is normally the default method for
manipulation.

The Object Modification Tools
From left to right starting from
the white arrow icon, these tools are the Selection Tool (spacebar to
deselect all, hold down control to select multiple objects) Translation Tool
(to move objects—click on this, then click on where you want the object to
go) Raise/Lower Object (remember that if you have Snap Objects To
Ground enabled, you will not be able to lower anything into the ground) Rotate
X, Rotate Y, Rotate Z, Nudge Tool, Snap Objects To Ground Toggle, Lock Selected
Object, Unlock Selected Object, Lock All Objects, and Unlock All Objects.
- Snap All Objects To
Ground (Tools > Snap All Objects to Ground) is a
useful tool to use if you have significantly changed the terrain
in your level after having put objects down. However, be careful with it—if
you’ve spent a long time adjusting the positions of your bunkers
to be half-buried in sand, using “Snap Objects to Ground” will
ruin them.
- You can move, rotate, etc. multiple
objects at the same time.
Use CTRL+click in order to select multiple objects,
and then whatever tool you select will affect all the objects you
have selected.
- Press spacebar to clear all selected
objects.
- The Nudge tool is the best option when
trying to move objects small distances, and the Translation tool
is better when moving objects larger distances.
Once objects are placed, they can
be copied and pasted. This is the
easiest way to create forests, large-scale cities, etc. In order to use copy and paste, simply hold
down the control key while clicking multiple objects. Once you’ve got all of the
desired objects selected, either select “copy” from the menu or hit keyboard
shortcut CTRL+C. Then press CTRL+V and click where you want to place the objects.
Any new Battlecraft 1942 map
starts out with two main bases (un-capturable bases); One
for each side. In order to place
control points, you must drag from “Drag new control point” to the map,
just like dragging an object from Cached Objects to the map. Once you’ve done this, a new control point
will be placed on the map. Control
points start out with default values—for modifying values,
refer to section 9.D of the Guide. The
one value you probably will want to change is “area value”—see
the tip below. In order to bring up the Edit
Control Point screen, double-click the control point, either in the viewer
or in the Level Tree. See the Tip below
for how to set area value to enable ticket bleed.
Ø
The most important
thing to remember is that Area Value governs ticket bleed on maps (where when
one side holds certain control points, the other team begins to lose tickets
steadily). In order for this to work
correctly, the total Area Value of the points controlled by one team must equal
or exceed 100.
Ø
Also very important: You can’t have more than 7 control points in
any map. 8 or more control points
will make Battlefield 1942 unable to launch.
Ø
The new control points
will automatically be assigned to the base that it is closest to (Axis or
Allied) unless otherwise changed in the Edit
Control Point screen.
In
order to place soldier spawn points, you must drag from “Drag new soldier
spawn” to the map, just like dragging an object from Cached Objects
to the map. A new soldier spawn will
appear, and automatically be attached to the closest spawn point. The soldier spawn has values that can be
modified, just like a control point. To
modify the values of the soldier spawn, refer to section 9.E of the Guide. In order to bring up the Edit Soldier Spawn
menu, just like with control points, double-click on the spawn point,
either in the viewer or in the Level Tree.
You can put as many soldier spawns as you want on your level, up to
1048. Spawn points can be manipulated
just like objects—rotated, lifted up or down, moved, etc. NOTE: Soldier spawns will automatically be assigned to the control
point closest to it.
There’s one little important binary value in the soldier spawn
edit screen. And that’s “SpawnAsParaTrooper”.
If you raise the soldier spawn off the ground, conventional wisdom
dictates that you put a “1” in this field so that the soldiers spawning in the
air will auto-deploy their parachutes.
However, if you want to leave it up to the soldiers to do so—I
personally prefer to pull my ‘chute when I’m an inch away from the ground—then
leave it at 0, and soldiers will spawn in the air, falling.
Unlike
placing static objects, control points, etc, object
spawns require that a template for the spawn point be created before the actual
spawn point. This, however, is also one
of the more fun and powerful tools in Battlecraft 1942.
For
detailed information about the various modifiable aspects of spawn points,
refer to the Guide, section 9.f.
However, if you just want to create some quick object spawns for your
level, here’s how:
Step 1: Click “Add Template” from the level tree,
under Object Spawns. This will bring up
the Edit Object Spawn Template.

The only
really important values here, if you’re in a hurry, are “team 1 object” and
“team 2 object”. This determines what
vehicle spawns when a certain team owns the spawn point. So, if team 1 is the Germans and Team 2 is
the US, and you want to make a light tank spawn template, change “team 1
object” to PanzerIV and “team 2 object” to Sherman. After the template has been created, you can
use it to create as many object spawns as you want—just drag it from the level
tree and drop it on the map.
The other
thing you have to decide about your object spawn is whether or not a control
point will govern it. In other words, do
you want the objects to just spawn all the time, or to spawn only when a
certain control point is held? If you
want to associate the spawn point with a control point, you have to change the
OsID value in the edit Object Spawn menu. (In order to access the Edit Object
Spawn Menu, simply double-click on either the object spawn point itself or the listing for the individual object spawn in the Level
Tree) Once in the Edit Object Spawn
Menu, the OsID is a dropdown menu—just change the OsID to the name of the
control point you want to associate the spawn point with. NOTE: If this value isn’t changed, the object will be assigned to the
control point closest to it.

Now that you’ve got your objects, spawn points, etc in
place and the terrain how you want it, it’s time for the final steps for your
level. For detailed information on this,
go to section 8.F in the Guide. To just
go ahead and paint on the material, switch to the Material Mapper by
pressing the shortcut button on the toolbar.

The Material Mapper
After that,
pick your terrain type from the drop-down menu (the one reading “default” here)
change your brush size with the number next to the paintbrush, and paint
away. Switch between surface views of
your materials by clicking the little orange scroll to the right of the
drop-down material chooser.
§
You can also
“paint” the desired texture over the texture placed in the Material Mapper Mode
by going into the Surface Map Painter Mode. This will not place
different texture, just alter the way the texture looks by making the texture
darker, or lighter, or changing the color, etc. For more on this, refer to
section 8.H in the Guide.
Okay, so you’ve got everything on
your level like you want it: Now you
should generate your surface maps. To do
that, click on Surface Map Assignments, the grid-like shortcut button in
the middle of the toolbar. Choose
“default” and press okay, or select (by clicking on) only those squares you
wish to be have the terrain rendered on.
Then go to Tools > Generate Surface Maps and press okay. This
process will take awhile.
Generate Terrain Shadows
In order to generate Terrain
Shadows, you use a tool found in the same drop-down menu as Generate Surface
Maps. Select Tools > Generate
Terrain Shadows, select “Select all” and press okay, or select just the
squares you want shadows generated on.
After this process is finished, select “okay” to the question “Do you
want to merge terrain lightmaps?”
Generating Object Lightmaps
In order to
do this, make sure that you have the files from the “samples” folder unzipped
and in a new folder named “StandardMesh” in the Battlefield 1942 root
directory. Then, select Tools >
Generate Object Lightmaps. This
process will take longer the more objects you have in the level.
Your map is now ready to go. Save it, distribute it to your friends. Make sure they have it in their BF1942 Levels
directory. Serve it up (making sure
Content Check is OFF) on a dedicated server with content checking off, and play
your little hearts out.
This Tutorial does not cover all
of the functionality of Battlecraft 1942.
For a complete overview of all available functions, please refer to the
Battlecraft 1942 Users’ Guide