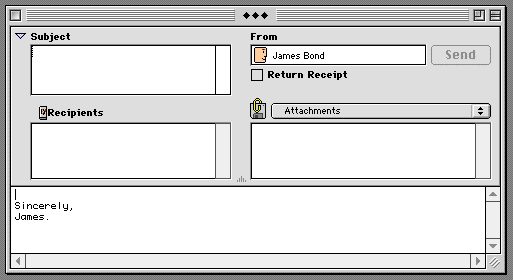
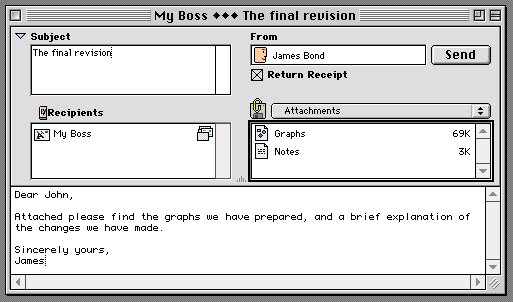
When the CommuniGator application is connected to the CommuniGate Server, you can choose New Message from the
File menu. A new window appears:

The upper part of the window contains the Mailer fields, the rest of the window is used to enter the message text (the message body). The triangle in the top left corner of the message window allows you to close the Mailer and leave more screen space for typing the message text.
The From field in the Mailer contains the message author's address record. When you create a new message, this field is filled automatically using your account name (or the Special 'From' Address, if you have specified one) and the Real Name string from your Personal Info User Settings.
The Subject field contains some plain text. Subject texts should specify the message contents in brief, so the recipients can easily sort and browse messages in their mailboxes.
The Recipients field contains the addresses that the message should be delivered, You add address records to that field using the Address Books panel (see below).
You can also Copy address records from other messages and Paste them into the Recipients field.
The field and pop-up menu in the bottom right corner of the Mailer are used to attach files and server documents to the message, and to set various options.
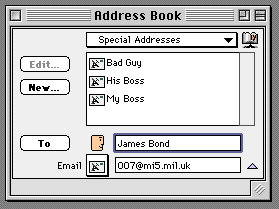
Another way to create a new message is to select addresses in the Address Books window and hit the "To" button. A new window appears with the Recipients box filled with selected addresses. The Address Books window is shown when you select the Address Books command from the Edit menu.
CommuniGate messages can contain styled text with embedded elements like graphics and sounds. When you send a message locally, i.e. to other users of the same CommuniGate Server, messages are transferred "as is", i.e. the styling info, as well as the embedded elements are transferred and can be seen by the recipients. When a message is transferred with a communication module, some information may be lost: the fax module cannot send sounds, and the voice module cannot transfer pictures and styling info. See the communication modules documentation for the details.
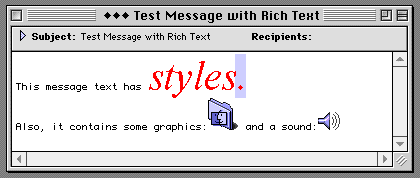
The message text is displayed in the bottom part of a message window. You can use the standard Macintosh technique to enter and modify the message text.
Note: In Station Settings the Display Options can specify the font used for your message text by default, and sets some other text options.
When you type a message, the Text menu appears in the menu bar and allows
you to set fonts, font sizes, font styles and colors.
Note: If a communication module that processes your message does not support
styled text, the message is sent as a plain text.
To insert graphics into a message, use any application to create graphics, copy it on the Clipboard, and then Paste into the message text. You also can insert the contents of a PICT (Macintosh Picture) file into your message text by choosing Insert/PICT File from the Text menu.
Note: If a module that processes your message does not support graphics, the message is sent without the graphic elements.
You can insert audio data (sounds) into a message by choosing Insert/Sound or Insert/Sound File from the Text menu. The Imsert/Sound option is available only if your computer is equipped with some sound-recording hardware. Sound objects are shown in the message text as the loudspeaker icons. By selecting that icon and choosing Play Sound from the Text menu, you can play back the inserted audio data.
Note: If a module that processes your message does not support sounds, the message is sent without the sound elements.
When you add any style information or an embedded element to the message
text, the ![]() indicator appears in the Mailer. If you click that
indicator, a dialog box appears and allows you to remove all style information
and all embedded elements from your message. This can be useful if you want
to make sure your message contains plain text only.
indicator appears in the Mailer. If you click that
indicator, a dialog box appears and allows you to remove all style information
and all embedded elements from your message. This can be useful if you want
to make sure your message contains plain text only.
When you create a new message, the signature text specified in your User Settings is placed at the the end of the message. You can edit it if necessary.
If you compose a message and do not enter anything into the message text,
the signature is deleted from the message before it is sent, so the sent
message has an empty body. In case of fax messages, for example, this allows
to send short notes entered in the Subject field: only a cover page with
the Subject text will be sent.
You should specify at least one recipient for each message you compose. The address records of the message recipients are displayed in the Recipients list. You can use the Address Books panel to specify the recipients. Click the Recipients icon and the Address Books panel will appear on the right side of the Mailer.
Station Setting: if the Auto Open Address Book option is turned on, windows for new messages appear with the Address Books panel already open.
The Address Books panel allows you to type in recipient addresses, and to retrieve addresses from your address books. The address book Local Users always exists. It contains addresses of the users registered with your CommuniGate Server. To send a message to a local user, select the Local Users address book from the panel pop-up menu, then select the recipients name, and click the To button.
To close the Address Books panel, click the Done button, or click the Recipients icon again.
For more information about address books, see the Address Books chapter.
To copy address records from any message, click the address records to select them and choose Copy from the Edit menu. To add the copied address records to the message you are composing, click the Recipients field of the new message to select it, and choose Paste from the Edit menu. You can use the standard drag-and-drop technique to copy address records.
You can remove address records from the recipients list by selecting them and choosing Clear from the Edit menu or pressin the Backspace key.
When you insert addresses into the Recipients list, they are marked as To: (or primary) addresses. If you want to send somebody a "carbon copy" of your message, you should mark that address as a Cc: (or secondary) address. To mark address records as Cc: ones, select them in the Recipients list and choose Cc: from the Recipients menu.
Sometimes you may want to send a copy of your letter to someone without
letting other recipients know about that copy. You use Bcc: addresses for
that. The Bcctype recipients will get a copy of your letter, but other
recipients will not see the Bcc-recipients names in their copies of your
message. To mark addresses as Bcc ones, select them in the Recipients list
and choose Bcc: from the Recipients menu.
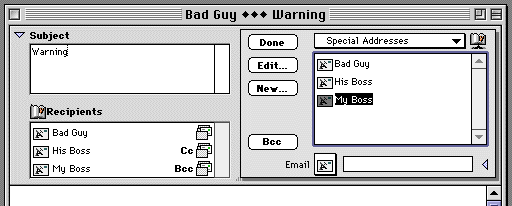
You can mark address records as Cc: addresses when you transfer them from the Address Books panel. If you press the Option key on the keyboard, the To button changes to the Cc button. If you click that button while the Option key is pressed, the selected addresses are inserted as Cc: addresses. If you press both Option and Shift keys, the To button changes to the Bcc button.
If you do not want a message to be sent immediately, you can delay processing of address records. Select addresses in the Recipients list and choose Delay from the Recipients menu. A dialog box appears and allows you to set the delay time. Each address in the Recipients list can be assigned a different delay time.
By default, all address records in the Recipients list are assigned the Regular Priority. You can select address records and use the Recipients menu to assign the High Priority to the selected records. When you submit the message, the system tries to deliver it to those recipients immediately, even if there are other Regular Priority messages in the queue. If you assign the Low Priority to recipient addresses, the message will be sent to those recipients only after all other Regular and High Priority address records from this and other messages are processed.
You can send one or several files attached to your message. Select Attachments in the Options pop-up menu in the bottom right part of the Mailer. The field below the menu displays the list of the attached files.
To add a file to the Attachments list, click the icon on the left side of the pop-up menu. Or you can choose Attach File from the File menu. A dialog box appears and allows you to select the files to attach. After you click the Add button, the name and icon of the selected files appears in the list. Also you can drop file icons from Finder to attach files.
You can remove files from the list by selecting them and choosing Clear from the Edit menu or pressing the Backspace key.
When you send a message, copies of all files you have selected are sent to the CommuniGate Server with the message. Make sure the modules that will process your message support attachments. Some modules do not accept attachments at all, some ignore them, some support attached files of certain types only.
If you click the Attachments list and choose Paste from the Edit menu, the Clipboard icon is added to the list. When the message is being sent, the current content of the Clipboard is attached to the message.
When you often send the same documents (your company data sheets, for example), it is effective to store them in the Documents folder inside the CommuniGate Folder on the Server computer. You can attach those documents to your messages as you attach files, but only the document name, not the file itself is stored in the message when the message is sent to the Server. As a result, submitting messages with server documents is faster, they take less disk space, and all CommuniGate users always have access to the same documents.
To attach server documents to your message, select Server Documents from the Options pop-up menu. Click the icon on the left side of the pop-up menu and a dialog box appears. It contains the lists of the documents stored in the Documents folder on the server. Select the documents you want to attach and their names will appear in the list below the Options pop-up menu.
Before you use Server Documents, make sure that the communication modules
you plan to use support Server Documents.
If you want to get a confirmation when your message is delivered to the recipients, you may want to select the Return-Receipt option in the Mailer.
![]()
When your message is delivered, the recipient mail system generates a special confirmation message and sends it to you. Please note that not all mail systems support Return-Receipts.
Station Setting: if the Request Return-Receipts option in the Send Options is selected, new messages have the Return-Receipt option selected by default.
CommuniGate modules that perform the "final" delivery (fax, pager, printer, etc) generate Return-Receipts when they transfer a message. Modules that work as links to other e-mail systems (UUCP, SMTP, etc) do not generate Return-Receipts, since they do not deliver the message to the final recipient. Instead, the recipient mail system is supposed to generate return-receipts.
Note: Some systems (including most U*ix E-mail systems) generate Return-Receipts when a message is placed into the recipient mailbox, not when the recipient actually opens and reads the message you have sent.
The Mailer Options pop-up menu allows you to assign supplementary attributes to a message. To specify the cover page to be used when faxing your message, select Fax Cover Page in the options pop-up menu and click the icon on the left side of the menu. A dialog box appears and displays all cover pages available on the Server:
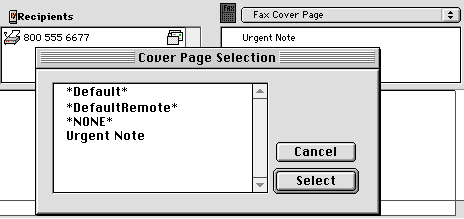
After you select one and close the dialog box, the name of the cover page selected appears in the field under the pop-up menu.
The same method is used to specify other attributes (the Voice System, the Internet Character Set, etc.)
To send a message you have composed, click Send button, or choose Send from the Message menu, or use Command-E key combination. The Send command is enabled if at least one address record is placed into the Recipients field. When the Send operation is completed, the message is submitted to the CommuniGate Server and placed into its queues. The message can be seen in your Out Box. After the message is sent to all its recipients, it is removed from the Server queues, and it is deleted from the server disk. At this moment the message disappears from your Out Box.
Note: if a message is sent to local recipients, it appears in their In Boxes, as well as in your Out Box. Only when all recipients remove your message from their In Boxes, the message is deleted from the server disk and it disappears from your Out Box. If you delete the message explicitly from your Out Box, it will disappear from the In Boxes of the local recipients (the Unsend feature).
Station Setting: if the Keep Sent Messages On Disk option in selected, a copy of the message is stored in the Sent Letters mailbox on your disk. These copies do not disappear when your messages are delivered. See the Mailboxes chapter for the details.
Station Setting: if the Keep Sent Messages On Server option is selected, a message is not deleted from the CommuniGate Server queue even when it has been sent to all its recipients. The message stays in your Out Box until you explicitly delete it. Use this option only when necessary, since it can degrade the CommuniGate Server performance.
You can store a message that has not been completed as a disk file in order to complete and send it later. Choose Save As from the File menu, select Letter in the File Format pop-up menu and store a message as a file anywhere on your disk. When a message is saved, you can close the message window, or you can continue composing the message. You can save it again in some other file using the Save As command, and you can choose Save from the File menu to save the message again into the same file.
Choose Open from the File menu and select a file containing a postponed
message or double click the icon of that file to open it. When it is open,
you can complete the message and send it out.
You can store a message as a template which will be used to create other messages. Choose Save As from the File menu, select Letter Stationery in the File Format pop-up menu and store a message template as a file anywhere on your disk. Later you can open this stationery using the Open command from the File menu or clicking on its icon in the Finder, apply the necessary changes and send it.
Note: The main difference between a letter stationery and a saved letter is that in a message created from a stationery the From address is always one of the the current user; while the From address in a saved letter remains the same as saved.