The real power of cam2pc is to be able to create destination directories for your pictures based on switches.

The benefit of masks is that you start to organize your images as soon as you transfer them to your PC. The available switches allow you to easily format a date in the new name and also have a free text range in it. If you successfully ran the Configuration Wizard then the mask should have been automatically setup. Still, you can tweak the settings defined by the Wizard.
For instance, you could use the following mask: [%Y-%m-%d] %P. The advantage of this mask is that your images will be sorted chronologically in Explorer (see the Image Browser screenshot later).
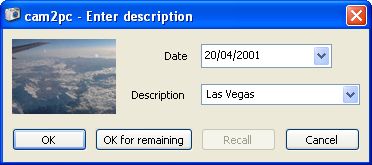
When you transfer your images, %Y will be replaced by the current year on 4 digits, %m by the current month on 2 digits and %d by the current date on 2 digits. %P will be replaced by a text you will be able to enter when you transfer. Of course, each time you transfer new images you will be prompted for a new text for the %P switch. The prompt window looks like:

A thumbnail is displayed so you can quickly identify the pictures you are transferring and set the appropriate description. Unfortunately, most camera makers do not include thumbnails in TIFF images and as these images are very quite big, it would not make sense to transfer the whole image just to display a thumbnail.
Therefore if you transfer pictures on the 23rd of June 2002 that you shot say in Paris, you will enter "Paris" when prompted and cam2pc will automatically create a new folder called "[2002-06-23] Paris".
Most of the time, you will not want to use the transfer date to initialize but the date that the pictures were shot. In that case, you can put all the pictures located on your memory card in the same directory whatever the day they were shot by selecting "Initialize date with first picture date". Of course you will still be prompted for a description if you used the %P switch.
You can also want to group pictures by day of shooting. Select the last option: "Get date for each individual picture". In that case cam2pc will prompt you for a description for each different day of shooting of your images.
You can click the "OK for remaining" button in the prompt window if you want to use the current date and description for all the remaining images. You can also click the "Recall" to re-use the previous day and description.
For instance suppose you shot pictures in Paris on the 23rd and 24th and pictures in London on the 25th, 26th and 27th of June, 2002. Suppose also that you want to put all the Paris images in one folder and all the London pictures in another one. In that case you will enter Paris in the description for the first set of images (23rd). Then when prompted for the images taken on the 24th, click "Recall" and then "OK" as we want to use the same folder. Then for the 25th enter London and here you can click "OK for remaining" as all the remaining images will be put in the same folder. If you used the mask defined above then two folders will be created by cam2pc: "[2002-06-23] Paris" and "[2002-06-25] London".
And thatÆs it, your images are automatically organized for you in folders named with understandable descriptions and all you had to do is to provide those descriptions!
All the available switches appear in the above screenshot. The menu of the screenshot was displayed by clicking on the small arrow button. Each switch is described in the menu.