How to use
- "Getting Started"
- "Configure" menu
- "Download" menu
- "Take" Picture menu
- "Time Lapse" menu
- "About" menu
- Appendix 1 : How to set baudrate to 230Kbps ?
- Appendix 2 : About camera.ini file
- Appendix 3 : How to make serial cable
1 Getting Started
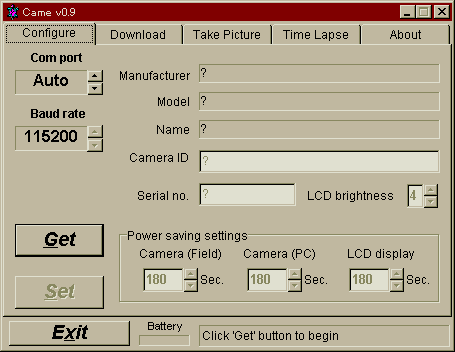
Copy Came.exe and the rest of the included files to the folder of your choice (default is C:\Program Files\Came\), then place a shortcut to Came on your Desktop. Came works as standalone utility, no DLLs or other drivers are needed (be sure that the camera.ini file is located in the same folder as Came.exe). After startup you are presented with the window as seen above.
To get started using Came with your camera you should:
- Turn off the digital camera and connect it to the computer's serial connection as usual
- Turn the digital camera on and set it to the 'take picture' mode
- Click the B:Get button on the Came screen or press ALT-G key
2 Configure menu
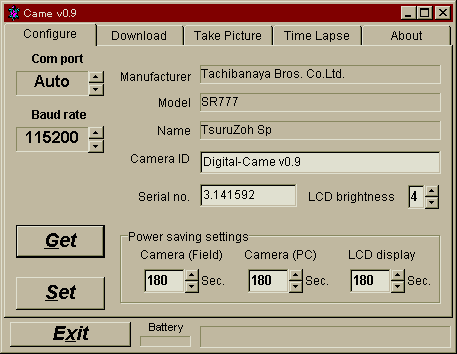
If you click the Get button and the digital camera is properly connected to your computer, then the current configuration parameters will be transferred from the camera to Came.
- A: Com Port
- Shows the serial port number connected to the digital camera.
- B: Baud Rate
- Sets the serial port baudrate (transfer speed). The baudrate is used only for picture downloading. The other operations use 19200bps. In most cases, setting the baudrate to 115200bps will not cause any problems. If you have problems downloading pictures, set a lower value. If you have a High-Speed serial adapter then you're lucky because you can set baud rate to 230400bps. See Appendix 1: for more information.
- C: Manufacturer
- Shows the Manufacturer of the digital camera.
- D: Model
- Model code of digital camera. Came.exe uses it to recognize what digital camera is connected to the serial port.
- E: Name
- Model name of digital camera. If this column doesn't show your camera's model name, you should add your model's information to camera.ini file. Details are described at Appendix.2.
- F: Camera ID
- I.D. of digital camera. I recommended setting camera's name and your name as shown in the above example.
- G: Serial No.
- Serial number of digital camera. Default value is '#00000001', I recommended setting the actual serial number of the camera.
- H: LCD Brightness
- Set Liquid-Crystal-Display brightness. It can set from 1 to 7. The default is 4.
- I: Set Button
- Writes the configuration parameters to the digital camera, then sets the computer clock time to camera clock time.
Notice: configuration parameters are not changed until the "Set" button is clicked or ALT-S key pushed - J: Camera(Field) Power Saving
- Sets the time before the camera goes into powersave mode during picture taking. It can set from 0 to 600 seconds by 30 second increments.
- K: Camera(PC) Power Saving
- Sets the time before the camera goes into powersave mode when the camera is connected to the computer. It can set 0 to 600 seconds by 30 second increments.
- L: LCD Display Power Saving
- Sets the time before the camera goes into powersave mode while displaying pictures. It can set form 0 to 1800 seconds by 30 second increments.
- M: Battery Level Indicator
- Shows the battery level. At low battery levels, the background color of "Battery" letter becomes yellow.
Note: If NiMH rechargeable batteries are used the camera will shutdown within a few minutes after "low battery" is displayed.
After all parameters are set, click the I: Set button or press ALT-S key. Came will then write the configuration parameters to the digital camera.
Note: Compression ratio setting is in the Take Picture menu.
3 Download menu
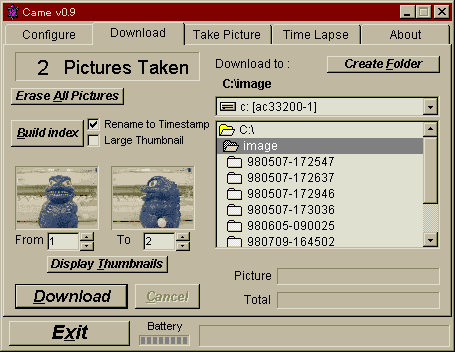
- A: Pictures Taken
- Show how many pictures have been taken during the current session.
- B,C: Download to
- Selects the drive and folder to which pictures will be download. As in the above example, double click "Folder" and 'Open' your selected folder. In this case, the selected folder is "F:\image". Under this folder, Came creates sub folders using the naming format 'YYYYMMDD-HHMMSS' for each folder created.
The Download folder name is saved to the 'came.ini' file when you terminate the Came program.
- D: Create Folder
- Click this to create a new folder. A dialog box like the example at the right pops up. Enter the folder's name then click 'OK'.
- E: From / F: To
- Sets download start / end picture number.
- G: Display Thumbnails
- Displays thumbnail of download start / end picture.
- H: Download
- Starts downloading. Pictures designated by E:From / F:To in the digital camera will be download.
- I: Cancel Download
- Cancels the downloading process.
- J: Picture
- Shows the progress of the download session for the current picture file.
- K: Total
- Shows the progress of the download session for all the pictures chosen to be download.
- L: Build Index, M: Rename to Timestamp, N: Large Thumbnail
- Creates thumbnail images, detailed picture information and HTML index of all sub-folders under selected by B,C:Download to:. If the L: Rename to Timestamp box is checked, all picture files will be renamed to thetime they were originally taken. If the M: Large Thumbnail box is checked, thumbnail view of images will be enlarged from normal 80x60 pixels to 160x120 pixels.
Notes 1: This function will work without having the camera connected to the computer.
Notes 2: If you have added or removed pictures to sub-folders and want to re-build its index, simply remove index.html from desired the sub-folder and press K:Build Index again.
Notes 3: Most HTML viewers (e.g. Netscape, Internet Explorer) can't display TIFF images. To display TIFF images, visit the Apple Computer web site and download Quicktime3.0 runtime. After installing it, open the Quick Time property window from the Control Panel, select File Type Assiciation, then select the Internet file types check box. All thumbnail images will be displayed without using Quicktime because Came.exe can convert the thumbnails to JPEG images.
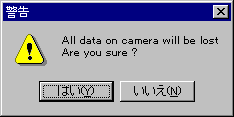
- O: Erase All Pictures
- Erases all pictures stored in the digital camera. A dialog box as seen at the right is shown, click 'Yes' to erase all pictures.
Note: If you're using a large capacity flash memory card the erasing process can take over 30 seconds.
4 Take Picture
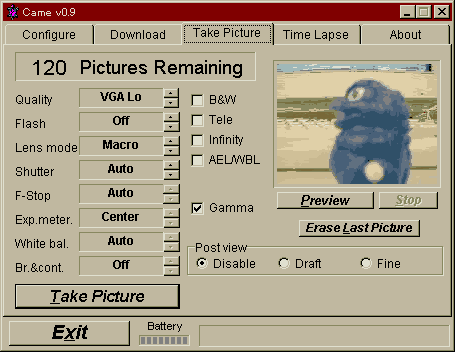
Notes 1: Modes C to M below can't be changed or will not appear if your digital camera doesn't support that particular function.
Notes 2: Some digital cameras ignore mode setting changes by Came when the camera is set to 'Manual' picture taking mode (user setting). To avoid this, set the camera to 'Auto' mode.
- A: Pictures Remaining
- Shows how many pictures can still be taken at the current quality mode.
- B: Quality
- Sets the picture quality mode. When changing this setting, the number of 'Pictures Remaining' also changes to match the mode.
- C: Flash
- Sets the flash mode. Auto: Automatically activate, On: Flash for all pictures, Off: Flash off, Red Eye: Auto with Red-Eye reduction.
- D: Lens Mode
- Set lens mode. This sets the lens to Normal or Macro mode. Some digital cameras can also be set to Wide or Fisheye.
- E: Shutter
- Sets shutter duration. Warning:If you set shutter duration and your digital camera doesn't support manual F-Stop adjustment, the camera sets the F-Stop to fully Open (lowest value of F-Stop).
- F: F-Stop
- Sets Lens focal ratio (F-Stop). Open means lowest value of F-Stop, Close means highest.
- G: Exp. Meter.
- Sets exposure measuring method. Multi-Seg.: measures multiple areas of the frame and adjusts exposure (matrix). Spot: measures only the center of the frame. Center: measures entire frame but weighted to the center.
- H: White Bal.
- Sets the white balance adjustment. Auto: automatic, Skylight: sets the camera to sunlight, f.l.: sets the camera to fluorescent light, tungsten: sets the camera to tungsten (incandescent) light, cloudy: sets the camera to overcast conditions.
- I: Br.&Cont.
- Set brightness and contrast.
- J: Tele
- Digital-Zoom mode. Sets the camera to Digital-Telephoto mode. The center of the frame (640x480 pixels) is enlarged to full-frame. It seems equivalent to 2x zoom. Most digital cameras, if digital-tele mode is on, the Quality setting goes to SQ(VGA). If the Quality mode is then set to HQ or SHQ(SVGA), digital-tele mode is turned off.
- K: B&W
- Sets the camera to Black & White mode.
- L: Infinity
- Sets the focus to infinity position.
- M: AEL/WBL
- Locks the Exposure and White balance to the first picture taken after this checkbox is marked. Mainly used for panorama picture taking so that all photos in a set are taken at the same exposure settings.
- N: Start Preview O: Stop Preview
- Shows a preview of the image to be captured. Preview mode stops after Camera (Field) Power Saving time passes (see: "Configure" menu) or the user clicks the stop button. Some cameras can't show B&W images in preview mode, but can still capture B&W pictures.

- P: Take Picture
- The shutter-release button. If the "picture remaining" number is zero, the dialog box at the right is shown. In that case, erase a picture or change the media card.
- Q: Gamma
- Most digital cameras use 1.8 for the display gamma value (brightness of display). 1.8 is the standard value for Macintosh computers, but most Windows computers use 2.2 to 2.5, so the pictures appear darker than the actual image. If you check this box, preview and postview images are compensated to 1.4 of gamma so they look more like the actual image.
Note: This function doesn't modify the actual image file. It only adjusts the display gamma. I recommend adjusting the image gamma using photo editing software after downloading the image file.
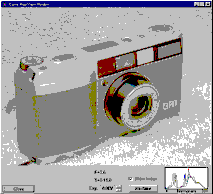
- R: Postview
- After taking a picture the Postview shows the image captured. It can be set to draft mode or fine mode.
In draft mode it shows a 2x magnified thumbnail image. It's not clear but very fast. Please use it to check framing or flash lighting.
In fine mode the image appears in a postview-window as in the example to the right. In this mode, it actually downloads the picture just captured and displays it in a 640x480 pixel window. If you've taken picture at SXGA mode, it takes 10~30 seconds to display.

A: shows exposure information
B: shows histogram of picture.
At the bottom of the Postview window you can change the following settings
C: Exp. Use this to adjust the exposure EV setting by 0.33EV steps. After changing this setting, click
E: Re-Take to recapture the picture with the new settings. If you only need to do some exposure bracketing, clear the
D: Show Image box, then Came won't download the captured pictures which will speed up the bracketing process. Even while the postview-window is active, the Came main-window is active as well and can be used to change camera settings.For example, if you want to take SXGA pictures with exposure adjustments, this is the fastest way. 1:Take picture at VGA mode with fine-postview. 2:Adjust exposure with retake the picture. When the settings look good, 3:Change quality mode to SXGA at Came main-window 4:Click the re-take button in the postview-window.
Note 1: Most digital cameras have a shutter speed range of only about 1/4sec. to 1/500sec. While using exposure adjustments it is possible that the camera's shutter speed can be pushed out of range. In this case, Came shows a red color for the shutter speed display.
Note 2: Only a few cameras can adjust the focal ratio (F-Stop) setting. If your digital camera does not allow the user to adjust the f-stop and you change exposure adjustment, the F-Stop will be set to force Open automatically.
Note 3: Some digital camera can't adjust exposure adjustment in the "plus" direction.
Note 4: When you use the flash, the shutter speed is fixed at 1/30 second. In this case, a change in the exposure adjustment will turn off the flash (unless your camera supports slow-sync. mode).
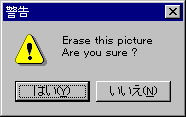
- S: Erase Last Picture
- Erases the last taken picture. After clicking this, a thumbnail of the last picture taken is first shown and a dialog box like the one at the right is displayed. After confirming that you wish to delete the picture click 'Y' to erase the file.
5 Time Lapse
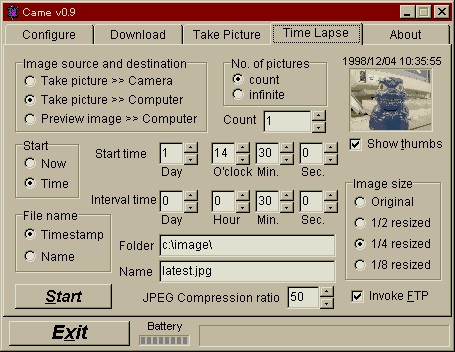
- A: Image source and destination
- Selects image source and destination. there're two image source, take picture as usual or preview image. If you select 'take picture', set image quality and picture mode at 'Take Picture' menu. 'preview' image is fixed size, 160x120 pixels and very low quality. But it's very fast to take and you can take preview without flash memory. It's usefil for webcam.
And two image destination is available, digicam's flash memory or computer's storage (Hard drive, Floppy, Zip etc.). Maximum number of picture is depends on your storage capacity. If you choose 'take picture >> computer', CAME takes picture as usual, transfer image to computer, then erase it from digicam's flash memory. You can take over million of pictures if you have plenty of storage space but it takes more interval time for transfering each images everytime.
- B: No. of pictures
- Sets number of pictures you want to take. If you select 'infinite', CAME will take until storage is exhausted or cancel button is pushed.
- C: Start
- Select Time Lapse starting mode. If you select 'Now', time lapse starts immediately. If you select 'Time', set the start time by 'start time' column. Day column in start time means the day after today. 0 means today, 1 means tommorow. If you set the time before current, CAME starts as you selected 'Now', immediately.
- D: Interval time
- Sets Time Lapse interval. Upto v0.8 of CAME, interval means the time of 'Take picture complete' to 'Next command start', it was vary by command execute time. From v0.9, CAME works by computer's real-time clock based. If you set 15 second, CAME takes picture almost accurate interval of 15 second. If you set the smaller time than minimun interval time, CAME takes picture contigiously. Minimun interval time you can set is vary by picture taking mode and data storage mode. Here's a sample of minimun interval of my Olympus C-840L(D-340L in US), 115Kbps connection, w/o flash.
Mode SQ(640x480) HQ(1280x960) SHQ(1280x960) Take picture >> Camera 6 sec. 9 sec. 10 sec. Take picture >> Computer 16 sec. 30 sec. 48 sec. Preview image >> Computer 5 sec. (160x120) - E: Show thumbs
- Show thumbnail image after taking picture, and displays date/time information.
- F: File name
- If image destination is computer, you can select the image naming method. If you choose 'Name', image will be stored to Folder of 'Folder' column and overwritten by name of 'Name' column. This mode is used for webcam(live camera). If you choose 'Timestamp', every image will stored by name of the timestamp, YYYYMMDD-HHMMSS.jpg format. The latest image is also copied to name of 'Name' column, you can do webcam with 'Timestamp' mode.
- G: Image size
- If you want to reduce traffic at webcam or reduce storage capacity, you can resize image before store it. You can select 1/2, 1/4, and 1/8. And you can select JPEG compression ratio while resizing image. If you're using CAME as webcam, compression ratio 50 is enough quality. Please notice that if you resize images, all the picture taking information (except timestamp) will be lost.
- H: Invoke FTP
- CAME executes FTP after image transfered. CAME uses Microsoft Windows' standard command, ftp.exe. If you want to do FTP, you should place the file 'ftp.ini' at the folder which image stores. This is a tiny description of sample ftp.ini file. For more details, Press Start-Button of Windows, click 'Help', type ftp, select 'ftp commands'.
open AAAAA enter your FTP host to AAAAA user BBBBB CCCCC enter your name to BBBBB, password to CCCCC bin select binary transfer mode cd EEEEE/FFFFF enter the directory name of FTP server put GGGGG enter the file name to transfer Notice:be sure to set the same name of CAME's 'Name' column. Problem may occure if you use over 8 character length of filename, or over 3 character length of extension. quit terminate operation
6 About
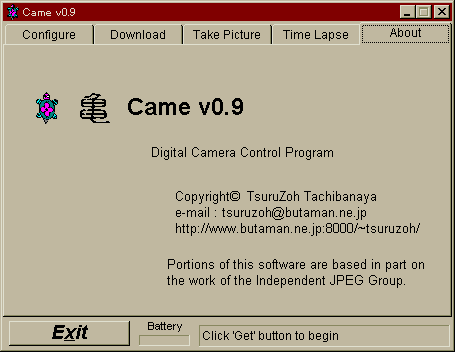
Shows the version and copyright information of Came.exe.
Appendix 1 : How do I set the baudrate to 230Kbps ?
Most digital cameras support 230400bps, but basically AT clones support only up to 115200bps. If you're lucky, you can might be able use 230400bps transfer.Some motherboards use the SMC I/O chipset. Please check your motherboard for this chipset (it may be located near the serial I/O connector), to see if your chipset is one the ones listed below:
ALI:M1543(Aladdin V south bridge)
NS:PC87308/PC87307/PC87317/PC97307/PC97317/PC87309/PC87338
SMC:37C665IR/37C666IR/37C669/37C669FR/37N769/37B72x/37B77x/37B78x/
37B80x/37C67x/37C68x/37C93x/37C93xAPM/37C93xFR/37M60x/37M61x/37N958FR
WinBond:W83877TF(TF only, A/F/AF not supported)/W83977F/W83977AF/W83977TF/W83977ATF
If it is, then you're lucky ! You can use 230400bps!
If you don't want to open your computer, there's a free software program to detect the SMC chipset. For details, please refer to
Mr. Gigo's webpage http://www.os.rim.or.jp/~gigo/over115K/index_e.html .
Here's a freeware serial driver patch for these chipsets.
Appendix 2 : About Camera.ini file
Came.exe can handle many brands and models of digital cameras. Each camera has a set of unique functions, so I created the camera.ini file. It contains each digital camera's characteristics which are used by Came.exe.
Came.exe refers to camera.ini when you push the Get button. If the Name window of the configure menu doesn't show your camera's model name, or if some parameters described in the camera.ini are incorrect, you should edit camera.ini.
Warning: Normally, you should NOT have to modify the camera.ini file. If you add invalid parameters to the camera.ini file it is possible, in a worst case scenario, that your digital camera may hang-up and won't recover.
The camera.ini file is a plain text file. You can use a text editor such as Notepad.exe to edit it. For example, C-840L/D-340L's description is listed here:
  [sr83]
  Name=OLYMPUS C-840L / D-340L
  Quality=SQ,HQ,SHQ
  Flash=Auto,On,Off,RedEye
  Lens=Macro,Norm
  MinShutter=2000
  MaxShutter=500000
  TeleMode=Yes
  BwMode=Yes
Below are all the possible entires for any camera in the camera.ini and a description of each of the parameters. You don't need to create entries and values for functions which are not present in your digital camera.
| Param. | Desc. |
| [%] | Digital camera's model code. This line MUST be placed at the first parameter. When you push Get button, Model column in configure menu shows this value. Copy it to here. |
| Name= | Digital camera's manufacturer and model name. Name column in configure menu displays this value. |
| Quality= | How many recording quality modes are supported. Default value is 2 modes, SQ/HQ. |
| Flash= | How many flash modes are supported. Default value is 3 modes, Auto/On/Off. |
| Lens= | If your digital camera has different modes for the setting of lens, they are described here. Default value is 2 modes, Macro/Normal. |
| MinShutter= | Minimun shutter duration in microseconds. EXAMPLE: If your digital camera's fastest shutter speed is 1/500 second, 1,000,000 / 500 = 2,000 is your value. Default value is 2,000 = 1/500 second. |
| MaxShutter= | Maximun shutter duration in microseconds. If your digital camera's slowest shutter speed is 1/2 second, 1,000,000 / 2 = 50,000 is your value. Default value is 12,500 = 1/8 second. |
| TeleMode= | If your digital camera has digital-zoom mode, write Yes. Default value is No. |
| BwMode= | If your digital camera has black & white mode, write Yes. Default value is No. |
| FStop= | If your digital camera has manual control of lens focal ratio (F-Stop), enter it here. Default value is Auto only. |
| ExpMetering= | If your digital camera has manual control of exposure metering method, enter it here. Default value is Center Weighted only. |
| WhiteBalance= | If your digital camera has manual control of white balance correction, enter it here. Default value is Auto only. |
| BrightContrast= | If your digital camera has brightness and contrast setting, enter it here. Default value is Normal only. |
| Infinity= | If your digital camera has long distance fixed focus mode, write Yes. Default value is No. |
| AelWbl= | If your digital camera has manual LOCK feature of AE and Whitebalance, write Yes. Default value is No. |
| ShutterControl= | If your digital camera has NO manual shutter speed control feature, write No. Default value is Yes. |
| PreView= | If your digital camera has NO preview function, write No. Default value is Yes. |
| PowerSaving= | If your digital camera can't change powersaving time, write No. Default value is Yes. |
Appendix 3 : How to make serial cable
Here's a serial cable diagram for some digicams.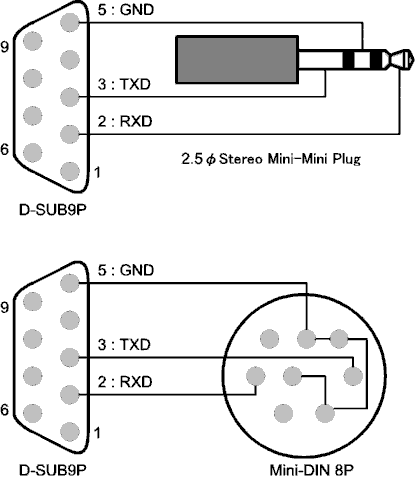
History
v0.9 1999/04/06
- Add: Time Lapse page
- Add: FTP feature
- Add: Nikon rejection
- Mod: Real-time based time lapse picture
- Mod: Changed the method of "erase last picture"
- Bug: Came didn't work with Epson PhotoPC550
v0.8 1998/11/11
- Add: Most of functions can now be controlled with the keyboard
- Add: Camera function management file (camera.ini)
- Add: Picture information data added to thumbnail view
- Add: Large Thumbnail mode
- Add: Shutter and F-Stop controll
- Add: Olympus C-1400L/C-1000L/D-600L/D-500L support
- Add: Uncompressed TIFF image format support
- Add: Thumbnail display of download start / end picture.
- Mod: Now Came won't rename image file if there is no time/date information in it
- Bug: Image handling routine was changed from v0.7, maybe more stable
- Bug: Came can't take over 60 minutes of Time-Lapse interval
- Bug: Came did't work at high baudrate with some digital cameras (e.g.VPC-G200)
v0.7 1998/09/08
- Add: Download Start / End picture number
- Add: Adjust downloaded picture's timestamp to actual taken time
- Add: Create thumbnail/picture info/html index while downloading
- Bug: Can't create folder to drive's root
v0.6 1998/08/02
- Add: Battery level indicator
- Add: Camera type check for some old models
v0.5 1998/06/28
- Add: Fine mode PostView
- Add: Display gamma correction
- Add: Anonymous digital camera support
- Modify: Appendix1
v0.4 1998/06/20
- Add: 230400bps serial transfer
- Add: Manufacturer information
- Add: Erase all pictures
- Add: List display of download folder
- Add: Cancel downloading
- Add: Realtime preview
- Add: Digital zoom
- Add: Postview
- Add: Erase last picture
- Add: Time lapse
- Add: Anonymous digital camera and its extended function support
v0.2 1998/06/06
- first release
Copyright and Notice
- Came is free software, sometimes referred to as "Freeware." All rights reserved.
- You may not distribute modified packages of Came, and may not distribute Came for profit without the specific written permission of the author (TsuruZoh Tachibanaya).
- There is no warranty expressed or implied for Came. The author supplies this software whereis/as is. The author will not be held responsible for any damages that may be caused by using this application. You use this software at your own risk.
- All trade names mentioned in this document are trademarks or registered trademarks of their respective holders.
- During the development of this software, I referred to Description of the protocol written by Eugene Crosser.
- Portions of this software are based in part on the work of the Independent JPEG Group.
Thanks to Randy G. at the Feather River Canyon News for helping with the English documentation.
TsuruZoh Tachibanaya
tsuruzoh@butaman.ne.jp
http://www.butaman.ne.jp:8000/~tsuruzoh/
Came.exe README Apr.06,1999 Copyright(c) TsuruZoh Tachibanaya