![]()
![]()
|
Here, we will explore how Gimp allows you to make advanced selections using the commands in the Select menu. |
Creating Selections
|
|
Toggle
InvertUse All And None
You may also want to use this command to select an entire layer (with Keep Trans. unchecked) if you want to fill all of it with paint and discard the objects in it.
FloatUse Moving it like this will change the position of the selection, at least a little bit. The effect will be even more obvious if you took the float from the background, so a "hole" now exists in the background image where the float used to be. Read more about floating selections in "Channels And Duotones" starting on page 351. | |
Adjusting Selections
|
|
Sharpen
Use Sharpen when you change your mind about feathering a selection. Perhaps more commonly, use Sharpen when you have added a fuzzy fill and want to enhance it by making a sharp fill or paste inside of the fuzzy one (a sharp selection is always smaller than a fuzzy selection). Border
Border is useful for applying special effects to text, or when you want to make drawings or frames from selections. The Difference Between Border And StrokeThe effects of A Border selection has fuzzy edges by default, the more so the wider the border is. This means that you may sometimes have to use Sharpen on the border before filling it, to remove unwanted blur effects. Feather
On the Feather dialog you select how much you want to feather the selection by. A low value produces a selection with a bit more softness to the edge than usual. The maximum value produces a very fuzzy selection; it will be so soft that you can fill it with patterns, then with colors, and then paste images into it, and all these things will blend together. If the Keep Trans. checkbox on the Layers & Channels dialog is checked, filling or painting within the selection will only affect areas that have an alpha value greater than zero (i.e., that are not fully transparent). Feathering reduces the detail of the selection's shape. Edge detail disappears in a fuzzy fog, and a hand-shaped selection with fingers will look like a softball mitt at best. You can use this to your advantage if your selection isn't as smooth as you'd like. Use Feather to smooth, use Grow to make the selection a little bigger (compensating for the loss in size from feathering), and lastly use Sharpen. Grow And ShrinkGrow and Shrink allow you to modify the size of the selection by a specified amount. If the selection edge has fine details, they will disappear if you shrink or grow too much. If you want your selection to be bigger or smaller, but otherwise look the same, you should instead save the selection to a layer and apply the Scale Layer command from the menu you get by right-clicking in the | |
Special Selection Commands
|
|
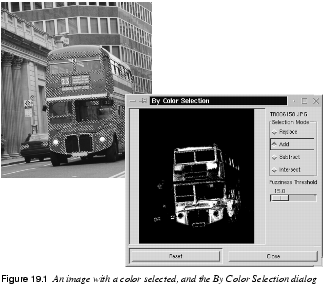
Save To ChannelIf you are working with a complicated image, you should use By ColorSelect By Color is a very advanced tool. You can use it to modify an existing selection, or you can create entirely new selections with it. This tool is based on color, but it works fine for grayscale or indexed images. Click on By Color to display the By Color Selection dialog. Click on an area in your image. All pixels with that color or a similar color will be selected. |
|
|
|
|
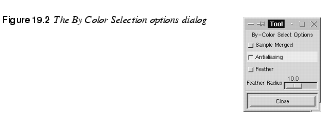
The Fuzziness Threshold slider lets you control how generous the "similarity" classification will be. A low Fuzziness Threshold value selects only pixels of that exact (or nearly exact) color. A high Fuzziness Threshold value accepts many similar shades/colors. While you are selecting by color, you see a grayscale representation of your current selection in the By Color Selection dialog. This preview works just like an alpha channel. White parts represent solid selections (opaque), gray parts are for more or less feathered selections (semi-transparent) and black areas represent unselected areas (wholly transparent). Selection ModesThe four Selection Modes are Replace, Add, Subtract and Intersect. · Replace is the standard mode, and also the most important one. Use Replace Mode to choose the basic color range for your selection. If you are not happy with the basic selection, you can click on another place in your image to select a different spot, or change the Fuzziness Threshold value and then click on another spot. · Add and Subtract are used to modify the basic selection. Click on the Add radio button and then click on an unselected part of the image and the new color or color range will be added to the selection. · Subtract will deselect areas of unwanted color from your selection. Click on the Subtract radio button and then click on areas in your image to remove them from the selection. · Intersect is a little trickier to understand. Intersect chooses areas of intermediate color between the original selection color and an adjacent color that you click on. If you click on a color that isn't directly adjacent to the original selection in the image, you'll end up with no selection at all. Using Intersect usually results in selecting thin, antialiased edges between different shapes. OptionsWhen you're using select By Color, you can see its Tool Options dialog by clicking on |
|
|
|
|
If you click on the Sample Merged option, you base the color selection on the entire composite image instead of just the colors in the active layer. This is useful if the active layer is slightly transparent or has another layer mode than Normal. Then, the colors of the composite image will be different than the colors present in the active layer. The Antialiasing checkbox is checked by default. If you uncheck it, the selection will become sharp with absolutely no feathering. The Feather option is quite interesting. Watch the selection preview window closely when you select with this option. You'll create soft cloudlike selections with Replace, and lightning or metal highlight effects with Intersect. Feel free to experiment with the Feather option checked. The results are always interesting. If you like the grayscale selection preview and want to work with it as an image, you can save it using the Save To Channel command, and then copy and paste that channel to a layer. |
|
![]()
![]()
| Frozenriver Digital Design http://www.frozenriver.nu Voice: +46 (0)31 474356 Fax: +46 (0)31 493833 support@frozenriver.com |
Publisher Coriolis http://www.coriolis.com |