Using Objects
Adding Objects
Adding objects to the Dia canvas can be accomplished by clicking on the desired object in the toolbox to select what you want placed on the canvas. Clicking on the canvas will then place the object on the canvas.
Dia provides two types of objects:
User-defined objects allow a user to create their own objects, which are based off of a prefabricated template.
For example, clicking on the square object and placing it on the canvas, creates a square. However, the dimensions of the object can be changed. See the Resizing Objects section for more information.
Pre-defined objects are mostly designs which cannot be edited. They can be resized, but the object itself cannot be edited.
Moving Objects
When an object is inserted into the canvas, the desired object will appear with small green boxes defining the borders.
The area inside the boxes is the object area. Click and hold on the object area. Then move the mouse around, inside the canvas, to move the object to another place on the canvas.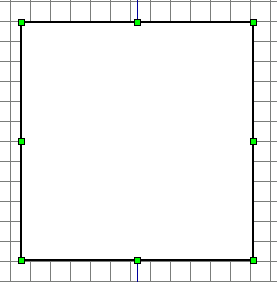
Resizing Objects
The previous paragraph, explains the concept of the green boxes. These are used to manipulate the size of the object. To change the size, click and hold on a green button. Drag to the respective size, then let go.
The corner green buttons will change both height and width at the same time. The two on the top and bottom edges, in the center will edit height while the two on the left and right edges, in the center will edit width.
 | To drag with the corner buttons, but keep proportions, hold the shift key while resizing. This only applies to the special objects, not regular shapes. |
Deleting Objects
To delete an object, click on the object to select it. The green boxes will appear. Hit Ctrl+D and the object will disappear.
Line Properties
One of Dia's objects is the line. The line object is symbolized by the following icon:
Line Styles
Lines can be easily edited to easily create items such as arrows. At the bottom of the toolbox is 3 buttons with lines through them. Clicking and holding will open up a menu which demonstrates what the change will look like.

Lines can employ different style types such as:
Solid
Dashed
Dash-Dot
Dash-Dot-Dot
Dotted
Line Thickness
The thickness of lines can be edited by clicking on the five thicknesses to the right of the color selector.
Arrows
The line tool can be used to create arrows. By clicking on the two side buttons on the bottom of the toolbox, a menu pulls out showing the possible beginning and end designs for the arrows.
Line Colors
The line color can be edited by double-clicking on the line once it has been placed on the canvas. A window will show up. The second line is labeled as "Line Colour" with a bar demonstrating the selected color. By clicking on the bar, you can change the color of the line.