(C) Petter Schau in 1996/1997/1998. (pschau@online.no)
Programming contributions also by:
(C) Roman Dolejsi 1997
(roman@sorry.vse.cz)
(C) David Voracek 1997
(assassin@paru.cas.cz)
(C) Rainer Sinsch 1998
(sinsch@stud.uni-frankfurt.de)
Please refer to the credits section for
a detailed description of contributions to the emulator.
You are allowed to use this program for free.
Free distribution is allowed with some restrictions described below.
This program is freely distributable as long as the content of this archive is intact and unmodified, and no profit is being made from the distribution beyond the price of the distribution media itself.
Redistribution will not change the conditions under which this program is used and distributed.
Inclusion in collections on CD-ROM with other freely distributable software is allowed.
Distribution in violation of the no-profit principle requires permission from the authors of this program.
The emulator is provided "as is", to be used on your own risk. There are no expressed or implied useability for this program, and no obligations for the author to provide support or repairs in any ways if problems arise.
By using this program, you agree that the author can not be held responsible for any problems arising from the use of this program. This is experimental software used at your own risk.
The above conditions also applies to the source-code archive for the
emulator.
Additional conditions for the source-code for the emulator are:
You can modify it as much as you want for personal use.
If you change or add something that will be useful for others, we'd really like it if you sent us a patch so it can be included in the official source-tree.
Inclusion of parts of the source-code in other freely distributable
software is allowed as long as the authors are notified first and
credited for the work.
"AMIGA", "AmigaOS", "Kickstart" and "Workbench" are registered trademarks
of Amiga International. Other trademarks mentioned are held by their
respective owners.
The Commodore Amiga 500 model was used as a reference Amiga system when creating the Fellow Amiga Emulator, and the default emulator configuration aims at providing the speed and feeling of this particular Amiga system to your PC.
Fellow is also highly configurable, advanced features can be enabled to provide more powerful capabilities that surpasses those of a stock Amiga 500. It is strongly adviced to read the feature summary so you can get familliar with the strengths and limitations of the emulator.
The Amiga 500 computer was first released in 1987 as the successor for Amiga 1000. It served for many years as the entry-level and the most popular member of the Amiga computer system family. With its rich multimedia capabilities thanks to several co-processors devoted to the generation of fast graphics as well as 4 channel sample-based stereo sound, it soon became a popular platform for games and demos. The advanced multimedia capabilities combined with a multi-tasking, window-based operating system made the Amiga well ahead of its time for a home computer.
Even though it is now well beyond 10 years since the release of the first Amiga, emulation of the early Amigas is still very demanding on present day computers, at least a Pentium CPU is required to run at original speed. It is especially the sheer amount of graphics processing and simply managing the interaction of the many sources of activity in the Amiga hardware architecture that consume the major part of the processing time.
The Fellow Amiga Emulator was created by Petter Schau, the first public
version was released in December 1996. Leading up to the release there
were several years of curious experimentation with methods to do fast emulation
of selected parts in the Amiga hardware. Today it is a mostly complete
software emulation of an Amiga 500 and beyond, also thanks to the contributed
works of several other people.
Without VBE 2.0 support, most screen resolutions will not be available to you when you run Fellow!
Fellow is quite CPU intensive, and should you wish to run graphics-intesive
Amiga programs at the intended "real Amiga" speed, you will require somewhere
between a Pentium 133 -> 166 CPU and a fast PCI/AGP video card, other factors
like RAM speed will also influence your results (keeping in mind that DIMM
RAM is 10ns, compared to standard EDO/Non EDO SIMMs which operate at 60ns
and 70ns respectively).
The correct way to obtain this file is to copy this software from the
Amiga you own, or buy the Amiga
Forever CD from Cloanto which
contains licensed Kickstart ROM images and Workbench software ranging from
V1.0 to V3.0 prepared for immediate use with the emulator.
CLI> transrom >RAM:kick.rom
Will copy the Kickstart ROM chip and write it into a file in RAM: called
"kick.rom". That file must then be copied to the PC and into the
Fellow directory (although it may be called from a different directory).
A disk-image is a file in which the data normally stored on a floppy-disk is collected.
A PC's floppy drive cannot read an Amiga floppy disk, so to be able
to use Fellow, you NEED a disk image of a real Amiga disk.
Transdisk is run from the AmigaDOS shell prompt, and will copy a floppy disk, track by track, into a file (which can be read by Fellow).
CLI> transdisk >RAM:df0.adf
Will make an image of any disk present in DF0:. The disk doesn't
have to be named "df0.adf", you can use whichever name you feel is appropriate.
For best results, obtain a copy of BaudBandit serial.device replacement for the Amiga, and set both ends to 57,600 Baud. BaudBandit should allow transfers of up to 5500cps to/from a 68000-based Amiga - it is available from AmiNET.
If you're one of those people with an AmigaOS 1.2/1.3 A500, with only
one floppy drive, you could be in trouble. Unless you have a Terminal
package on a floppy disk which you can boot or use in a second drive, there's
no way you can use a null-modem cable to talk to the PC (which is essential
to actually get software like transdisk or transrom onto Amiga floppy).
Your best bet would be to approach an Amiga user group, who may be able
to supply you with such a disk, or if you're lucky, an Amiga shareware
house/distributor in your area.
i) Obtain a 720k PC diskette. Format it either on your PC, or on the Amiga using CrossDOS.
ii) Create either an .ADF file or Kickstart ROM image using the method described above.
iii) Archive this file using either LhA or Zip (Make sure you have these on the PC, so you can unarchive them when you take the disk over).
iv) Copy the archive to the 720k diskette, using CrossDOS or MessyDOS.
v) Take the diskette over to the PC, copy the archive to the hard-disk, and unarchive it. Copy the Kickstart ROM image or .ADF file to the Fellow directory and you're ready to go!
You can automatically move to a specific file by starting to type its name.
A memory option can be used to remember a file-name and insert it later
in a configuration menu directly. Consult the file-system browser shortcut
key table for this.
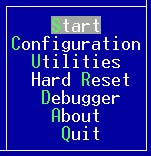
When the emulator has been temporarily stopped, this option will continue and return to emulation mode.
When no Kickstart-image has been loaded, hard reset will set up a simple replacement loader capable of booting some programs that do not depend on interaction with the Amiga OS. The disk-image to boot must be inserted in DF0 first. Some demos and games with trackloaders fall in the category of programs this feature can handle. (NOTE: This applies only to Fellow V0.3.2a and earlier versions.)
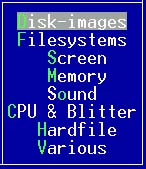
The configuration menu contains a collection of menus which allows you to configurate the behaviour of the emulator. The different menus are explained below.
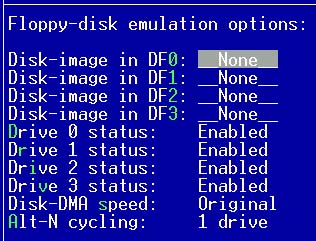
This configuration menu controls a number of settings pertaining to
disk-images and Amiga floppy hardware emulation.
Pressing DEL on this option will eject the inserted disk-image in the virtual drive.
Pressing ALT-0 to 9 on this option will insert the file whoose name is stored in one of the 10 memory settings.
Disk-images compressed with gzip or bzip will be uncompressed to the
directory set in the TEMP or TMP environment variables. Changes to
these compressed images are discarded. (Only the uncompressed temporary
image is changed.)
The intended use for this is to help running old demos that were packed
with broken crunchers. Usually, just leave the drives enabled.
Permittable values are "Original" and "Fast".
Just keep in mind that a quite a few programs will not load unless this
setting is "Original".
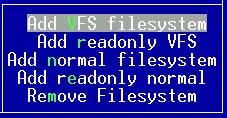
This menu contains a number of selections to control and define filesystems in your setup. A filesystem is a location in your native filesystem which becomes visible within the emulator as a device.
When selecting this option, first enter the volume name this filesystem should appear as in the Amiga, then the mountpoint in the native filesystem. The third option defines the maximum filename length allowed before long filename mangling is used for a file. Usually leave the third option default.

This sub-menu controls aspects of the graphics-emulation and visualization on the host screen.
| 800x600x16 bit color |
| 800x600x15 bit color |
| 640x480x16 bit color |
| 640x480x15 bit color |
| 640x400x16 bit color |
| 640x400x15 bit color |
| 640x350x16 bit color |
| 640x350x15 bit color |
| 400x300x16 bit color |
| 400x300x15 bit color |
| 400x300x8 bit color |
| 320x480x16 bit color |
| 320x480x15 bit color |
| 320x480x8 bit color |
| 320x400x16 bit color |
| 320x400x15 bit color |
| 320x400x8 bit color |
| 320x240x16 bit color |
| 320x240x15 bit color |
| 320x240x8 bit color |
| 320x200x16 bit color |
| 320x200x15 bit color |
| 320x200x8 bit color (Std. VGA) |
NOTE:
Non-VGA resolutions will only be used with linear framebuffer support
in the VESA-driver.
The emulator will keep track of the apperance of the entire Amiga graphics playfield, which is about 768x580 in size. Many of the supported host-resolutions are not big enough to display an image of this size. The result is clipped to fit on the host-screen, and in lores host-resolutions, hires Amiga graphics will go through a lossy conversion, losing every second pixel.
Lower ratios will result in jerky animations etc., but will save a lot of time that can be spent on other parts of the emulation. Adjusting the frame-skip ratio is generally the first step when fine-tuning the emulator's performance.
Your options are "Unlimited", "50 hz" and "Synch with VGA-card".
"Unlimited" will disable all timing, and allow the emulator to run as fast as possible. This also affects the repeat rate of keys, as well as destroys the the concept of time within the emulator . You may find it impossible to use the keyboard if your machine is too fast.
"50 hz" limits the speed to a normal PAL A500.
"Synch with VGA-card" will try to synchronize the display with the refresh of the VGA-resolution used. It can in some cases cause animations to appear absolutely smooth. Since the normal PAL-refresh rate does not usually match the VGA-mode refresh rates, this will mess up both sound-speed and the general speed of the application.
NOTE:
This setting is ignored when sound-emulation is set to "Sychronized
with emulation". Except the "Synch with VGA-card" option, which is always
used, even with sound. Observe that "Synch with VGA-card" and sound is
not a good combination.
NOTE:
Leaving this permanently enabled is a dead-end scenario. It needs
much fine-tuning and more work to work correctly and safely. Recommended
use is to switch it on to watch a particular effect.
You have 3 options: "No Scaling", "Hardware VGA Line Doubling" and "Insert black lines".
"No Scaling" provides no vertical scaling.
"Hardware VGA Line Doubling" uses some VGA registers to provide double scanlines in hardware. It will only work on VGA register compatible graphics-cards that responds to VGA registers even in SVGA mode. (Not all do.)
"Insert black lines" is a software only method that interleaves black
lines into the image to show the Amiga screen with a more correct aspect
ratio.
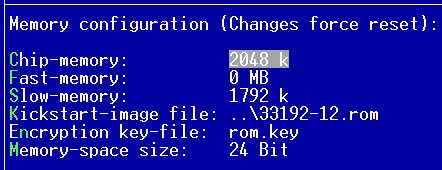
This submenu controls what types and amounts of memory the emulated
Amiga has.
The suffix .rom is required for these files. Additionally, a kickdisk in ADF format can be used.
The emulator will autodetect the loaction to which the ROM must be loaded. For ROM-images which are located at $F00000, a secondary ROM-file can be loaded to $F80000 or $FC0000 with the -r2 command line option. It is useful for watching the CDTV boot animation for instance. (Although the hardware needed to actually boot CDTV is not emulated.)

This submenu controls aspects of the sound-emulation.
"No Sound" will disable emulation of Amiga sound-hardware as well as playback.
"Emulated, not played" will emulate the Amiga sound-hardware, but not play any sound.
Options only available when a soundcard (Soundblaster) is found are: "Normal, synchronized with emulation" and "Normal, synchronized with real-time"
Behind these awkward option names are two alternative timing methods for sound playback. "Normal, synchronized with emulation" will keep production of sample output in synch with the general progress of emulation. If the emulation runs too slow, there will be "black holes" or stops in the playback. On reasonable fast machines though, this method will provide good playback quality.
"Normal, synchronized with real-time" will detach sound-emulation from the rest of the emulation, ensuring that there are always enough samples available to produce contiguous sound-playback. The drawback is that you are most likely to experience tempo distortions. Well, you can not get it all on a slow machine. Another drawback, the timer method used does not perform well on a CPU with a PII architecture, but that should not be a problem since the "Normal, synchronized with emulation" method will mostly perform well on those CPUs.
NOTE:
The "Normal, synchronized with real-time" option is not included in
V0.3.3, so the information only pertains to earlier versions.
NOTE:
Not all sound-cards support all possible output settings. If you have
specified an illegal output setting for your card, the settings are forced
to minimum settings when you start the emulation. Any settings can be used
with the "Emulated, no playback" option though. This is to allow any sound
quality to be saved in a WAV-file.
PERFORMANCE NOTE:
44100 hz is unnecessary and a major CPU-hog. A good tradeoff between
speed and quality is 31300 hz. 8/16 bits mono/stereo only make a
minor difference in terms of speed.
The important side-effect of the sound buffer depth selection is one
of synchronization tightness. A fast machine (PII type CPU) will do best
with a short buffer interval in order to get an even output of graphics
frames.

This sub-menu controls some aspects of the CPU and Blitter emulation.
Options are "3.5 MHZ", "7 MHZ", "14 MHZ" and "28 MHZ". These clocks
are estimated from the timing of the normal A500 7MHZ 68000 and does not
necessarily have a counterpart in a real CPU. (It is one of those things
one can do with emulation.)
"Normal OCS Speed" will provide blitter behaviour that attemps to mimic the behaviour of a proper OCS blitter with respect to speed. Blits take time with this option, and most programs will probably want it this way.
"Finish instantly" provides a blitter that appears to take no time to finish its operations. In some cases this can overwhelm the emulator with blitter operations and seriously degrade real-time performance. It can, however, also do some good with programs that suffer from buffer synchonization problems, such as visible tearing in moving graphics or vector graphics that appears to be "half" drawn when they are made visible by the Amiga program.
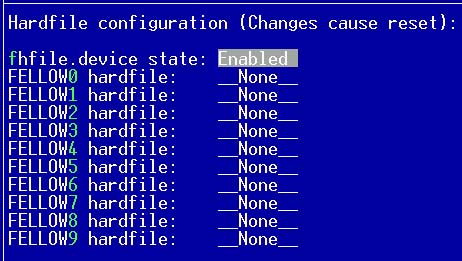
This submenu controls the hardfiles.
A hardfile is a way to provide mass-storage to the emulated Amiga. The hardfile is a huge file which is used as a "harddisk". The hardfile can be any size.
Hardfiles can only be used if your Kickstart is V2.0 or higher.
Remember to format a new hardfile.
You can boot from any hardfile, they have a boot-priority less than DF0, but higher than DF1.
You may also use uncompressed ADF-files instead of actual hardfiles.
The units handled by this facility is named FELLOW0 with increasing numbers.
NOTE: Changing the hardfile setup will automatically force a
hard reset of the Amiga.

This menu is a collection of options that did not fit in elsewhere.
Possible settings are:
Disabled, Mouse, Analog Joystick, Keyboard Joystick Replacement 1 &
2
The Keyboard Joystick Replacements are:
Arrow-keys with right CTRL as firebutton 1 and right ALT as firebutton 2.
or
'D' is left, 'F' is down, 'G' is right, 'R' is up, Left CTRL is firebutton
1, left ALT is firebutton 2.
The Analog Joystick handling is somewhat awkward. To calibrate the joystick, rotate the stick during emulation.
If the built-in Analog-joystick handling feels insufficient, then the
Joyemu utility provides a far better Analog-joystick handling.
(Search for it with a suitable search engine.)
A led board is also supported (added by Roman Dolejsi). Look at ledboard.txt.
The setting for Keyboard led order is to tell the emulator of the order
of the leds on your keyboard.
This figure is only approximate.
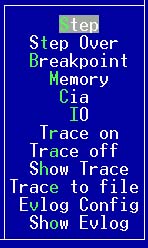
First, a normal user will probably never find any use for the debugger, so if you don't understand the things described here, just move on.
The debugger is a simple environment where you can among other things
inspect the state of the emulated Amiga. It contains a simple disassembler
that shows the code around the program counter and the state of the emulated
Motorola 680X0 processor. The CPU can be single-stepped or run until
a breakpoint. Memory can be browsed, and some of the registers contained
in the Amiga custom chips can be inspected. Logging of exceptions and irqs
as well as CPU history are also available if this is compiled into the
emulator-binary (*). Usually you will need to compile the emulator yourself
to include the logging options in the debugger.
| Various command line options: | |
| -h | Command line option summary |
| -log | Generate log-file fellow.log while initializing the emulator. Use this to see what the emulator finds out about your hardware (Default: No log) |
| -nogui | Skip initial GUI-session (Default: Use initial GUI-session) |
| -f12exit | F12 exits the emulator completely (Default: F12 returns to GUI) |
| -config <file> | Use config-file <file> (Default: Use fellow.cfg) |
| -noconfig | Do not use config file (Default: Use config file) |
| -ns | Do not save settings on exit (Default: Save settings) |
| -nommx | Do not use MMX instructions even if MMX is present. (Default: Use MMX if detected) |
| Floppy disk command line options: | |
| -0 <file> | Use diskimage <file> in DF0 (Default: No diskimage) |
| -1 <file> | Use diskimage <file> in DF1 (Default: No diskimage) |
| -2 <file> | Use diskimage <file> in DF2 (Default: No diskimage) |
| -3 <file> | Use diskimage <file> in DF3 (Default: No diskimage) |
| -0e +|- | Enable (+) or Disable (-) DF0 (Default: Enabled) |
| -1e +|- | Enable (+) or Disable (-) DF1 (Default: Enabled) |
| -2e +|- | Enable (+) or Disable (-) DF2 (Default: Enabled) |
| -3e +|- | Enable (+) or Disable (-) DF3 (Default: Enabled) |
| -ds +|- | Enable (+) or Disable (-) fast disk access (Default: Slow access) |
| -dmX <file> | File-requester disk memory X (0-9) contents |
| -dpath <dir/file> | Specify active element in file-requester |
| Hardfile command line options: | |
| -hfX <file> | Use <file> as hardfile X, where X is a number from 0 to 9. (Default: No hardfile) |
| -he +|- | Enable (+) or disable (-) hardfile device. (Default: Enabled when using Kickstart V2.0++) |
| Memory command line options: | |
| -c <size> | Use <size> KB of chip-memory, where size is 256, 512, 768, 1024, 1280, 1536, 1792 or 2048. (Default: 2048 KB) |
| -fm <size> | Use <size> MB of fast-memory, where size is 0, 1, 2, 4, or 8. (Default: 0MB) |
| -b <size> | Use <size> KB of bogo-memory, where size is 0, 256, 512, 768, 1024, 1280, 1536 or 1792. (Default: 0 KB) |
| -r <file> | Use <file> as Kickstart image or kickdisk (Default: kick.rom) |
| -r2 <file> | Use <file> as secondary Kickstart image or kickdisk. (Default: No image) |
| -K <file> | Use <file> as keyfile for encrypted Kickstart images. (Default: rom.key) |
| Joystick command line options: | |
| -j1 n|a|m|k1|k2 | Specify equipment in game port 1:
n - No equipment a - Analog joystick m - Mouse k1 - Joystick keyboard replacement 1 k2 - Joystick keyboard replacement 2 (Default: Mouse) |
| -j2 n|a|m|k1|k2 | Specify equipment in game port 2:
n - No equipment a - Analog joystick m - Mouse k1 - Joystick keyboard replacement 1 k2 - Joystick keyboard replacement 2 (Default: No equipment) |
| Sound command line options: | |
| -s d|n|c|e | Specify sound emulation method:
d - disabled n - Normal, synchronized with emulation c - Normal, synchronized with real-time e - Emulated, no playback (Default: Disabled) |
| -sf <rate> | Sound output rate in HZ, where rate is 15650,
22050, 31300 or 44100
(Default: 15650) |
| -ss on|off | Stereo output, on or off (Default: off) |
| -sb <bits> | Sound bits, where bits are 8 or 16 (Default: 8) |
| -sd <frames> | Sound buffer depth in 50 hz frames, where frames range from 1 to 9. (Default: 5) |
| -sw +|- | Enable (+) or Disable( -) wav-dump soundlayer. (Default: Disabled) |
| -sl 0|1|2 | Low-pass filter usage:
0 - Original 1 - Always 2 - Never (Default: Original) |
| -s1 | Force Soundblaster V1 routines |
| Screen command line options: | |
| -res 800600w | 640480w | 640400w | 640350w | 400300w | 400300b | 320480w | 320480b | 320400w | 320400b | 320240w | 320240b | 320200w | 320200b | Specify host resolution to use (Default:800600w, then 320200b) |
| -fl none|50|vga | Framerate timing constraint |
| -f <number> | Frame-skip ratio 1/number (Default: 1/1) |
| -i on|off | Deinterlace in 800600 (Default: off) |
| -gc on|off | Use cycle-exact graphics in 800600 (Default: off) |
| -y n|h|b | Specify vertical scaling:
n - No scaling h - Hardware VGA Scaling b - Blank line interleave |
If this is a Workbench disk, make sure you have copied your Kickstart ROM into a file and have it situated in the Fellow directory, and named as "kick.rom", or selected a different location in the config-menu.
If the Kickstart is not present, Fellow will bypass the normal Amiga bootstrap and try to boot anyway. This works with some demos and games which ignore the Kickstart-routines and handle everything on their own. You may have to select "RESET" to enable this after inserting a disk-image.
Select the amount of RAM you wish to use, configure sound emulation to suit your hardware, and select "RUN" from the main menu.
All things being well and good, Fellow should boot your disk image.
| Keypress: | Description: |
| ALT-X | Quit |
| CTRL-q | Quit |
| F1 | Configuration Menu |
| F3 | Utilities Menu |
| F5 | Hard Reset |
| F7 | Debugger Menu |
| F9 | Start |
| F11 | About |
| ALT-d | Disk-Image Configuration Options |
| ALT-f | Filesystem Configuration Options |
| ALT-m | Memory Configuration Options |
| ALT-o | Sound Configuration Opitons |
| ALT-c | CPU and Blitter Configuration Options |
| ALT-h | Hardfile Configuration Options |
| ALT-v | Various Configuration Options |
| ALT-a | Add VFS Filesystem |
| ALT-r | Remove Filesystem |
| Keypress: | Description: |
| F12 | Exit to the menu-system, pausing the emulation |
| HOME-PGUP | Switch to next available host screen resolution |
| HOME-PGDOWN | Switch to previous available host screen resolution |
| END-PGUP | Use next scaling method |
| END-PGDOWN | Use previous scaling method |
| HOME-KEYPAD ARROW UP | Scroll virtual Amiga playfield up |
| HOME-KEYPAD ARROW LEFT | Scroll virtual Amiga playfield left |
| HOME-KEYPAD ARROW RIGHT | Scroll virtual Amiga playfield right |
| HOME-KEYPAD ARROW DOWN | Scroll virtual Amiga playfield down |
| HOME-F11 | Capture screen and save it to a BMP image file |
| HOME-F1 | Insert disk-image in DF0 |
| HOME-F2 | Insert disk-image in DF1 |
| HOME-F3 | Insert disk-image in DF2 |
| HOME-F4 | Insert disk-image in DF3 |
| END-F1 | Eject disk-image in DF0 |
| END-F2 | Eject disk-image in DF1 |
| END-F3 | Eject disk-image in DF2 |
| END-F4 | Eject disk-image in DF3 |
Just keep in mind that I (Petter Schau) no longer find myself in the position to answer all mail. Issues such as when the next version is coming, or what will be in it is usually ignored, as well as "user support" concerning documented features and tasks. This also goes for things people ordinarily should seek to get answered by other means, such as how to operate an Amiga, or technicalities of transferring data from Amiga to PC.
Old fashioned mail-address:
Petter Schau
Ravnkollbakken 83
N-0971 Oslo
Norway
E-Mail addresses for other authors and contributors are found in the
credits file.
This document was prepared by Brett Eden, and was last updated by Petter Schau 18/9/98. Any questions, comments or suggestions should be forwarded to Brett Eden on revere@sub.net.au