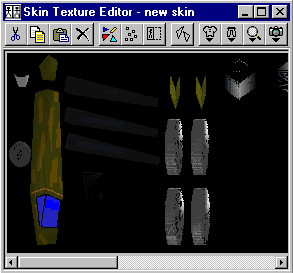
The skin editor is used for editing skin vertices and painting on the skins.
![]()
From left to right these buttons perform the following operations:
![]()
Use this button to paint the outlines of the skin triangles on the skin.
![]()
Use this button to recalculate the skin vertices from a base frame, or when you don't have a base frame to create one.
A base frame is important if you want your model to look good, because it is used to get a good 2D skin to 3D frame mapping. A skin to frame mapping is good when every triangle in the 3D frame has enough pixels in the skin to show a correct texture with little stretch or other forms of deformation.
The base frame is the first frame in the base scene. You need to arrange the objects and even the vertices in your base frame in such a way that after recalculating skin vertices, all the triangles of your frame are shown as triangles (and not as lines) in the skin.
In qME you mostly assemble your models from prefab objects. These objects are already created in such a way that there is an optimal skin to frame mapping. The skins and skin vertices of prefab objects are combined into a single skin. Pressing recalculate skin vertices in this situation will not work as you expect. In fact it will probably create a very messy skin to frame mapping as the base frame you created with the prefab objects is not useable as a base for skin vertex recalculation. Furthermore, any skin texture that was painted will be lost since triangles will be located somewhere completely different.
What you can do in this situation is rename the base scene in the 3D frame editor to something like "frame". Then when you press the recalculate skin vertices button, qME replies with "Cannot locate 'base' frame, shall I reconstruct it ?" replying yes to this dialog will create a base frame from the skin vertices. This is actually a reverse recalculate skin vertices operation.
When you are not working with prefab objects, but you are creating new objects by moving and merging vertices and combining primitives, you will need to use the recalculate skin vertices operation, since vertex operations inherently destroy the optimal skin to frame mapping.
Now if you would NOT take special precautions in creating a base frame, almost certainly a number of triangles will degenerate to lines when you recalculate the skin vertices. This gives the triangles a very ugly looking stripy texture.
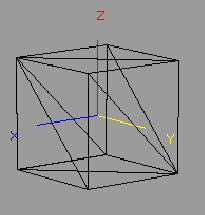
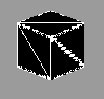
To illustrate the degeneration of triangles look at the simple box below. The image is a snapshot taken from the 3D editor and you can see that the box has triangles that are parallel to the X unit vector. The skin vertex recalculation has to create a flat 2D image to captures all triangles on the 3D frame. This means a complete dimension has to be eliminated. To do this, all vertices of the base frame are projected on the YZ plane. These projected vertices are the actual skin vertices.
Well below is what happens when you press the recalculate skin vertices button and then paint triangles button to paint the outlines of the skin triangles on the skin.
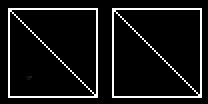
As you can see, only four triangles of the model have been preserved. The other eight triangles have degenerated to lines. Since these lines are white, the eight degenerate triangles are all completely white as can be seen in the 3D snapshot in texturemapped rendering mode below.

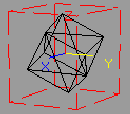
Now to get a better skin to frame mapping, we rotate the cube by using the rotate object tool in the 3D frame editor. The cube is rotated over and angle of 45 degrees around both Y and Z axis. As you can see, there are no triangles parallel to the X unit vector any more.
Recalculating the skin vertices now will give a much better result. We first created a new skin by using the skin tree panel in the main window. Then we pressed the recalculate skin vertices button and the paint triangles button. The resulting skin is shown below.

As you can see, all triangles are now visible in the skin. The 3D textured snapshot of the cube looks a lot better too.
![]()
The re-arrange object skin button rearranges the skins of objects horizontally. Use this option if you have inserted and then removed a number of prefab objects in your model. Since skins of deleted objects are not removed, the skin of model would grow to an unacceptable size if you would not use the re-arrange object skins operation.
Don't use this operation on a model that has a lot of small objects, since the objects will be layed out horizontally, this usually will create a very wide skin with lots of unused texture. In a future release I will change the layout algorithm to make optimal use of the skin height, so it will also work for models made out of small objects.
![]()
This button is useful if you are painting on the skin and you want to know what the triangle layout of the skin triangles is.
Pressing down this button will toggle the showing of the triangle mesh. This button wil NOT paint the triangles onto the skin like the paint triangles button does.
These buttons allow you to change the shirt and pants color on your model. Note that this will NOT modify your model in any way, it only shows you how a player model would look in Quake, when you select a certain shirt or pants color.
![]()
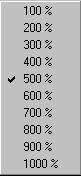
This button will pop-up a menu that allows you to change the zoom percentage to take a closer look at your skin.
When the camera tool is selected, you also can left click and right click with the mouse button to zoom in and out of your skin.
![]()
![]()
The snapshot menu lets you take snapshots of the edit panel contents. The snapshot can be put on the clipboard or saved into a file.
Note that you should not use snapshots as a base for skins, since snapshots usually loose colors in the process. Use the copy button in the clipboard operations to make an exact copy of your skin with the correct palette.

In the edit panel you paint on the skin with paint tools and and move skin vertices with the vertex tool.
The tool palette found in the main window lets you select a tool to use in the edit panel.
Use the tool palette to activate a tool. When you select a tool, the tool properties palette is changed to show the properties for the selected tool. Initially you will find the tool properties palette directly on the right side of the tool palette.
Below you'll find a description of what you can do with each tool in the edit panel.
![]()
With the camera tool you can zoom-in (left click) and zoom-out (right click).
![]()
This tool is used to select and drag around vertices in a skin.
You can multi-select vertices with a selection rectangle or by selecting them one by one. To select multiple vertices one by one, hold down the SHIFT key and click every vertex you want to select separately. Use a selection rectangle by left clicking outside the vertices and then left click and drag a selection rectangle around the vertices you want to select.
You can also move around all vertices at once, by holding down the CTRL key, left clicking a vertex and then move the mouse to drag the vertices around.
![]()
You can paint on the skin by using the pen tool.
The pen size used during painting can be selected in the tool properties palette. The tool properties for the paint tools have been described in detail in the main window description.

The color that is used for painting can also be selected in the color palette or in the skin color editor.

![]()
The flood fill tool will replace an area of solid color with the currently selected color.
![]()
The color dropper is used to select the current color from the skin and to completely replace a color in the skin.