|
enable
Netris32 v3.1
help
|
|
 |
enable
Netris32 is a
challenging and exciting game of skill, reflex and strategy. Different shaped
pieces, composed of coloured blocks, fall from the top of the game board to the
bottom at increasing speed. The object of the game is to manipulate the pieces to
form solid rows, which will then disappear. The game ends when the rows build up to
reach the top of the screen. enable
Netris32 allows
players to customise most aspects of their game. Features include:
- Single or Two Player Mode, including TCP/IP Network Play
- Mouse Control Option
- Piece Preview
- Column Line Up
- UNIQUE Ghost
Mode
- UNIQUE Enable
Mode
- Animation, Sound and Highlight Options
- Penalties
- Speed Controls
- Level Controls
- Customisable Screen and Game Board Backdrops
- Resizable Display Window
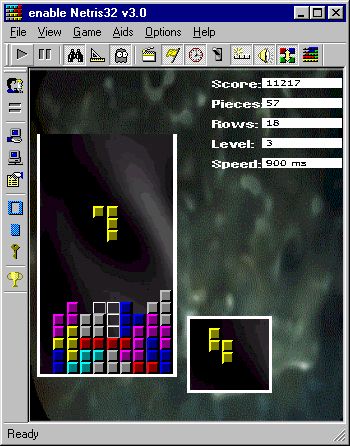
The screen above shows enable
Netris32 running in
one player mode. Pieces appear at the top of the game board shown on the left of the
screen. The screen also shows the current score, the number of pieces that have
fallen during the game, the number of rows completed, the current level and the current
speed.
This screen also shows some of the player aids that can be
used while playing enable Netris32. The piece preview window to the right of the game board shows which
piece will be the next to fall. At the bottom of the game board, the line up mode
enables players to line a piece up properly before dropping it from the top of the board,
and within the game board, the new, unique ghost mode is demonstrated. Ghost mode
allows a player to see what would happen if a piece was dropped at its current location
and rotation.
All game functions can be accessed and controlled using the
toolbar at the top of the screen, as well as through menus. |
|
|
|
enable Netris32 automatically
starts a game in single player mode whenever it is loaded. |

Start Game
|
To
start a new game, select Game > Start from the menu
or press the  icon on
the toolbar. enable Netris32 will retain any configuration changes that have previously been made. icon on
the toolbar. enable Netris32 will retain any configuration changes that have previously been made. |

Key
Configuration
|
To play the game, use the keys to move and
rotate the blocks as they fall. Pieces can be rotated both left and right. The
default configuration for the keys is as shown in the Keyboard Configuration dialog box
below: 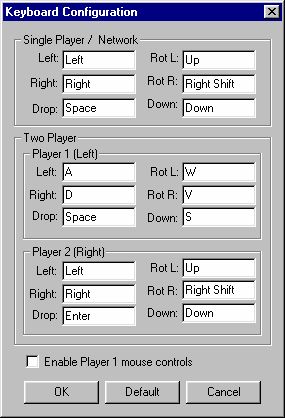
When playing in network mode, the key
configuration for both players is the same as that for single player mode.
The default key configuration can be changed
by selecting Options > Keyboard... from the menu or by pressing the  icon on the toolbar. icon on the toolbar.
The mouse can also be used to control player 1. This
is useful for high-speed play and makes play easier for people with physical disabilities
who have trouble using the keyboard. The mouse controls can be enabled by selecting Options > Keyboard... from the menu and selecting the option Enable Player 1 Mouse Controls.
The mouse controls are:
| Left Button |
Rotate piece (left) |
| Right Button |
Drop piece |
| Middle (Wheel) |
Rotate piece right and left |
Move the mouse left and right to align pieces in the channel.
|

Pause Game
|
To pause the game, select Game > Pause from the menu or
press the  icon on
the toolbar. To return the game to normal operation, select the Pause option again. enable Netris32 also contains an AutoHide feature. During the game, players can press the
Shift + Up Arrow keys to automatically pause and minimise the game. To continue
playing, restore the game and select the Pause option. icon on
the toolbar. To return the game to normal operation, select the Pause option again. enable Netris32 also contains an AutoHide feature. During the game, players can press the
Shift + Up Arrow keys to automatically pause and minimise the game. To continue
playing, restore the game and select the Pause option. |

Two Player Mode
|
To play enable Netris32 in two player mode, select Game > Two
Player from the menu or press the  icon on the
toolbar, then start a new game. The icon will appear sunken in when two player mode
is activated, and a second game board will appear on the right side of the screen.
The key configuration for the two player mode is shown in the Key Configuration dialog box
above. icon on the
toolbar, then start a new game. The icon will appear sunken in when two player mode
is activated, and a second game board will appear on the right side of the screen.
The key configuration for the two player mode is shown in the Key Configuration dialog box
above.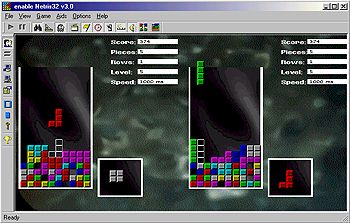
|

Identical Piece Mode |
Identical Piece Mode will cause both players to receive
the exact same series of pieces in a two player game. This mode works both in two player
mode and over a network. Pressing the  icon will toggle
Identical Piece Mode. icon will toggle
Identical Piece Mode. |

Network Mode
|
enable Netris32 can be played by
two players across a network. For network play you must
have TCP/IP communications on your machine. You also need to have someone else running a
version of enable Netris32
to play with. You must decide if you want to
be the Server (the person whose machine will be connected to) or the Client (the person
who is going to connect to the other machine). |

Server
|
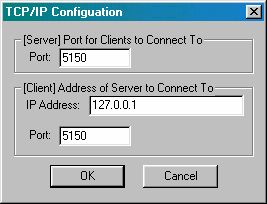
You will need to make
sure your settings are correct for network play. If you want to be the Server, select Game > Network Settings from the menu, or
press the  icon
on the toolbar to bring up the TCP/IP Configuration dialog box shown below. Make
sure that the port setting under '(Server) Port for Clients to Connect To' is the same as
that which the client will use. Normally, you should not need to modify this.
If the port setting is correct, close the dialog box and select Game > Start Server
from the menu or press the icon
on the toolbar to bring up the TCP/IP Configuration dialog box shown below. Make
sure that the port setting under '(Server) Port for Clients to Connect To' is the same as
that which the client will use. Normally, you should not need to modify this.
If the port setting is correct, close the dialog box and select Game > Start Server
from the menu or press the  icon on the toolbar. If the server is running correctly, the toolbar icon should
appear, and remain, sunken.
 |
|
|

Client
|
If you want to be the Client, select Game > Network Settings from the menu, or
press the  icon
on the toolbar to bring up the TCP/IP Configuration dialog box shown above. Make
sure that the port settings under '(Client) Address of Server to Connect To' are the same
as that to which the server is configured. Also make sure that the IP Address is set to
that of the server to which you are connecting. If you are unsure of the correct IP
Address, check with your system administrator. When the settings are correct, close
the dialog box and select Game > Connect to Server from the menu or press the icon
on the toolbar to bring up the TCP/IP Configuration dialog box shown above. Make
sure that the port settings under '(Client) Address of Server to Connect To' are the same
as that to which the server is configured. Also make sure that the IP Address is set to
that of the server to which you are connecting. If you are unsure of the correct IP
Address, check with your system administrator. When the settings are correct, close
the dialog box and select Game > Connect to Server from the menu or press the  icon on the toolbar. If
the connection is running correctly, the toolbar icon should appear, and remain, sunken. icon on the toolbar. If
the connection is running correctly, the toolbar icon should appear, and remain, sunken.NOTE: You must start the Server before you start the Client...a client
cannot connect to a server which does not exist.
Reconfiguration of the Network Settings is not possible while
connected. The Network Settings menu option will be unavailable, and the icon on the
toolbar will be greyed. In this mode of operation, configuration changes on either
machine will result in both machines being updated so no single player can configure their
game to give themselves an unfair advantage.
To disconnect from the network, simply reselect the menu
option which enabled the network connection in the first place, or press the corresponding
toolbar icon. |
|
|
|
|

Piece Preview
|
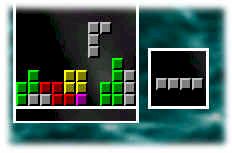
The Piece Preview option allows you to see what piece will be next to
appear on the game board. Selecting Aids > Piece Preview from the menu,
or pressing the  icon on the toolbar, will toggle the piece preview display in the window by the side of
the game board.
 |
|
The image to the right
shows the piece preview display as it appears to the right of the game board. |
|

Line Up
|
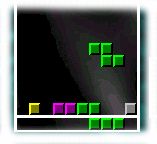
The Line Up option allows you to make sure a piece is properly lined up
before dropping it. Selecting Aids > Line Up from the menu or pressing
the  icon on the
toolbar will toggle line up display at the bottom of the game board. icon on the
toolbar will toggle line up display at the bottom of the game board. |
|
The image to the right
shows the line up display as it appears below the game board. |
|

Ghost Mode
|
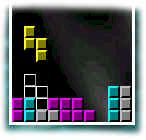
The Ghost Mode option allows you to see the outcome if you were to drop
a piece at is current location and rotation. Selecting Aids > Ghost Mode
from the menu or pressing the  icon on the toolbar will toggle the display of a
"ghost" piece on the game board. icon on the toolbar will toggle the display of a
"ghost" piece on the game board. |
|
The image to the right
shows a "ghost" piece as it appears on the game board. |
|

Animation
|
The Animation option shows a dropped piece falling down onto the current
board. If this option is not selected, the piece will fall instantly and the next
move will begin. Selecting Options > Animation from the menu or pressing
the  icon
on the toolbar will toggle the animation mode. icon
on the toolbar will toggle the animation mode. |

Sound
|
The Sound option allows enable Netris32 to play sounds
which are set up to work off your current sound configuration. Selecting Options
> Sound from the menu or pressing the  icon on the toolbar
will toggle the use of sounds during play. icon on the toolbar
will toggle the use of sounds during play. |

Highlight
|
The Highlight option will highlight any completed rows briefly before
removing them and moving on to the next turn. Selecting Options > Highlight
from the menu or pressing the  icon on the toolbar will toggle the highlight
mode. icon on the toolbar will toggle the highlight
mode. |
|
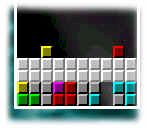
The image to the right
shows two highlighted, completed rows. |
|

Random Piece Color |
When the Random Piece Color option is selected, enable Netris32 will select a color at random for each piece. When this
option is not selected, each piece will have a specific colour based on its shape.
Selecting Options > Random Piece Color from
the menu or pressing the  icon will toggle the Random Piece Color option.
 |

Enable Mode |
Enable Mode offers an extra challenge, allowing you to extend your enable Netris32 skills by providing a range of new pieces. When this option is not
selected, enable Netris32 uses all the permutations of 4 (without diagonals) for its
pieces. This gives a total of 7 different piece types which you can use. However, in
Enable Mode, the system also generates all permutations (without diagonals) of 1, 2, 3, 4,
and 5, resulting in a total of 28 pieces. Selecting Options > Enable Mode from the menu or pressing the  icon will toggle the Enable
Mode option. icon will toggle the Enable
Mode option.
|

Speed
|
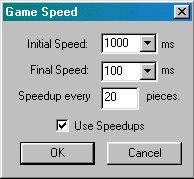
The Speed option allows players to configure the game speed. Selecting Options
> Speed... from the menu or pressing the  icon on the toolbar will bring up the Game Speed
dialog box shown below. Players can switch speed increases ON or OFF, and also
configure the initial and final speeds (in milliseconds). The dialog box also allows
players to specify at what intervals the game should speed up from its current speed
towards its final speed. When speed increases are ON, the game will increase by 50ms
each interval. icon on the toolbar will bring up the Game Speed
dialog box shown below. Players can switch speed increases ON or OFF, and also
configure the initial and final speeds (in milliseconds). The dialog box also allows
players to specify at what intervals the game should speed up from its current speed
towards its final speed. When speed increases are ON, the game will increase by 50ms
each interval. |
|
When speed increases
are OFF, the game remains at a constant speed throughout play. The current game
speed is shown at the right of the game board. |
|

Level
|
The Level option allows players to use levels to provide an extra challenge
in both single player mode and in network and two player operation. Selecting Options
> Level... from the menu or pressing the  icon on the toolbar will bring up the Level
Configuration dialog box shown below. Players can switch the levels option ON or
OFF, and determine the number of rows to appear at the beginning of a game. Players
can also determine the interval, in rows, at which the game moves on to the next level,
and can specify how many free blocks are in the preset rows. The game speed can be
reset every time a new level is reached. icon on the toolbar will bring up the Level
Configuration dialog box shown below. Players can switch the levels option ON or
OFF, and determine the number of rows to appear at the beginning of a game. Players
can also determine the interval, in rows, at which the game moves on to the next level,
and can specify how many free blocks are in the preset rows. The game speed can be
reset every time a new level is reached.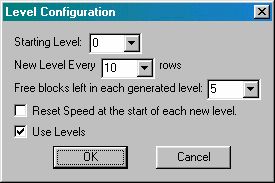
|

Penalty
|
The Penalty
option allows use of penalties in the two player and network modes. Penalties work
by inserting rows randomly into a players board when the other player completes two or
more rows. Selecting Options > Penalty... from the menu or pressing the  icon on the toolbar will
bring up the penalty dialog box shown below. Players can switch Penalty Mode ON or OFF,
and specify how many empty blocks will be contained in each of the inserted penalty rows. icon on the toolbar will
bring up the penalty dialog box shown below. Players can switch Penalty Mode ON or OFF,
and specify how many empty blocks will be contained in each of the inserted penalty rows.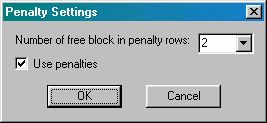
|
Penalties work as follows:
blah blah
| Player One |
|
Player Two |
| Completes 1 row |
- |
No affect |
| Completes 2 rows |
- |
One row inserted |
| Completes 3 rows |
- |
Two rows inserted |
| Completes 4 rows |
- |
Three rows inserted |
|

High Scores
|
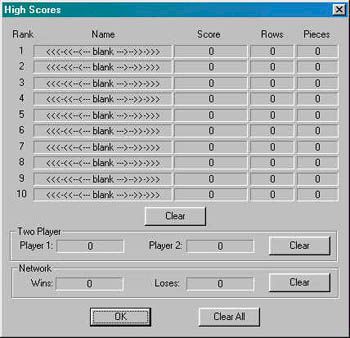
High scores are stored in the registry so that they can be recorded
from game to game. Selecting Options > High Scores from the menu or
pressing the  icon on the toolbar will bring up the current high score list. The high score list
also provides a record of the number of rows reached and the number of pieces played, and
keeps win-loss records for Two Player and Network modes.
|
|
|
|
enable Netris32 allows players to
configure certain aspects of the display to suit their own tastes. |
| Scalable
Display |
The enable Netris32 display is scalable so that you can resize it to suit
you. You can maximize the display to fill your entire screen, or change its size by
moving the mouse over the edge of the window until a double arrow appears, then clicking
and dragging it until it is your preferred size. |

Load Backdrop
|
The Load Backdrop feature allows players to load a different backdrop
in the main enable Netris32
window. To change the main window backdrop
select File > Load Backdrop... from the menu or press the  icon on
the toolbar. You can then browse your computer, as shown below, and choose a bitmap
(BMP) file to load as a main window backdrop. icon on
the toolbar. You can then browse your computer, as shown below, and choose a bitmap
(BMP) file to load as a main window backdrop.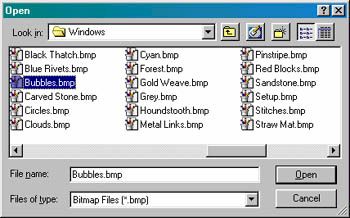
|

Load Game Backdrop
|
The Load Game Backdrop feature allows players to load a
different backdrop in the game board window. To change the game board backdrop
select File > Load Game Backdrop... from the menu or press the  icon on the
toolbar. You can then browse your computer, as shown above, and choose a bitmap
(BMP) file to load as a game board backdrop. icon on the
toolbar. You can then browse your computer, as shown above, and choose a bitmap
(BMP) file to load as a game board backdrop. |
|
|
The toolbar can be
toggled on and off by selecting View > Toolbar from the menu. The
extended toolbar, which appears on the left side of the display window, can be toggled on
and off by selecting View > Extended Toolbar from the menu. |
|


![]() icon on the toolbar.
icon on the toolbar.


![]() icon will toggle
Identical Piece Mode.
icon will toggle
Identical Piece Mode.


![]() icon will toggle the Enable
Mode option.
icon will toggle the Enable
Mode option.


