
December, 1995 - Vol. 2 No. 12
Many commercial applications support drag-and-drop operations from File Manager. While many users don't take full advantage of File Manager's drag-and-drop capabilities (not everyone runs File Manager all the time), the Explorer interface in Windows 95 will make these operations become more commonplace.
However, it's not always easy to find information about
responding to all the different drag-and-drop scenarios. In this
article, we'll show how you can add support for all types
of drag-and-drop File Manager operations to your ObjectWindows
Library (OWL) applications.
File Manager supports three types of drag-and-drop operations:
dropping a file icon onto an application's File Manager
icon to launch the application, dropping a file icon onto an open
application window, and dropping a file icon onto the application's
minimized icon on the desktop. To respond to each of these operations,
you'll need to create slightly different code.
When you use File Manager to drag a data file icon over an application icon (the icon that appears in the File Manager window) and drop it, File Manager will launch the application. If you want to retrieve the name of the file with which the user launched the application, you'd check the value of the command-line parameter that Windows passed to your application when launching it this way.
In an OWL application, you can retrieve the command-line parameters quite easily. To do so, you use the argc argument that OWL passes to your OwlMain() function to determine how many command-line parameters the system has passed to the application. Then you can use the argv argument of the same function to retrieve the values of individual parameter strings.
For example, if the value of the argc argument is 3, you'll know that there are three parameter strings for you to retrieve. You can then use argv[1], argv[2], and argv[3] to return each of the three strings.
Unfortunately, in Windows 3.x, File Manager passes only the first filename if you launch an application by dropping multiple files onto its icon. However, Windows 95's Explorer interface correctly passes each of the files as a command-line parameter.
After you've retrieved a given command-line parameter,
you can use the resulting string as a path and filename within
a function or procedure call. For example, if you drop a Windows
WAV sound file on your application's icon, you can use
the WAV file's path and filename to begin playing that
sound after your application launches.
Once your application is running, you may want to allow users to drop files onto the application's open window. Many commercial text editors support this behavior (the Borland IDE, for example), so you may want to include this feature in your own programs.
Before Windows will let you drop files onto an application's window, you must register the window as one that can accept dropped files. To do so, you'll call the TWindow member function DragAcceptFiles() and pass to it a boolean value TRUE.
The best place to make this call in your OWL application is in a TWindow-derived class's SetupWindow() function. This registers the window as soon as OWL creates it.
To respond to the drop action itself, you'll create a message
response function using the function signature
void EvDropFiles(TDropInfo);
If you add this declaration to the window class, add the EV_WM_DROPFILES macro to the window class's list of response table macros, and then define this function, OWL will call this function whenever you drop a file on that particular type of window.
Unfortunately, this technique works only for an individual window. As we'll see in a moment, you can make your application respond to the same message at the application level and, therefore, respond to drop events involving any of the application's windows instead of only one type of window.
When your application destroys a window that can respond to drop
events, you should tell Windows that it doesn't need to
retain that window in its drop-event registration system. If you
use a window class's SetupWindow() member function
to register a window for drag-and-drop messages, it's logical
to cancel the window's registration in the window class's
CleanupWindow() member function. To do so, you'll
simply call the same TWindow member function, DragAcceptFiles(),
but this time you'll pass to it a boolean value FALSE.
Dropping files onto the icon that appears on the desktop when you minimize an application is very similar to dropping them onto an application's window. However, there's one significant difference: If you want your application to respond when you drop a file onto its minimized icon, you'll need it to respond to a message that Windows sends to the application's main window itself. (An application's main window is responsible for displaying the minimized icon and responding to messages that Windows sends to it.)
To respond to the drop action for the application's icon,
you'll create another message response function of the
form
void EvDropFiles(TDropInfo);
This time, you'll add this declaration to the application class (instead of the window class), add the EV_WM_DROPFILES macro to the application class's list of response table macros, and then define this function. OWL will call this function whenever you drop a file onto the application's minimized icon.
If you want your application to respond to dropping files onto
the minimized icon only when your application has a specific type
of window open, you can use that window class's SetupWindow()
and CleanupWindow() member functions to enable and disable
drag-and-drop actions for the minimized icon. However, to enable
and disable these actions for the application window (instead
of the window class's window), you'll need to call
the member function DragAcceptFiles() for the application's
main window. To do so, you can call
GetApplication->GetMainWindow()
  ->DragAcceptFile(TRUE);
anywhere in your TWindow-derived class's member functions.
Similarly, when you're ready to disable the drag-and-drop
operations for the main window (and therefore the minimized icon),
you can call
GetApplication->GetMainWindow()
  ->DragAcceptFile(FALSE);
anywhere in your TWindow-derived class's member
functions. Now let's create a simple example program that
responds to all three types of File Manager drag-and-drop operations.
To begin, launch Borland C++ (version 4.0 or higher). When the main window of the Integrated Development Environment (IDE) appears, choose New Project... from the Project menu. In the New Target dialog box, enter \DRAGDROP\DRAGDROP.IDE in the Project Path And Name entry field, choose Application [.exe] from the Target Type list box, select the OWL checkbox in the Standard Libraries group, and click OK.
In the Project window, delete the dragdrop [.def] node by selecting it and pressing [Delete]. Next, double-click the dragdrop [.cpp] node to open the code editing window for this file. In the editing window, enter the code from Listing A.
Listing A: DRAGDROP.CPP
#include <owl/owlpch.h>

class TDropWindow : public TDialog
{
 public:
  TListBox* clList;
  TListBox* winList;
  TListBox* iconList;

  TDropWindow() :
    TDialog(0,1)
  { clList = new TListBox(this, 101);
    winList = new TListBox(this, 102);
    iconList = new TListBox(this, 103);
  }
 protected:
  void EvDropFiles(TDropInfo info);
  void SetupWindow()
  { TDialog::SetupWindow();
    DragAcceptFiles(TRUE);
    GetApplication()->GetMainWindow()
        ->DragAcceptFiles(TRUE);
  }
  void CleanupWindow()
  { GetApplication()->GetMainWindow()
      ->DragAcceptFiles(FALSE);
    DragAcceptFiles(FALSE);
    TDialog::CleanupWindow();
  }
  DECLARE_RESPONSE_TABLE(TDropWindow);
};

DEFINE_RESPONSE_TABLE1(TDropWindow, TDialog)
  EV_WM_DROPFILES,
END_RESPONSE_TABLE;

void TDropWindow::EvDropFiles(TDropInfo info)
{  char tempFileName[256] = "";
   for(int count = 0;
       count < info.DragQueryFileCount();
       ++count)
   { info.DragQueryFile(count, tempFileName,
       info.DragQueryFileNameLen(count) + 1);
     winList->AddString(tempFileName);
   }
}

class TDropApp : public TApplication
{
  TListBox* clList;
  TListBox* iconList;
  int argCount;
  char** argList;
 public:
   TDropApp(int argCount, char** argList) :
     argCount(argCount), argList(argList)
   { }

 protected:
  void EvDropFiles(TDropInfo info);
  void InitInstance();
  void InitMainWindow()
  { EnableCtl3d();
    BOOL ShrinkToClient = TRUE;
    TDropWindow* nameDropper =
      new TDropWindow();
    SetMainWindow(new TFrameWindow(0,
                    "Drop Test",
                    nameDropper,
                    ShrinkToClient));
    clList = nameDropper->clList;
    iconList = nameDropper->iconList;
    GetMainWindow()->Attr.Style &=
           ~(WS_THICKFRAME |
             WS_MAXIMIZEBOX);
   }

 DECLARE_RESPONSE_TABLE(TDropApp);
};

DEFINE_RESPONSE_TABLE1(TDropApp, TApplication)
  EV_WM_DROPFILES,
END_RESPONSE_TABLE;

void TDropApp::EvDropFiles(TDropInfo info)
{  char tempFileName[256] = "";
   for(int count = 0;
       count < info.DragQueryFileCount();
       ++count)
   { info.DragQueryFile(count, tempFileName,
       info.DragQueryFileNameLen(count) + 1);
     iconList->AddString(tempFileName);
   }
}

void TDropApp::InitInstance()
{
  TApplication::InitInstance();
  for(int count = 1;
      count < argCount;
      ++count)
  { clList->AddString(argList[count]); }
}

int OwlMain(int argc, char** argv)
{
  return TDropApp(argc, argv).Run();
}
When you finish entering the code, choose Save from the File menu. Then, right-click the dragdrop [.rc] node, and choose Text Edit from the View submenu of the popup menu. In the editing window that appears, enter the resource definition code from Listing B.
Listing B: DRAGDROP.RC
1 DIALOG 7, 20, 258, 197
STYLE WS_POPUP | WS_VISIBLE |
		WS_CAPTION | WS_SYSMENU |
		WS_THICKFRAME |
		WS_MINIMIZEBOX |
		WS_MAXIMIZEBOX

FONT 8, "MS Sans Serif"
{
 LISTBOX 101, 6, 18, 245, 51, LBS_STANDARD
 LISTBOX 102, 6, 80, 245, 51, LBS_STANDARD
 LISTBOX 103, 6, 142, 245, 51, LBS_STANDARD
 LTEXT "Command Line:", -1, 6, 7, 68, 9
 LTEXT "Window Drops:", -1, 6, 69, 68, 9
 LTEXT "Icon Drops:", -1, 6, 131, 68, 9
}
When you finish entering the resource file definition, choose Save from the File menu, and close the editing window. Choose Build All from the Project menu to begin building the application.
When the IDE finishes compiling and linking the code, minimize the IDE's main window and launch File Manager. (For the remainder of the article, we'll assume you're using Windows 3.1 or Windows NT. If you're using Windows 95, you can perform all the File Manager operations directly using the Explorer interface.) Using File Manager, display the directory that contains the DRAGDROP.EXE file that you just created.
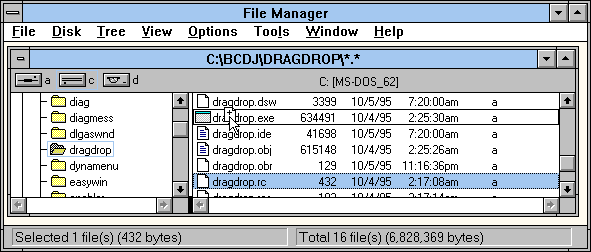
Now, locate one of the source files for this project, such as DRAGDROP.RC, and select it. Using the mouse button, drag that file over the icon or name of the DRAG-DROP.EXE file in the same directory, as shown in Figure A. (If Windows displays a prompt asking if you really want to launch the application this way, click Yes.)
Figure A - You can launch the DRAGDROP.EXE application using drag-and-drop.

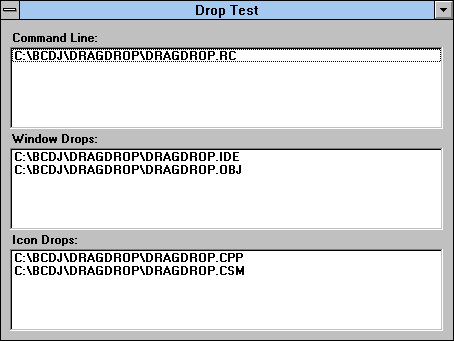
When the application's window appears, you'll see the full pathname of the DRAGDROP.RC file in the Command Line list box. Now, adjust the position of the window so that it will be visible while File Manager's window is visible.
Return to File Manager and drag one or more files over the DRAGDROP.EXE main window and drop the file(s) onto it. As soon as you release the mouse, you'll see the full pathname of the file(s) you dropped in the Window Drops list box, as shown in Figure B.

Figure B - The DRAGDROP.EXE application displays each type of drag-and-drop operation in a different list box.
Finally, minimize the DRAGDROP.EXE main window. Once again, drag
one or more files from File Manager, but this time, drop them
on the minimized icon. Double-click the minimized DRAGDROP.EXE
icon to return the window to its normal size. When you do, you'll
notice the names of the files you dropped onto the icon in the
Icon Drops list box, also shown in Figure
B. To exit the DRAGDROP.EXE application, double-click
its System menu icon.
Many commercial applications are beginning to take advantage of
File Manager's drag-and-drop interface. As users begin
experimenting with Windows 95, they'll come to expect full
drag-and-drop support from your applications as well. Using the
techniques we've shown here, you can create OWL applications
that respond to any of the standard File Manager drag-and-drop
operations.
Copyright (c) 1996 The Cobb Group, a division of Ziff-Davis Publishing Company. All rights reserved. Reproduction in whole or in part in any form or medium without express written permission of Ziff-Davis Publishing Company is prohibited. The Cobb Group and The Cobb Group logo are trademarks of Ziff-Davis Publishing Company.