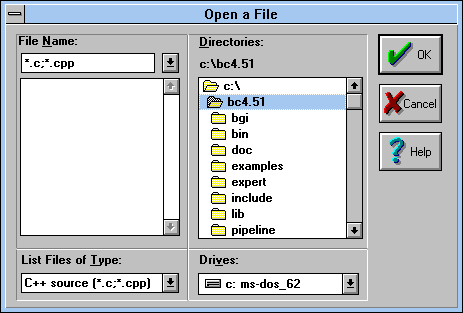
Figure A - All Borland products use large, non-standard buttons.

November, 1995 - Vol. 2 No. 11
This article was inspired by an example program created by
Tom Boser. Tom is a C++ programmer for Quad Tech International
in Sussex, Wisconsin.
If you've ever used a Borland product, you've used custom controls. For example, all of the dialog boxes that appear in the Borland C++ Integrated Development Environment (IDE), such as the Open A File dialog box shown in Figure A, use "Borland-style" buttons.

Figure A - All Borland products use large, non-standard buttons.
By definition, any window control that's not part of Windows is a custom control. What is a window control? In the simplest terms, window controls are a special type of window class. To make them usable in multiple applications, they reside in Dynamic Link Libraries (DLLs).
Unfortunately, writing custom controls is not something most Windows programmers feel comfortable doing. In part, that's because there's not a great deal of information available to help the would-be custom control author.
The primary obstacle, however, is that writing a custom control
has typically required you to write an old-fashioned, error-prone,
non-object-oriented window class and its corresponding window
procedure. In this article, we'll show how you can take
advantage of some powerful ObjectWindows Library (OWL) classes
to dramatically simplify writing your own custom controls.
As we just mentioned, custom controls are really just a special style of window class. Since the backbone of Windows programming is creating window classes that respond to user input the way we want them to, the fact that custom controls are window classes should come as no surprise.
However, custom controls are a little more than a window class and a window procedure. They're also a set of standard functions that a visual environment like Resource Workshop can use to manipulate the controls at design time.
Before we show you the OWL magic you can use to accelerate custom
control development, let's look at the key elements that
you'll find in every custom control. To simplify the discussion,
we'll examine the core functions that you'd have
to provide if you wrote a custom control using C.
To allow Windows to use a given window classwhether it's a custom control's window class or notyou need to initialize and register a window class data structure. This data structure, which the Windows Application Programming Interface (API) refers to as a WNDCLASS structure, contains all the information that Windows needs in order to create, display, manage, and destroy a window of any given type.
A significant element of this data structure is a pointer to the window class's window procedure. (The window procedure is the function that Windows calls to process an event message such as a keypress or mouse movement.)
If you've ever written a Windows application without using a class library such as OWL, you're probably painfully aware of how complicated it can be to write a window procedure. This function needs to respond correctly to any of the possible Windows messages and, in some cases, to combinations of messages that occur in a sequence.
Once you've defined a window class and window procedure, you'll need to provide four additional functions. Three of these functions provide an interface to either Resource Workshop or Microsoft Dialog Editor. The fourth function is necessary only if you're going to use Resource Workshop to manipulate your OWL-based custom control.
Unfortunately, there isn't a simple, object-oriented way to get around writing these four functions. Microsoft Dialog Editor and Resource Workshop expect your custom control's DLL to export these functions.
The first three functionsinformally known as the Info(),
Flags(), and Style() functionsprovide
the interface that Microsoft Dialog Editor and Resource Workshop
use to allocate, identify, and modify instances of our custom
controls. The fourth function, ListClasses(), provides
information that Resource Workshop needs in order to use the other
three functions. (See the article Interfacing with Resource Workshop for more information on these functions.)
As we mentioned previously, a custom control is basically just a window class and a window procedure wrapped up in a DLL along with some special functions. However, if you stop to think about it, one of the most important features of OWL is its ability to "crack" Windows messages (break down the message into its specific elements) and call member functions of your TWindow-derived classes.
It would be nice to be able to apply the power of OWL message handling to custom controls. Doing so would take much of the drudgery out of creating custom controls and would dramatically simplify the code's design. Obviously, given the title of this article, you can achieve this lofty goal.
However, the method OWL uses to provide a window procedure for
a window isn't obvious, and it interferes somewhat with
cleaning up the appropriate resources when Windows destroys the
custom control. Now, let's take a look at each of the steps
you'll need to take in order to create an OWL-based custom
control.
There are three key elements you'll have to address when
you create an OWL custom control: DLL startup and shutdown, setup
of the control itself and the OWL object that manages the control,
and cleanup actions that you need to take when Windows destroys
the control.
Since OWL's event-handling classes expect to have access to a pointer that addresses either an application object (in an EXE) or a DLL, you'll want to create an instance of the TModule class as a globally accessible object. Initializing this object correctly requires some unusual code.
First, you'll need to declare the TModule object as a global, static variable. Declaring the variable this way ensures that the startup code initializes the variable before executing any of the DLL's functions, and it ensures that the variable will be accessible as long as the application is making calls to the TModule object.
This requirement forces us to perform the actual initialization of the TModule object explicitly by calling the InitModule() member function in the DLL's LibMain() function. We have to use this explicit initialization process for two reasons: First, we don't want to create a TModule object to load a separate DLL for our custom control to use. Second, of the two other TModule constructors, one requires you to supply an identifier for the DLL's parent window, and the other doesn't.
Since we want to create the TModule object as a static
global variable, but we don't have an identifier for the
current parent window at that time, we have no choice but to use
the TModule constructor
TModule(const char far* name,
        BOOL shouldLoad = True);
which creates an alias for the DLL. (An alias is simply
an OWL object that communicates with a Windows element but doesn't
release the element's memory.)
The next issue we need to deal with is creating a suitable OWL object that implements the run-time functionality of the custom control. An ideal way to do so is to create a window procedure that our DLL will use to intercept the WM_CREATE message that Windows issues when it creates a new window of a given type.
Inside this window procedure, we'll need to dynamically allocate memory for the OWL object and set the initial window style information. However, if we're going to deallocate this object later, we'll need to store this pointer in a location that will be accessible at that time.
Fortunately, the Windows API provides a method for you to embed a small amount of information inside a window's data structure. Specifically, if you create a WNDCLASS structure (defined in the WINDOWS.H file) and set the cbClsExtra data member to a value of 4, Windows will reserve four bytes for you within this data structure.
In fact, the "extra" bytes that you can embed in
a window's data structure are an ideal location for storing
the address of the window's corresponding OWL object. To
set the value of these bytes to a variable's address, you'll
use the API function SetWindowLong(). Similarly, to retrieve
the value of the OWL object's pointer, you'll use
the GetWindowLong() function.
Perhaps the most confusing element of the technique we're suggesting here is how we have to handle the destruction of the custom control's window and synchronize it with the destruction of the corresponding OWL window object. It's not as simple as you might think.
When you create an OWL TWindow object, its initialization sequence does something unusual. OWL removes the current window procedure from the custom control's WNDCLASS structure and installs its own window procedure. The OWL window procedure is key, because that's how OWL "magically" intercepts messages destined for that window.
As long as the OWL window procedure is in place, the OWL code will use it to crack incoming messages for the custom control and then dispatch those messages to the message-handling functions you've defined. The OWL window procedure will remain there until you delete the object or reassign its window procedure.
You may think that you'll be able to simply respond to the WM_DESTROY or WM_NCDESTROY message, retrieve the object pointer from the window's data structure, and then call delete() for that object. However, as you'll recall from the previous paragraph, the OWL window procedure calls the appropriate member function for a given message.
If you create a message-handling function for the WM_DESTROY message or the WM_NCDESTROY message and then call delete() for the OWL object, you'll almost certainly generate a General Protection Fault (GPF). This is because when the function returns, it won't be using a valid object anymore. You deleted it in mid-function call.
To solve this problem, we'll need to find a message that occurs just before Windows deletes a control. Then, we'll create a mes-sage handler for that message and add code to the body of that message-handling function to reassign the original window procedure for the control's window class. As it turns out, Windows issues the WM_DESTROY message just prior to issuing the WM_NCDESTROY message. In turn, the TWindow class calls the virtual function CleanupWindow() when it receives the WM_DESTROY message.
Reassigning the original window procedure (and therefore making
sure no pending member function calls for the OWL object are about
to return) in an overridden version of the CleanupWindow()
function will allow the code to delete the OWL object's
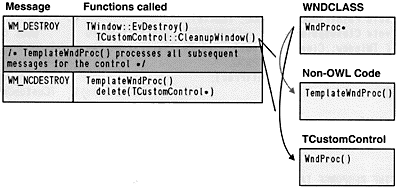
pointer when it later processes the WM_NCDESTROY message, as illustrated
in Figure B. Now let's create
a simple custom controlbasically a do-nothing controlthat
you can use as a template for your own custom controls.

Figure B - If you reassign an OWL custom control's window procedure when you process the WM_DESTROY message, you can safely delete the object when you receive the WM_NCDESTROY message.
Launch the Borland C++ IDE and choose New Project... from the Project menu. In the dialog box that appears, enter \CTRLTMPL\CTRLTMPL.IDE as the Project Path And Name, select Dynamic Library [.dll] from the Target Type list box, select the OWL and Static check boxes in the Standard Libraries group, and click OK. (If you're using version 4.0, you'll need to create the static version of the OWL library.)
When the CTRLTMPL.IDE project window appears, double-click the ctrltmpl [.cpp] node. In the editing window for this file, enter the code from Listing A.
Click on the text "ctrltmpl.rh" in line 5 of the file. Then, right-click and choose Open Source from the pop-up menu. When the Open A File dialog box appears, click OK to create the new file. Enter the code from Listing B in the editing window for this file.
Listing B: CTRLTMPL.RH
#define CTRL_DLG           100
#define CTRL_BMP           100

#define ID_CKBORDER        100
#define ID_HSCROLL         103
#define ID_TABSTOP         104
#define ID_CKVISIBLE       105
#define ID_VSCROLL         106
#define ID_EDNAME          107
#define ID_EDCAPTION       108
#define ID_STIDVALUE       109
#define IDC_EDITABLE       126
#define IDC_STRLEN         127
When you finish entering this code, choose Save from the File menu. Double-click the editing window's System menu icon to close this window.
Next, right-click the ctrltmpl [.rc] node and choose Text Edit from the View submenu of the pop-up menu. In the editing window for this file, enter the code from Listing C.
Listing C - CTRLTMPL.RC
#include "ctrltmpl.rh"

CTRL_BMP BITMAP
{
'42 4D 96 01 00 00 00 00 00 00 76 00 00 00 28 00'
'00 00 18 00 00 00 18 00 00 00 01 00 04 00 00 00'
'00 00 20 01 00 00 00 00 00 00 00 00 00 00 00 00'
'00 00 00 00 00 00 00 00 00 00 00 00 80 00 00 80'
'00 00 00 80 80 00 80 00 00 00 80 00 80 00 80 80'
'00 00 C0 C0 C0 00 80 80 80 00 00 00 FF 00 00 FF'
'00 00 00 FF FF 00 FF 00 00 00 FF 00 FF 00 FF FF'
'00 00 FF FF FF 00 00 00 00 00 00 00 00 00 00 00'
'00 00 F7 77 77 77 77 77 77 77 77 77 77 70 F7 00'
'00 00 00 00 00 00 00 00 00 70 F7 07 77 77 77 77'
'77 77 77 77 70 70 F7 07 77 77 77 77 77 77 77 77'
'70 70 F7 07 77 77 77 77 77 77 77 77 70 70 F7 07'
'77 77 77 77 77 77 77 77 70 70 F7 07 77 77 77 77'
'77 77 77 77 70 70 F7 07 77 77 77 77 77 77 77 77'
'70 70 F7 07 77 77 77 77 77 77 77 77 70 70 F7 07'
'77 77 77 77 77 77 77 77 70 70 F7 07 77 77 77 77'
'77 77 77 77 70 70 F7 07 77 77 77 77 77 77 77 77'
'70 70 F7 07 77 77 77 77 77 77 77 77 70 70 F7 07'
'77 77 77 77 77 77 77 77 70 70 F7 07 77 77 77 77'
'77 77 77 77 70 70 F7 07 77 77 77 77 77 77 77 77'
'70 70 F7 07 77 77 77 77 77 77 77 77 70 70 F7 07'
'77 77 77 77 77 77 77 77 70 70 F7 07 77 77 77 77'
'77 77 77 77 70 70 F7 07 77 77 77 77 77 77 77 77'
'70 70 F7 00 00 00 00 00 00 00 00 00 00 70 F7 77'
'77 77 77 77 77 77 77 77 77 70 FF FF FF FF FF FF'
'FF FF FF FF FF FF'
}

CTRL_DLG DIALOG 20, 38, 289, 121
STYLE DS_MODALFRAME | WS_POPUP |
  WS_VISIBLE | WS_CAPTION | WS_SYSMENU
CLASS "BorDlg_Gray"
CAPTION "Template Control Style"
FONT 8, "MS Sans Serif"
{
 RTEXT "ID", -1, 11, 23, 35, 8
 EDITTEXT ID_EDNAME, 48, 21, 141, 12, WS_BORDER |
   WS_TABSTOP
 LTEXT "", ID_STIDVALUE, 189, 22, 38, 10
 RTEXT "Title", -1, 8, 38, 35, 8
 EDITTEXT ID_EDCAPTION, 48, 36, 141, 12,
  WS_BORDER | WS_TABSTOP

 CONTROL "Visible", ID_CKVISIBLE, "BorCheck",
  BS_AUTOCHECKBOX | WS_CHILD | WS_VISIBLE |
  WS_TABSTOP, 11, 76, 35, 10
 CONTROL "Tab Stop", ID_TABSTOP, "BorCheck",
  BS_AUTOCHECKBOX | WS_CHILD | WS_VISIBLE |
  WS_TABSTOP, 49, 76, 45, 10
 CONTROL "Horizontal Scroll", ID_HSCROLL,
  "BorCheck", BS_AUTOCHECKBOX | WS_CHILD |
  WS_VISIBLE | WS_TABSTOP, 110, 77, 67, 10
 CONTROL "Border", ID_CKBORDER, "BorCheck",
  BS_AUTOCHECKBOX | WS_CHILD | WS_VISIBLE |
  WS_TABSTOP, 11, 95, 35, 10
 CONTROL "Vertical Scroll", ID_VSCROLL,
  "BorCheck", BS_AUTOCHECKBOX | WS_CHILD |
  WS_VISIBLE | WS_TABSTOP, 49, 95, 60, 10
 CONTROL "Editable", IDC_EDITABLE, "BorCheck",
  BS_AUTOCHECKBOX | WS_CHILD | WS_VISIBLE |
  WS_TABSTOP, 110, 95, 41, 10
 CONTROL "", IDOK, "BorBtn", BS_DEFPUSHBUTTON |
  WS_CHILD | WS_VISIBLE |
  WS_TABSTOP, 242, 35, 37, 25
 CONTROL "", IDCANCEL, "BorBtn", BS_PUSHBUTTON |
  WS_CHILD | WS_VISIBLE |
  WS_TABSTOP, 242, 67, 37, 25
 CONTROL "Identification", -1, "BorShade",
  BSS_GROUP | BSS_CAPTION | BSS_LEFT |
  WS_CHILD | WS_VISIBLE, 5, 6, 225, 50
 CONTROL "&Styles", -1, "BorShade", BSS_GROUP |
  BSS_CAPTION | BSS_LEFT | WS_CHILD |
  WS_VISIBLE, 5, 62, 185, 50
}
Choose Save from the File menu. Then, double-click the window's System menu icon to close the window.
Finally, double-click the ctrltmpl [.def] node. In the editing window for this file, enter the code from Listing D.
Listing D: CTRLTMPL.DEF
LIBRARY ctrltmpl

CODE MOVEABLE DISCARDABLE
DATA SINGLE
HEAPSIZE 16384
When you finish entering this module-definition file, choose Save from the File menu. Once again, double-click the window's System menu icon to close it.
To build the new control, choose Build All from the Project menu.
When the Compile Status window displays Success for the build's
status, your OWL-based custom control is ready to use. To see
how it works, let's install it as a custom control for
Resource Workshop and then place the control in a sample dialog
box.
Return to Program Manager and launch Resource Workshop (this application is simply called Workshop in version 4.0) by double-clicking its icon in the Borland C++ program group. When the Resource Workshop main window appears, choose Install Control Library... from the File menu.
In the Install A New Control Library dialog box, enter \ctrltmpl\ctrltmpl.dll in the File Name entry field. Click OK to install this DLL's custom control.
Next, choose New Project... from the File menu. When the New Project dialog box appears, click the .RC radio button in the Project File Type group and then click OK. When the Add File To Project dialog box appears, click Cancel.
Choose New... from the Resource menu. When the New Resource dialog box appears, select DIALOG from the Resource Type list box and click OK. When the Dialog Expert dialog box appears, click OK to create the new dialog box.
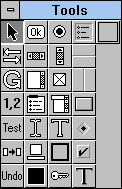
In a moment, you'll see the dialog box editing window. At the upper right-hand side of the window, you'll notice the Tool palette contains a new icon () in its upper-right corner, as shown in Figure C. This is the icon that our ListClasses() function registers with Resource Workshop.

Figure C - When you install a custom control into Resource Workshop that contains the ListClasses() function, it will display a custom toolbox icon.
To place a new OWL-based custom control on this dialog box, click
the new tool icon in the toolbox. Next, click the dialog box itself
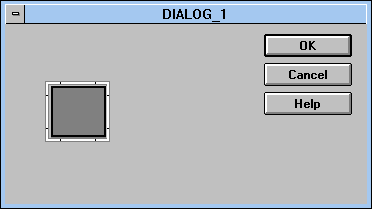
to place the new custom control. Figure D
shows the new custom control in an example dialog box.

Figure D - You can use Resource Workshop to manipulate our custom control at design time.
Double-click the new custom control to display its Style Editing dialog box (called Template Control Style in version 4.0). When the Style Editing dialog box appears, click the Border check box and then click OK.
To see how the new custom control will appear at runtime, choose Test Dialog from the Options menu. When the dialog box that contains the new custom control appears, click the custom control to confirm that this action causes your computer to beep.
When you finish, close all the open windows for this project,
but don't save any RC files. To remove the custom control
from Resource Workshop, choose Remove Control Library from the
File menu, select the CTRLTMPL.DLL file from the Installed Control
DLL's list box, and click OK.
Writing custom controls has been an obscure art for many years.
However, by using OWL and employing the technique we've
shown here, you can simplify and accelerate the development of
your own custom controls.
Copyright (c) 1996 The Cobb Group, a division of Ziff-Davis Publishing Company. All rights reserved. Reproduction in whole or in part in any form or medium without express written permission of Ziff-Davis Publishing Company is prohibited. The Cobb Group and The Cobb Group logo are trademarks of Ziff-Davis Publishing Company.