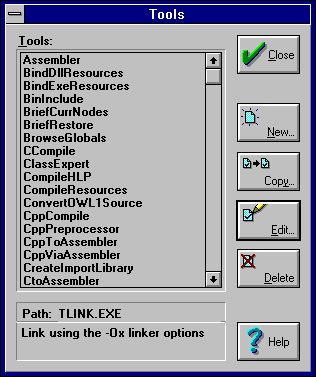
Figure A - You'll use the Tools dialog box to create the new TLINK IDE tool.

In the article Shrinking Windows EXEs and DLLs, we show how you can use some new command-line optionsOc, Oi, Oa, and Orto force TLINK to remove unnecessary information from your EXE or Dynamic Link Library (DLL) files. If you're building Windows applications using TLINK and the command-line compiler BCC from an MS-DOS command line, you can begin using the new -Ox options right away.
However, if you're using the Integrated Development Environment
(IDE) compiler and linker, you'll be disappointed to find
that the IDE's integrated linker doesn't support
the new TLINK options. In this article, we'll show how
you can use TLINK as a tool for your IDE-based projects.
In most respects, you'll add a TLINK tool to the IDE the
same way you would add any other IDE tool. However, adding TLINK
as a tool requires some command-line parameters that you won't
use for other tools.
Anytime you call an external application as an IDE tool, you'll probably want to see the output from that application (assuming that it's a command-line application, such as TLINK). There are two ways to capture the output from an IDE tool: in an editing window or in the Message window that the IDE normally uses to report errors and information.
To capture command-line output in an editing window, you need to add the $CAP EDIT macro to the tool's command line. When you use the tool, the IDE routes the output from the tool to a window titled "Transfer Output."
Unfortunately, if you run the tool multiple times, the IDE won't open a new window for each run. Instead, it will append the output from the most recent session at the end of the output from the previous session. If the tool reports many errors each time, it can be difficult to locate the error messages that belong with the last session.
As an alternative, you can capture command-line output in the IDE's Message window by adding the expression $CAP MSG(BORL2MSG) to the tool's command line. (The Message window is the one that displays information from the IDE's built-in compiler and linker.)
In the $CAP MSG() macro, you'll want to specify the BORL2MSG output filter. This is the standard output filter for most of the Borland C++ command-line tools.
If you use either version of the $CAP macro to capture the output
from a tool, you'll want to include the $NOSWAP macro in
the command line as well. The $NOSWAP macro forces the IDE to
run the tool in the background so you won't see the screen
flip back and forth between character mode and graphics mode.
If you've ever used command-line tools to build applications other than simple ones, particularly Windows applications (which usually contain several object files and libraries), you're familiar with the DOS command-line buffer's limit of 128 characters. DOS just won't accept a longer command-line string.
Since TLINK may need to bring together files from a large number of directories or subdirectories, running out of command-line buffer space is a common occurrence. To alleviate this problem, you can create a linker-response file that contains all or part of the command-line parameters that you'd normally pass directly to TLINK. As TLINK builds the application, it scans the linker-response file for the necessary filenames and paths as well as any command-line options.
Manually creating and maintaining a linker-response file can be somewhat cumbersome, since you have to update it whenever the link options or object file list changes. However, if you want to run TLINK as an IDE tool, you can use the $RSP() and $TLINKRSP macros, which force the IDE to create a linker-response file for you and use that file to link the application. After TLINK finishes linking the EXE or DLL, the IDE will automatically delete the linker-response file.
To use these macros on the tool's command line, you'll
need to specify $RSP($TLINKRSP). In this expression, $TLINKRSP
adds the correct OBJ and LIB files to the linker-response file,
and the $RSP() macro formats the file's name and inserts
the actual text string that the IDE passes to TLINK.
The final option you need to specify is whether the target for the TLINK tool will be an EXE file or a DLL. If you're going to create EXE files, you'll need to add the Twe option to the tool's command line.
If, instead, you're going to link DLLs, you'll want
to use the Twd option. However, since you'll
also want to rebuild the import library when you rebuild the DLL,
creating the appropriate tool isn't quite as simple. Next
month, we'll show how you can create an IDE tool for linking
DLLs using TLINK.
You can create three different types of IDE toolssimple transfer tools, translators, and viewers. A translator does just what its name implies: It converts a file or set of files into a different format. The command-line compiler BCC.EXE and the command-line linker TLINK.EXE are both examples of translator applications.
TLINK translates a set of OBJ files and library files into an EXE file, just like the IDE's built-in linker does. If you create an IDE tool that runs TLINK, you'll need to specify whether the IDE should use the built-in linker or your tool-based linker when it finishes compiling source files and is ready to link the OBJ files into an EXE. When you create an IDE TLINK tool, you can set it up as the default for EXE files.
Even if you don't configure the IDE to use a TLINK IDE
tool by default, you can still have it available and run it manually
from the Project window's pop-up menu. In addition, you
can specify which linker to use by adjusting the local attributes
for that EXE file. Doing so allows you to use different linker
tools for different targets in the same project.
To see how you can create an IDE tool for linking EXEs with TLINK, launch the Borland C++ IDE. When the IDE's main window appears, choose Open Project... from the Project menu.
In the Open Project File dialog box, enter
\bc45\examples\owl\owlapps\diagxprt\diagxprt.ide
in the Project File And Name entry field and click OK. When the DIAGXPRT.IDE project window appears, choose Tools... from the Options menu to display the Tools dialog box shown in Figure A.

Figure A - You'll use the Tools dialog box to create the new TLINK IDE tool.
When the Tools dialog box appears, click New... to begin
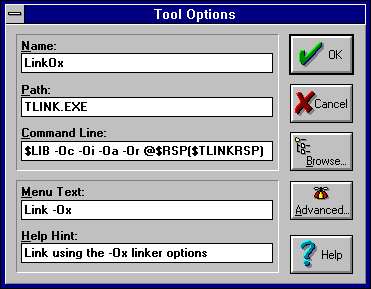
creating a new IDE tool. In the Tool Options dialog box, enter
LinkOx in the Name entry field and TLINK.EXE in
the Path entry field. To tell the IDE which command-line options
to use when you call the tool, enter
$NOSWAP $CAP MSG(BORL2MSG) -Twe -LLIB -Oc
Â-Oi -Oa -Or @$RSP($TLINKRSP)
in the Command Line entry field.
In the command-line arguments, you'll notice that we use each of the special options we discussed earlier. In addition, we've added -LLIB to specify the path to the standard library files, and the four -Ox options to perform the special optimization that we're creating this tool for.
In the Menu Text entry field of the Tool Options dialog box, enter Link -Ox, and then enter Link using the -Ox linker options in the Help Hint entry field. When you finish, confirm that the Tool Options dialog box resembles the one shown in Figure B, and click the Advanced... button.

Figure B - You'll use the Tool Options dialog box to specify the name, path, and command-line options for the new IDE tool.
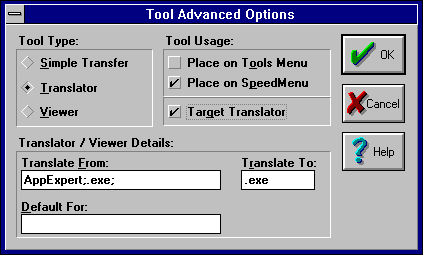
In the Tool Advanced Options dialog box, choose Translator from
the Tool Type radio button group, select the Place On SpeedMenu
and Target Translator check boxes in the Tool Usage group, enter
AppExpert;.exe; in the Translate From entry field, and
enter .exe in the Translate To entry field. When you finish,
confirm that the dialog box resembles the one shown in Figure
C, and click OK.

Figure C - The Tool Advanced Options dialog box controls which types of targets the new tool will translate.
When the Tool Options dialog box reappears, click OK to save the new tool's settings. When the Tool dialog box reappears, click Close to return to the IDE main window.
Now, choose Build All from the Project menu. When the IDE finishes
building the application, switch to Program Manager, open a DOS
command prompt, and enter cd\bc45. Then enter
dir \examples\owl\owlapps\diagxprt\*.exe
Record the size of the DIAGXPRT.EXE file, and switch back to the IDE. (Keep the DOS command prompt open.)
Right-click on the diagxprt [.exe] node in the Project window, and choose Special from the pop-up menu. From the pop-up menu, choose Link -Ox to launch TLINK using the -Ox options.
When the new TLINK tool finishes relinking the EXE, switch back to the DOS command prompt and press [F3] to repeat the dir command. This time, notice that the size of the EXE is considerably smaller than it was before, as shown in Table A.
Table A: Linker differences
| Linker tool | EXE size |
| LinkTarget | 1,521,427 |
| Link -Ox | 310,272 |
Much of the size difference is due to the fact that the new TLINK
tool doesn't insert debugging and other default information.
However, even if you remove this information from the EXE by using
all the optimizations available on the linker page of the IDE's
Project Options dialog box, you won't be able to create
a smaller EXE than the Link -Ox tool does.
Every programmer wants to create the most efficient programs possible,
and the new Ox options help TLINK keep EXE size at
a minimum. By creating the TLINK IDE tool we've described
here, you can take advantage of the external linker's superior
optimizations without sacrificing the convenience of the IDE.
Copyright (c) 1996 The Cobb Group, a division of Ziff-Davis Publishing Company. All rights reserved. Reproduction in whole or in part in any form or medium without express written permission of Ziff-Davis Publishing Company is prohibited. The Cobb Group and The Cobb Group logo are trademarks of Ziff-Davis Publishing Company.