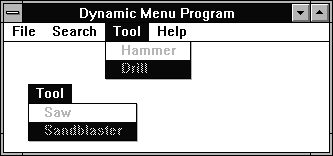
Figure A - In a complex application, you may need to dynamically change an entire menu.

In a Windows application, the menu bar provides the user with a tool for issuing commands and changing program modes. But what if you want to present the user with different options depending on what type of data the user is viewing?
For many situations, the answer is simpleyou can provide all the possible commands in various menus, enabling commands that are appropriate for the current context and disabling those that aren't. (See "Enabling and Disabling Commands in an ObjectWindows 2.0 Application" [July 1994] and "Menu Enabling and Disabling in OWL 2.0" [October 1994] for more information.) However, the answer is not always so easy. Some situations may require you to replace the individual menu items that appear in a given menu or even to eliminate or replace an entire menu, as shown in Figure A.

Figure A - In a complex application, you may need to dynamically change an entire menu.
In a traditional Windows application, managing your menus this
way would be a nightmare of complex code. In this article, we'll
show how you can use objects from the TMenuDescr class
in an ObjectWindows Library (OWL) application to easily change
the menus that appear in the menu bar.
To simplify initializing and modifying the menu bar, the OWL class library provides the TMenuDescr class. This class works cooperatively with the TFrameWindow class to add commands or menus to or delete them from the menu bar.
Internally, the TMenuDescr class maintains the ID of a menu resource and an array of six pop-up menu types, as listed in Table A. In this array, TMenuDescr objects keep track of how many menus of each type the application will display.
Tabe A - The TMenuDescr class defines these six types of menus.
| Menu Type | Commands |
| FileGroup | File manipulation and print commands |
| EditGroup | Data modification and Clipboard commands |
| ContainerGroup | Commands that affect the current window or view |
| ObjectGroup | Data creation or property modification commands |
| WindowGroup | Window commands |
| HelpGroup | Help commands |
For example, most applications will display only one File or Edit menu at a time. However, you might want to display a menu titled View and another titled Settingsboth of which provide commands that apply to a specific type of window and, therefore, could belong to the ContainerGroup menu type.
When you create the TFrameWindow object that will display these menus, you'll also create a TMenuDescr object. The TMenuDescr object then sets the value of the array entries for both the File and Edit menu types to 1. To identify both the View and Settings menus as ContainerGroup menu types, you'll set the value of the Container-Group array entry to 2.
In the TMenuDescr object's constructor, you'll
specify the Menu resource's ID and identify the integers
that represent the array entry values. For example, to create
a TMenuDescr object that has one FileGroup menu, one
EditGroup menu, and two ContainerGroup menus, you'd write
TMenuDescr md(MAIN_MENU, 1, 1, 2, 0, 0, 0);
(There are no ObjectGroup, WindowGroup, or HelpGroup menus in this menu resource.)
In the resource file that defines these menus, you'll need
to make sure that the different types of menus appear in the same
order as the types in Table A. For example, the File, Edit, View,
and Settings menu definitions we just described would need to
appear as
MAIN_MENU MENU
{
  POPUP "File"
  {
  }
  POPUP "Edit"
  {
  }
  POPUP "View"
  {
  }
  POPUP "Settings"
  {
  }
}
in the resource file.
(Actually, you could reverse the order of the View and Settings menus since they belong to the same menu typeContainer-Group. However, if you moved the Edit menu to the end of the MAIN_MENU definition (after the closed curly brace}that follows POPUP "Settings"), the View menu would become part of the Edit-Group menu, and the Edit menu would become part of the ContainerGroup menu.)
Listing A: menudefs.h
#define MAIN_MENU      1
#define OPTION_MENU    2

#define CM_FILENEW  1000
#define CM_FILEOPEN 1001
#define CM_FIND     1002
#define CM_REPLACE  1003
#define CM_REPEAT   1004
#define CM_PASTE    1005
#define CM_HAMMER   1006
#define CM_DRILL    1007
#define CM_SAW      1008
#define CM_SNDBLST  1009
#define CM_HELP     1010
After you've created the TMenuDescr object for the window, you'll assign it to the TFrameWindow object by calling that object's SetMenuDescr( ) member function. This function uses the TMenuDescr class's copy constructor to create a dynamically allocated copy of the TMenuDescr object in heap memorynot stack memoryand to set the TFrameWindow object's MenuDescr data member to that heap address.
When you need to make changes to the current menu bar, you'll create a new TMenuDescr object. This TMenuDescr object describes how the frame window should modify its menu bar using a particular Menu resource. As before, when you call the TMenuDescr object's constructor, you'll specify a resource ID for the menu and identify the integer values that represent how many menus of a given type the resource defines.
To merge the menus from the new TMenuDescr object into the existing menu bar, you'll call the frame window's MergeMenu( ) member function. If you specified a value of 0 for a specific type of menu in the TMenuDescr object's constructor, this function won't change the current menus of that type.
If the new TMenuDescr object describes one or more menus of a given type, the MergeMenu( ) function will remove all the current menus of that type and replace them with the new menus of the same type. However, if you want to remove a set of menus instead of replacing them, use a value of -1 for that menu type's parameter in the TMenuDescr object's constructor. (See BCJ - Under the Hood of Owl 2.0 - Understanding how menu merging works, for more information on the TFrameWindow class's MergeMenu( ) member function.)
If at some point you need to restore the original menu bar, you can call the frame window's RestoreMenu( ) member function. In this function's body, the RestoreMenu( ) function calls the AssignMenu( ) member function with the original menu resource ID to reset the menu bar.
Finally, when your application destroys its TFrameWindow
object, the frame window's destructor destroys its TMenuDescr
object as well. Now, let's create a simple program that
changes its menu bar dynamically using TMenuDescr objects.
To begin, launch the Borland C++ 4.0 Integrated Development Environment (IDE). When the IDE's main window appears, choose New Project... from the Project menu.
In the New Project dialog box, enter \DYNAMENU\DYNAMENU.IDE in the Project Path And Name entry field, choose Application from the Target Type list box, choose Small from the Memory Model combo box, and select the OWL check box in the Standard Libraries section. Click OK to create the new project.
When the DYNAMENU.IDE project window appears, choose New from the File menu and enter the code from Listing A in the editor window that appears. When you finish, choose Save As... from the File menu, enter MENUDEFS.H in the File Name entry field of the Save File As dialog box, and click OK.
Choose New from the File menu again. When the new editor window appears, enter the resource definitions from Listing B. When you finish, choose Save As... from the File menu, enter DYNAMENU.RC in the File Name entry field of the Save File As dialog box, and click OK.
Listing B: dynamenu.RC
#include "menudefs.h"

MAIN_MENU MENU
{
  POPUP "File"
  {
    MENUITEM "New", CM_FILENEW
    MENUITEM "Open...", CM_FILEOPEN
  }

  POPUP "Search"
  {
    MENUITEM "Find...", CM_FIND
    MENUITEM "Replace...", CM_REPLACE
    MENUITEM "Repeat", CM_REPEAT
  }

  POPUP "Tool"
  {
    MENUITEM "Hammer", CM_HAMMER
    MENUITEM "Drill", CM_DRILL
  }

  POPUP "Help"
  {
    MENUITEM "HELP", CM_HELP
  }
}

OPTION_MENU MENU
{
  POPUP "Edit"
  {
    MENUITEM "Paste", CM_PASTE
  }
  POPUP "Tool"
  {
    MENUITEM "Saw", CM_SAW
    MENUITEM "Sandblaster", CM_SNDBLST
  }
}
Listing C: dynamenu.cpp
#include <owl\applicat.h>
#include <owl\framewin.h>
#include "menudefs.h"

class TDMWindow : public TWindow
{
  public:
    TDMWindow(TWindow* parent = 0) :
      EditMenu(FALSE)
    { Init(parent, 0, 0); }

  protected:
    BOOL EditMenu;
    void EvLButtonDown(UINT, TPoint&);

    DECLARE_RESPONSE_TABLE(TDMWindow);
};

DEFINE_RESPONSE_TABLE1(TDMWindow, TWindow)
  EV_WM_LBUTTONDOWN,
END_RESPONSE_TABLE;

void TDMWindow::EvLButtonDown(UINT, TPoint&)
{
  TFrameWindow* frame =
    GetApplication( )->GetMainWindow( );
  if(EditMenu)
  { frame->RestoreMenu( );
    EditMenu = FALSE;
  }
  else
  { frame->MergeMenu(TMenuDescr(OPTION_MENU,
      0,   // # of FileGroup entries
      1,   // EditGroup
      -1,  // ContainerGroup
      1,   // ObjectGroup
      0,   // WindowGroup
      0)); // HelpGroup
    EditMenu = TRUE;
  }
}

class TDynaMenuApp : public TApplication
{
  public:
    TDynaMenuApp( ){}
    void InitMainWindow( )
    {
      TFrameWindow* frame;
      SetMainWindow(frame = new TFrameWindow(0,
        "Dynamic menu Program",
        new TDMWindow));
      frame->AssignMenu(1);
      frame->SetMenuDescr(TMenuDescr(MAIN_MENU,
                1,   // # of FileGroup entries
                0,   // EditGroup
                1,   // ContainerGroup
                1,   // ObjectGroup
                0,   // WindowGroup
                1)); // HelpGroup
    }
};

int OwlMain(int, char* [])
{
  return TDynaMenuApp( ).Run( );
}
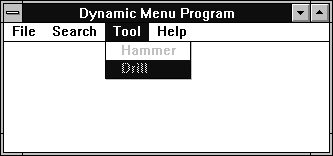
Choose Run from the Debug menu to build and run the DYNAMENU.EXE program. When the program runs, its main window will contain the menu items from the MAIN_MENU resource, as shown in Figure B. (By the way, since we didn't define any menu command response functions in this program, OWL automatically disables all the menu items.)

Figure B - The initial menu bar contains File, Search, Tool, and Help menus.
To initialize the menu bar, the TDynaMenuApp application class's InitMainWindow( ) member function creates a new TFrameWindow object. Then, this member function makes the new TFrameWindow object the main window for the application by calling the SetMainWindow( ) member function.
Finally, the SetMainWindow( ) function sets up the menu bar by creating a TMenuDescr object from the MAIN_MENU resource and then passing the object to the SetMenuDescr( ) function. In the constructor, we specify that the TMenuDescr object contains one FileGroup menu (File), one ContainerGroup menu (Search), one ObjectGroup menu (Tool), and one HelpGroup menu (Help).
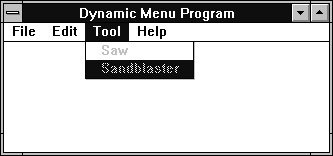
Now, click anywhere in the Dynamic Menu Program window. As you click the mouse, the menu bar should immediately change and contain the menu items from the OPTIONS_MENU resource, as shown in Figure C.

Figure C - After you click the mouse, the menu bar contains the File, Edit, and Help menus, and a new version of the Tool menu.
When you click the mouse, Windows sends a WM_LBUTTONDOWN message to the program that OWL handles by calling the program's EvLButtonDown( ) member function. Inside this member function, the program simply tests the value of the EditMenu flag to see whether the Edit menu is visible. Then the program either restores the default menu or merges the default menu with the optional menu.
In the constructor for the new TMenuDescr object, we specify that the object contains one EditGroup menu (Edit) and a new ObjectGroup menu (Tool). In addition, we tell the TFrameWindow object to remove the current ContainerGroup menu by specifying a value of -1 for that parameter.
If you continue to click the mouse in the program's window,
the menu bar will toggle back and forth between these two settings.
To exit the application, double-click on its System menu icon.
Experienced Windows users will appreciate a user interface that
presents them with logical menu choices for specific situations.
By learning to use TMenuDescr objects to dynamically
change your OWL application's menu bar, you can easily
add this functionality. In a future issue, we'll show how
you can use TMenuDescr objects in a Doc/View application
to provide different menu commands for specific types of views.
Copyright (c) 1996 The Cobb Group, a division of Ziff-Davis Publishing Company. All rights reserved. Reproduction in whole or in part in any form or medium without express written permission of Ziff-Davis Publishing Company is prohibited. The Cobb Group and The Cobb Group logo are trademarks of Ziff-Davis Publishing Company.