Figure A - You'll use the Advanced Options dialog box to suppress any default source nodes.

November, 1994 - Vol. 1 No. 11
If you're like most C++ programmers, you take pride in finding ways you can reuse code in an object-oriented design. If you take reusing code seriously, you look for ways you can share code between different projects. TurboVision, ObjectWindows, and other class libraries are examples of code the designer intended you to reuse.
However, there may be times when you want to build an application with two different sets of compiler options (for example, with and without debugging information), but you want to keep copies of the OBJ and EXE files for both builds. A convenient way to accomplish this is to put a target for each type of build in the same project. (To learn more about this, see Borland C++ 4.0 IDE - Adding multipletargets to a project.)
Unfortunately, if you maintain two different targets that consist
of the same set of files, you have to remember to add new files
to both targets to keep them synchronized. In this article,
we'll show how you can use sets of files called source
pools to share source files between multiple target nodes
in a Borland C++ 4.0 project.
A source pool is simply a collection of project files that the Integrated Development Environment (IDE) won't build directly. If you want the IDE to build any of the files in a source pool, you'll need to reference copy either one of the files or the entire source pool to an executable target's node. (See Making reference copies of project nodes, for more information about reference copies.)
If you reference copy only one of the files in a source pool to an executable target, the IDE will process that file as if you'd added it directly to the target's node. If you reference copy the entire source pool, the IDE will process the files from the source pool as if you'd added all of them directly to the target's node.
Before you start using source pools in a project, you'll want to make sure you've created separate directories to contain the OBJ files for each target. You should do so because the whole idea behind source pools is to provide a convenient means of sharing source files between two or more target nodes.
Also, if you're going to build two applications from targets that have the same name, you'll want to add a description at the end of the target name. To do this, you'll use the Node Attributes dialog box.
To create the source pool, you'll create a new target that has Source Pool as its Target Type. Once you've created the source pool, you'll reference copy the source pool to the appropriate target nodes. Then, you'll add to it all the source files you'll want to use when you reference the source pool in target nodes.
Finally, you'll change the local options of the appropriate
target nodes to specify a new Intermediate directory and Final
directory for that target's OBJ and EXE files. To see how
all this fits together, let's create an example project
that shares source files with a source pool.
At a DOS command prompt, enter the following commands:
MD \GIGO
MD \GIGO\EASYWIN
These commands create the directories you'll use for the two different applications this project will produce.
Now, launch the Borland C++ 4.0 IDE. When the IDE's main window appears, choose New Project... from the Project menu.
In the New Project dialog box, enter \GIGO\GIGO.IDE in the Project Path And Name entry field. Then, select Application [.exe] in the Target Type list box and choose DOS Standard from the Platform combo box.
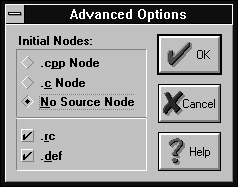
Next, click the Advanced... button. In the Advanced Options dialog box, select No Source Node, as shown in Figure A, and click OK.

Figure A - You'll use the Advanced Options dialog box to suppress any default source nodes.
When the New Project dialog box reappears, click OK to create a new project with these settings. When the project window appears, it will have a single target node named gigo [.exe], which has no child nodes.
To differentiate this target from the one you'll create next, right-click on the name gigo [.exe] and choose Edit Node Attributes... from the pop-up menu. When the Node Attributes For GIGO dialog box appears, enter DOS Version in the Description entry field and click OK.
To add the second target node, choose New Target... from the Project menu. In the New Target dialog box, enter GIGO in the Target Name entry field, choose Standard from the Target Type combo box, and click OK.
When the Add Target dialog box appears, choose EasyWin from the Target Type list box. Then, click the Advanced... button. When the Advanced Options dialog appears, select No Source Node again and click OK.
When the Add Target dialog box reappears, click OK to create the new target. Now, you should see a second target named gigo [.exe] in the project window.
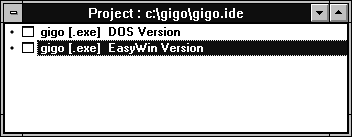
Right-click on the new target and choose Edit Node Attributes... from the pop-up menu. When the Node Attributes For GIGO dialog box appears, enter EasyWin Version in the Description entry field and click OK. Now, you should see two empty targets named gigo [.exe] in the project window, as shown in Figure B.

Figure B - In the project window, the node descriptions will help you recognize each target.
Right-click on the EasyWin Version target and choose Edit Local Options... from the pop-up menu. When the Options: At GIGO.EXE dialog box appears, enter EASYWIN in the Intermediate and Final entry fields in the Output Directories section. Click OK.
To add the source pool for this project, choose New Target... from the Project menu. When the New Target dialog box appears, enter GIGO in the Target Name entry field, choose SourcePool from the Target Type combo box, and click OK.
In the project window, you'll now see a third target named gigo [SourcePool]. To reference copy this source pool to each of the [.exe] target nodes, press [Alt], left-click on the name gigo [SourcePool], drag it onto one of the target nodes, and release the mouse button.
Repeat this operation on the other [.exe] target node. When you finish, you'll see a reference copy of the source pool as a child node of each [.exe] target node.
To add a source file to the source pool, right-click on the source pool node and choose Add Node from the pop-up menu. When the Add To Project List dialog box appears, enter GIGO.CPP in the File Name entry field and click OK.
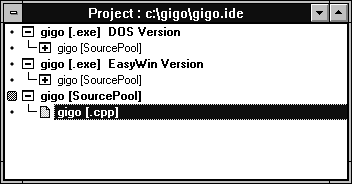
Now, you'll see the new source node gigo [.cpp] appear as a child node of the source pool. You should also notice that the icons for the reference copies of the source pool now show a plus sign (+), as shown in Figure C.

Figure C - As you add source files to the source pool, those files will become part of the target nodes that use the source pool.
The plus sign in the source pool reference copies indicates that the source node you just added is now a child node of both [.exe] target nodes. To confirm that this node is part of the targets, left-click on the plus sign for each [.exe] target node.
Double-click on the source node gigo [.cpp] in the project window. When the editor window for this file appears, enter the code from Listing A.
Listing A: gigo.cpp
#include <iostream.h>

int main()
{
 cout << "Enter 'garbage'" << endl;
 char cesspool[80];
 cin >> cesspool;
 cout << cesspool << " cin," << endl;
 cout << cesspool << " cout" << endl;
 cout << "Enter q to quit" << endl;
 cin >> cesspool;
 return 0;
}
When you finish entering the code, choose Save from the File menu. Then, double-click on the editor window's System menu icon to close the window.
Now, choose Make All from the Project menu. As the compiler displays the Compile Status window and begins building the target applications, you'll notice that it doesn't try to build the source pool node. When the Compile Status window displays Success, click OK.
To run the EasyWin target application, double-click on its target
name. When you see the prompt
Enter 'garbage'
enter GARBAGE.
Now, you'll see the following output in the application
window:
garbage cin,
garbage cout
Enter q to quit
When you enter a Q (or any other character) from the keyboard, the application will exit. Double-click on the application's window to close it.
Run the DOS version by double-clicking on its target name. When
you enter GARBAGE, you should see the same output you saw
with the EasyWin version.
You can use source pools a number of other ways in your projects. Even so, there are many reasons to use the basic technique we've shown here. For example, you might be building 16- or 32-bit versions of the same application, or you might be building processor-specific versions (optimized for 386, 486, or Pentium systems).
Keep in mind that you can change the build options for the source
pool to affect all the targets that use it. If you want to change
the build options for just one of the targets, that action won't
affect the build options of the source pool or any of the other
targets.
Using source pools is a somewhat abstract method of logically
grouping source files. By learning to use source pools, you can
synchronize source files that are common between applications.
Copyright (c) 1996 The Cobb Group, a division of Ziff-Davis Publishing Company. All rights reserved. Reproduction in whole or in part in any form or medium without express written permission of Ziff-Davis Publishing Company is prohibited. The Cobb Group and The Cobb Group logo are trademarks of Ziff-Davis Publishing Company.