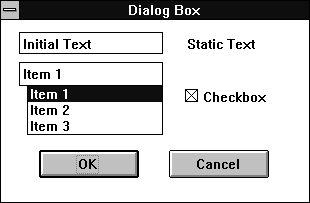
Figure A - You can use transfer buffers to simplify managing complex dialog boxes.

November, 1994 - Vol. 1 No. 11
In last month's issue of Borland C++ Developer's Journal, we showed how you can use a transfer buffer to pass data to and from a list box control (see "Using Transfer Buffers With OWL 2.0 List Boxes"). However, in the example, we created a simple dialog box that contained only a list box and two buttons.
To manage a more complex dialog box with a transfer buffer, you
must be very careful about specifying the transfer buffer elements
in the correct manner. In this article, we'll show how
you can use transfer buffers to set up and respond to complex
dialog boxeslike the one shown in Figure Ain
an ObjectWindows Library (OWL) 2.0 application.

Figure A - You can use transfer buffers to simplify managing complex dialog boxes.
In a dialog box that contains only one control, the transfer buffer you'll create will be correspondingly simple. For example, in the TRANSBUF.EXE program we created last month, the transfer buffer class MyDialogBuffer consisted of only a TListBoxData struct.
As you add more controls to your dialog boxes, though, you'll
have to add corresponding elements to your transfer buffer. In
fact, if you don't include a transfer element for each
control in the dialog box that transfers data, it's unlikely
that the OWL code will be able to properly initialize any of the
controls.
In addition, for you to include an element for each control, the transfer buffer must contain those elements in a very specific order. The order that you'll use for the transfer elements will be the same order you use for the controls when you build the dialog box.
When you add OWL control objects to a TDialog-derived object, OWL builds a list of child objects it will manage. This happens due to cooperation between the TDialog-derived object and the constructors of the OWL control objects.
For example, if you're building a simple dialog box that
contains an edit field, a list box, and a check box, you can write
TDialog* d = new TDialog(GetMainWindow(),DLG_ID);
TEdit* ed = new TEdit(d, ED_ID, 20);
TListBox lb = new TListBox(d, LB_ID);
TCheckBox cb = new TCheckBox(d, CB_ID);
These lines create a new TDialog object d, then add the edit field ed, the list box lb, and the check box cb to the TDialog object.
You'll notice that the first parameter of each control's constructor is the pointer to the TDialog object d. In the control constructors, each control object notifies the TDialog object that the control object is the TDialog object's child.
When the TDialog object is ready to set or retrieve the dialog box data, it uses this same list of controls to identify the data in its transfer buffer. Inside the SetupWindow() member function of the TWindow class, the OWL code indirectly calls the Transfer() member function, which in turn calls the Transfer() member function with each of the TDialog object's child objects.
As the TWindow::Transfer() function iterates the list of child objects, it uses the return values from these calls to increment a pointer that points to the current transfer element in the transfer buffer. (By default, each control object's Transfer() member function returns the size of its corresponding transfer buffer element.)
To illustrate, consider what happens if we define a new transfer
buffer to use with the TDialog object d. If
we write
struct DlgBuff
{  char         edText[20];
   TListBoxData lbData;
   WORD         cbData;
};
and then create an instance of the DlgBuff struct buf, the TWindow::Transfer() function will advance the pointer through the transfer buffer, as shown in Figure B.

Figure B - The TWindow::Transfer() function initializes each child control from a corresponding location in the transfer buffer.
Last month, we focused our attention on transferring data to and
from a list box. Briefly, let's examine how you transfer
data to and from the other OWL controls.
If you look at the class declaration for the TComboBox class, you'll see that it derives most of its behavior from the TListBox class we used before. However, to manage a TComboBox object, you'll use a TComboBoxData object as its transfer buffer element.
Unfortunately, the section on combo box transfer buffers in Chapter 10 of the OWL 2.0 Programming Guide might lead you to believe that the member functions for the TComboBoxData class are significantly different from those for the TListBoxData class. In reality, there are only a few small differences.
For the most part, you'll use both classes the same way. The primary difference is that a list box can contain more than one selected item. In contrast, you can select only one item in a combo box.
To support multiple selections, the class TListBoxData provides a member function GetSelIndices() that returns a reference to an internal array of integers. In this array, each integer contains the index of one of the selected items in the list box.
Because it doesn't need to support multiple selections, the TComboBoxData class provides the GetSelIndex() member function instead. This function returns the integer value of the selected item's index.
By the way, the Programming Guide mistakenly lists the
Selection data member of the TComboBoxData class
as a char* that contains the selected item's text.
Selection is actually a string object for the
selected item, but you can retrieve the internal char*
pointer by calling GetSelection().c_str().
The transfer buffer elements for the remaining controls are all basic C++ types. To transfer data to and from a TEdit object, you use an array of characters that's the same size as the textLen parameter of the TEdit object's constructor. For TRadioButton or TCheckBox objects, you use a WORD (the Windows typedef for an unsigned int).
By default, TStatic, TButton, and TGroupBox
objects don't take any action in response to the Transfer()
function call. This is because each of their constructors calls
the member function DisableTransfer(). To transfer data
to one of these controls (for example, to alter the text in a
TStatic control), you'll need to call the EnableTransfer()
member function of the appropriate object.
Now, let's rewrite the TRANSBUF.EXE application from last month to manage a more complex dialog box. To begin, launch the Borland C++ 4.0 Integrated Development Environment (IDE).
When the IDE's main window appears, choose New Project... from the Project menu. In the New Project dialog box, enter \TRNSBUF2\TRNSBUF2.IDE in the Project Path and Name entry field. Then, select Application [.exe] from the Target Type list box, Windows 3.x (16) from the Platform combo box, and the OWL check box in the Standard Libraries section. Click OK to create the new project.
When the Project window appears, double-click on the name TRNSBUF2 [.CPP]. When the new editing window for this file appears, enter the code from Listing A.
When you finish entering the code, choose Save from the File menu. Then, choose New from the File menu and enter the resource code from Listing B in the editing window that appears.
Listing B: TRNSBUF2.RC
1000 DIALOG 19, 15, 154, 91
STYLE WS_POPUP | WS_CAPTION | WS_SYSMENU
CAPTION "Dialog Box"
{
 DEFPUSHBUTTON "OK", IDOK, 19, 65, 50, 14
 PUSHBUTTON "Cancel", IDCANCEL, 84, 65, 50, 14
 COMBOBOX 1200, 9, 21, 72, 38,
   CBS_SIMPLE | WS_TABSTOP
 EDITTEXT 1100, 9, 6, 72, 11
 CHECKBOX "Checkbox", 1300, 92, 32, 52, 12,
   BS_AUTOCHECKBOX | WS_TABSTOP
 LTEXT "Text", 1400, 93, 8, 54, 12
}

1 MENU
{
 POPUP "Menu"
 {
  MENUITEM "Dialog", 101
 }
}
When you finish entering the code for the resource file, choose Save from the File menu and enter TRNSBUF2.RC in the Save File As dialog box. Click OK to save the file. To let the compiler use its default module definition file, right-click on the name TRNSBUF2 [.DEF] in the project window and choose Delete Node from the pop-up menu. Click Yes when the IDE asks if you want to delete this node.
When you're ready to build and run the application, choose Run from the Debug menu. When the TRNSBUF2.EXE window appears, choose Dialog from the menu. When the dialog box appears, it should resemble the one shown in Figure A.
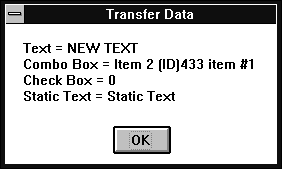
Now, enter NEW TEXT in the entry field, select Item 2 in the combo box, and click the Checkbox check box. When you click OK, you'll see a message box that displays a summary of the data from the transfer buffer, as shown in Figure C.

Figure C - The message box displays a summary of the transfer buffer information for each control.
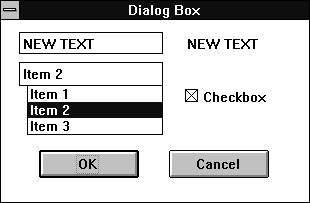
When you click OK in the message box, the dialog box will reappear
with the same information you entered previously, as shown in
Figure D. However, you'll notice that the static text field
now contains the text you entered in the entry field. This demonstrates
how you can use the function EnableTransfer() to explicitly
transfer text to this control.

Figure D - Each control in the dialog box contains the data from the corresponding transfer buffer elements.
Click Cancel to dismiss the dialog box. Then, double-click on the System menu icon to exit the TRNSBUF2.EXE application.
If you want to use one of the other combo box styles, you won't
need to make any changes to the TRNSBUF2.CPP file, because the
TComboBoxData class will work correctly with all three
styles of combo boxes. To confirm this, change the combo box style
in the TRNSBUF2.RC file from CBS_SIMPLE to either CBS_DROPDOWNLIST
or CBS_DROPDOWN and relink the application.
It's not uncommon to see OWL programs derive new dialog box classes from the TDialog class, as we've shown in this example. However, unless you need to define some specific action that must occur while the user is viewing the dialog box, you should avoid overriding member functions of the TDialog class.
Particularly if you're just beginning to use the OWL TDialog and TWindow classes, you should derive new classes from TDialog merely to customize the creation of the dialog box object's child controls in the derived class constructor. If you find yourself defining member functions for a TDialog-derived class to set or retrieve control states when the dialog box is not in view, you're probably not using transfer buffers properly.
You'll notice that in the example we've shown here,
we create a MyDialog object and then assign its address
to a TDialog pointer. Using a TDialog pointer
prevents us from calling anything other than the public member
functions of the TDialog class. This is a good habit
because it makes it impossible to manipulate any of the dialog
box's control objects directly from the pointer.
Initializing dialog box controls in a traditional C application
can be tedious. By using transfer buffers to manage complex dialog
boxes in OWL applications, you can achieve the same results with
fewer problems.
Copyright (c) 1996 The Cobb Group, a division of Ziff-Davis Publishing Company. All rights reserved. Reproduction in whole or in part in any form or medium without express written permission of Ziff-Davis Publishing Company is prohibited. The Cobb Group and The Cobb Group logo are trademarks of Ziff-Davis Publishing Company.