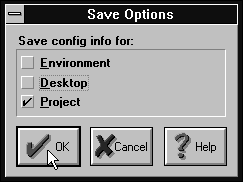
Figure A - You save the settings of the current project by using the Save Options dialog box.

In the accompanying article, Borland C++ 4.0 IDE - Copying a tool to another project we show you how to copy a custom tool from one project to another existing project. However, even this shortcut may seem too time-consuming if you have to use it to add a tool to each new project you create.
Fortunately, the Borland C++ 4.0 Integrated Development Environment
(IDE) maintains a default project file containing the information
for the tools that will be available when you create a new project.
Here, we'll show you how to specify the default tools for
new projects.
There are basically two ways for you to create tools that will appear in new projects. The first method is to create each tool without an open project file. The IDE will save the tools you create this way to the BCWDEF.IDE default project file.
The second method is to use the technique from the accompanying article to copy a tool's description text to the BCWDEF.PDL file. This method is frequently better because it allows you to copy existing tools from a project instead of re-creating each of them for the default project.
Now, let's copy a tool from an existing project to the
default file for new projects. (The example below assumes that
you've completed the example from the accompanying article.)
To add a tool to the default project, begin by closing any project file that may be open. Next, choose Save... from the Options menu.
When the Save Options dialog box appears, deselect the Environment and Desktop check boxes, as shown in Figure A. To save the current project settings (and create the BCWDEF.PDL file), click the OK button.

Figure A - You save the settings of the current project by using the Save Options dialog box.
Open the settings file for the WHELLO project by choosing Open...
from the File menu and entering
\bc4\examples\windows\whello\whello.pdl
in the File Name entry field of the Open A File dialog box. Click
OK to open the edit window for the file WHELLO.PDL, and then locate
the section of the file that contains the lines
{ Tool = "Notepad"
  { Category = Transfer }
  { Path = "notepad.exe" }
  { MenuText = "Notepad" }
  { SearchPath = SourcePath }
  { ToolFlag = ToolsMenu }
}
and select this text.
Copy the text description for the Notepad tool to the Clipboard by choosing Copy from the Edit menu. Then, close the edit window for the WHELLO.PDL file by double-clicking on its System menu icon.
Open the settings file for the default project by choosing Open...
from the File menu and entering
\bc4\bin\bcwdef.pdl
in the File Name entry field of the Open A File dialog box. Click
OK to open the edit window for the BCWDEF.PDL file, and then find
the section that contains
{ SubSystem = Tool
}
and place the cursor in front of the right brace (}).
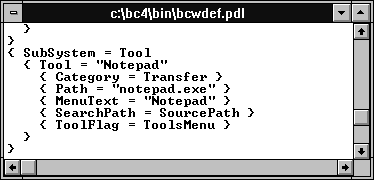
Choose Paste from the Edit menu to add this tool definition to the default project settings file, as shown in Figure B. Choose Save from the File menu to save the change to BCWDEF.PDL, and then double-click on the edit window's System menu icon to close the window. Now, all new projects that you create will automatically have the Notepad tool available on the Tool menu.

Figure B - You add tools to the BCWDEF.PDL file to make them available inside new projects.
Copyright (c) 1996 The Cobb Group, a division of Ziff-Davis Publishing Company. All rights reserved. Reproduction in whole or in part in any form or medium without express written permission of Ziff-Davis Publishing Company is prohibited. The Cobb Group and The Cobb Group logo are trademarks of Ziff-Davis Publishing Company.