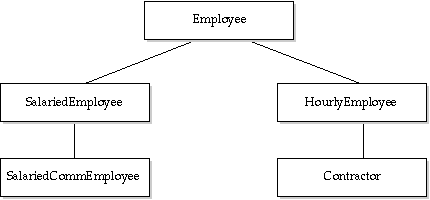
Figure A - You can derive several types from a base class.

If you need to know the real type of a particular object when you have a base class pointer or reference to the object, you can use one of the Run-Time Type Identification (RTTI) functions to query the object for its real type. This is useful when you're interested in testing to see if a given object belongs to a particular class in an existing class hierarchy, or if you'd simply like to catalog or display the object's class name at run time.
In this article, we'll show you how to use the RTTI function
typeid() to determine an object's true class,
even if your program is using a base class pointer or reference
to refer to the object. First, we'll show you the basic
syntax of the RTTI functions, and then we'll work through
a simple example that demonstrates how you might use RTTI.
If your program maintains a list of objects that all derive from a given base class, you'll probably retrieve objects from the list as base class pointers or references. Figure A shows a typical hierarchy that you might use to implement a simple employee payroll program.

Figure A - You can derive several types from a base class.
If you've defined a CalculatePay() virtual function
for each class in this hierarchy and you keep track of the current
objects by using a list of pointers to Employee objects,
you'll be able to calculate the pay for each object in
the list by using something like
employeeList[i]->CalculatePay();
Now, if you wanted to print the classification of each object
in the list (perhaps to confirm that you've entered an
employee as the correct type), you might define a function similar
to
void HourlyEmployee::printType()
{ cout << "HourlyEmployee" << endl; }
for each class in the hierarchy, and then call that function for
each item in the list.
If you decide to use the RTTI function typeid() instead,
you can simply write
Type_info item = typeid(*employeeList[i]);
This statement uses the typeid() function to return a
Type_info object that contains information about the
class the object belongs to.
The Type_info class contains specific information about
a given class and its ancestry. Figure B shows a simplified version
of the Type_info class definition you'll find
in Borland's TYPEINFO.H header file.
class Type_info {
  private:
    Type_Info(const Type_info &);
      Type_Info&
    operator=(const Type_info&);
  public:
      virtual
    ~Type_info();
      int
    operator==(const Type_info &) const;
      int
    operator!=(const Type_info &) const;
      int
    before(const Type_info &) const;
      const char*
    name() const;
};
Once you have a Type_info object (from calling the typeid()
function), you can easily display information for the associated
object's class. From the earlier example, you can now print
the name of each employee's specific class by calling the
Type_info::name() member function as shown below:
cout << item.name() << endl;
By using the RTTI mechanism instead of writing your own naming function, you can be sure that your program will print the correct name even if you change the names of the classes. If you defined your own naming function, you'd have to update those functions when you changed the names of the corresponding classes.
In addition to simply displaying an object's name as a
text string, you can also compare two Type_info objects
directly to see if their corresponding objects belong to the same
class. To do this, you might write something similar to
HourlyEmployee tempHE;
if(typeid(tempHE) == typeid(*employeeList[i]))
  // this is an HourlyEmployee object
  ;
else
  // this is something else
  ;
Now let's put the RTTI mechanism to work. To do this, we'll
implement a simplified version of the payroll program we described
earlier.
To begin, launch the Borland C++ 4.0 Integrated Development Environment (IDE). When the IDE's menu bar appears, choose New Project... from the Project menu.
In the Project Path and Name entry field of the New Project dialog
box, enter
c:\bc4\rtti\rttitest.ide
In the Target Type list box, select the EasyWin[.exe] item.
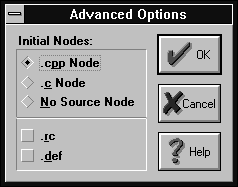
Next, click the Advanced button. When the Advanced Options dialog box appears, select the .cpp Node radio button, as shown in Figure C. Click OK to save this setting.

Figure C - You'll use the Advanced Options dialog box to set the default source nodes as C++ files.
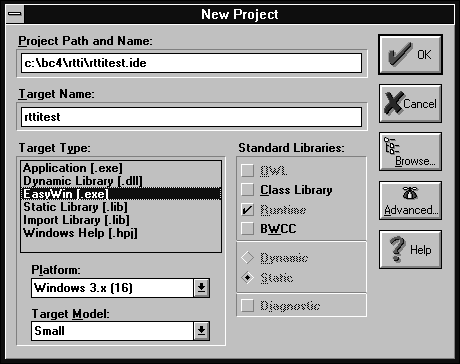
When the New Project dialog box reappears, it should resemble
the one shown in Figure D. Click OK to create the new project.

Figure D - You'll use the New Project dialog box to set the project's characteristics.
When the Project:RTTITEST.IDE window appears, double-click on the name rttitest[.cpp] to open an editor window for that file. In the editor window that appears, enter the code from Listing A.
Listing A: RTTITEST.CPP
#include <iostream.h>
#include <typeinfo.h>

class Employee
{
  public:
      virtual void
    printPayFormula() = 0;
};

class SalariedEmployee :
  public Employee
{
  public:
      virtual void
    printPayFormula() {
      cout << "salary";
      cout << endl;}
};

class SalariedCommEmployee :
  public SalariedEmployee
{
  public:
      virtual void
    printPayFormula() {
      cout << "salary + commission";
      cout << endl;}
};

class HourlyEmployee :
  public Employee
{
  public:
      virtual void
    printPayFormula() {
      cout << "straight + ot";
      cout << endl;}
};

class Contractor :
  public HourlyEmployee
{
  public:
      virtual void
    printPayFormula() {
      cout << "straight";
      cout << endl; }
};

main()
{
  Employee* employeeList[4];

  employeeList[0] = new HourlyEmployee();
  employeeList[1] = new Contractor();
  employeeList[2] = new SalariedEmployee();
  employeeList[3] = new SalariedCommEmployee();

  for(int count = 0;
      count < 4;
      ++count)
  {
    cout << typeid(*(employeeList[count])).name();
    cout << endl;

    cout << "Pay formula = ";
    employeeList[count]->printPayFormula();
    cout << endl;

    delete employeeList[count];
  }

  return 0;
}
When you finish entering the code, choose Save from the File menu to save the program. Now let's walk through this program step by step.
First, we declare the Employee class and the classes that derive from it. Inside each of these classes, we redefine the function printPayFormula() to print out the correct formula for each type of employee.
In the main() function, we declare an array of pointers to Employee objects (or objects that derive from the Employee class). Then, we initialize each item in the array with a pointer to a specific type of Employee object.
Finally, we enter a for() loop where we print the RTTI information for each object, call the virtual printPayFormula() function for each object, and then delete each object in the array.
To close the editor window, double-click on its System menu icon.
Now you're ready to test your new RTTI application.
To compile and run RTTITEST.EXE, click on the name rttitest[.exe] with the right mouse button. From the pop-up menu that appears, choose View, and then choose Run from the View submenu.
When the IDE begins compiling, the Compile Status dialog box will appear and display the compilation's status. When the IDE finishes linking the application, it will run the application.
When the application's main window appears, you'll
see the output shown in Figure E. To close the application, double-click
on the window's System menu icon. To quit the IDE, choose
Exit from the File menu when the IDE's menu bar reappears.
Figure E - The RTTITEST program displays the name of each employee object's class.
HourlyEmployee
Pay formula = straight + ot

Contractor
Pay formula = straight

SalariedEmployee
Pay formula = salary

SalariedCommEmployee
Pay formula = salary + commission
Run-Time Type Identification is a new feature of the Borland C++
4.0 compiler that allows you to identify the class of an object
at run time. For some specialized applications, RTTI may help
you avoid writing your own class identification functions.
Copyright (c) 1996 The Cobb Group, a division of Ziff-Davis Publishing Company. All rights reserved. Reproduction in whole or in part in any form or medium without express written permission of Ziff-Davis Publishing Company is prohibited. The Cobb Group and The Cobb Group logo are trademarks of Ziff-Davis Publishing Company.