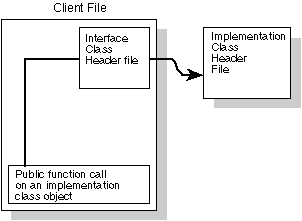
Figure A - A client file can use a public interface class to call an implementation class object's public functions.

When you're designing an application that you'll write using Borland C++, it's appropriate for you to consider the language features that C++ offers. Within classes, C++ allows you to specify data members or member functions as public, protected, or private. These access specifiers allow you to hide some of the details of a class's internal structure from other parts of the program.
If a particular source file needs to call a class's member functions, you'll frequently create a #include directive dependency between that class and the source file. If that source file is part of a project with more than four or five source files and you're using precompiled headers, you'll find that changing the class declaration in any way forces the compiler to recompile all source files using that class.
If more than one or two of the source files call only public
member functions of a class and never create instances of the
class, you may want to eliminate this dependency by using a public
interface class. In this article, we'll show you how
to create a public interface class you can use to isolate the
private and protected parts of a class from
source files that use only the class's public
member functions.
In most C++ projects, you'll add to a source file a #include directive for the header file that declares a class you want to use in that source file. By adding the #include directive for the header file, you make the source file dependent on the contents of the header file.
For example, if you add a new data member to a class, the compiler will need to recompile any source file that creates objects of that class. In this case, the dependency is necessary and the Borland C++ compiler will enforce it.
However, if a source file doesn't create objects of a given class and calls only the class's public member functions, the file doesn't need to know the internal layout or structure of that class (we'll call this the implementation class). This type of source file (we'll call it a client file) needs to know only about the class's public member functions or public interface.
If one of your projects contains two or more client files that use a class's public interface only, you'll want to consider creating a public interface class that declares the public interface as public pure-virtual functions. You'll then derive the implementation class from the public interface class.
Instead of using pointers or references to objects of the implementation class in a client file, you can use pointers or references to objects that belong to the public interface class. If you put the implementation class and public interface class definitions in separate header files, you can then use a #include directive for the public interface's header file in the client file.
Now the client file is no longer dependent on the layout or structure of the implementation file. Only if you need to change the public interface will a class dependency force the compiler to recompile the client file.
When other files call functions from the client file, they'll pass pointers or references to an object of the implementation class. When the client file calls any of the public interface functions for one of these objects, it converts a pointer or reference to an object of the implementation class into one for the public interface class. Since the pointer or reference really belongs to an implementation class object, the function call will execute those functions instead of the interface class's pure-virtual functions, as shown in Figure A.

Figure A - A client file can use a public interface class to call an implementation class object's public functions.
To see how a public interface class can eliminate a client file's
dependency on an object's internal structure, let's
create an example project. In this project, we'll create
one header file for the interface class and another for the implementation
class. Then, we'll create the main source file and a client
file that uses the public member functions of the interface class.
To begin, launch the Borland C++ 4.0 Integrated Development Environment (IDE). When the IDE desktop appears, choose New Project... from the Project menu.
When the New Project dialog box appears, enter
\bc4\intclass\magnum.ide
in the Project Path And Name entry field. Select Application [.exe] in the Target Type section's list box and then choose DOS Standard from the Platform combo box. Click OK to create the new project.
When the Project window appears, choose New from the File menu to create a header file for the public interface class. In the editor window that appears, enter the code from Listing A.
Listing A: MAGINT.H
class MagnumInterface
{
  public:
    virtual
    int
   getGun() = 0;
    virtual
    int
   getCar() = 0;
};

 void
clientCall(MagnumInterface* detective);
When you finish entering the code, choose Save from the File menu. In the Save File As dialog box, enter MAGINT.H in the File Name entry field and click OK. Close the editor window for MAGINT.H by choosing Close from the Window menu.
To create a header file for the implementation class, choose New from the File menu again. In this editor window, enter the code from Listing B.
Listing B: MAGIMP.H
#include "MAGINT.H"

class MagnumImplementation :
      public MagnumInterface
{
  public:
   MagnumImplementation(int car, int gun)
    { i = car; otherI = gun; }

    virtual
    int
   getGun() { return eye(); }
    virtual
    int
   getCar() { return i; }

  private:
    int eye() { return otherI; }
    int  i;
    int  otherI;
};
When you finish entering the code, choose Save from the File menu. In the Save File As dialog box, enter MAGIMP.H in the File Name entry field and click OK. Close the editor window for MAGIMP.H by choosing Close from the Window menu.
To create a primary source file for this project, double-click on the magnum [.cpp] filename in the Project window. When the editor window for this file appears, enter the code from Listing C.
Listing C: MAGNUM.CPP
#include "MAGIMP.H"
#include <iostream.h>

int main()
{
  MagnumImplementation* Tom =
    new MagnumImplementation(308, 45);

  cout <<"Detective Tom" << endl;

  clientCall(Tom);

  return 0;
}
When you finish entering the code, close the editor window for MAGNUM.CPP by choosing Close from the Window menu. A dialog box will appear, asking if you want to save the changes to this file. Click OK. Now we'll create the client file that uses the public member functions of the implementation class via the public interface class functions.
Using the right mouse button, click on the name magnum [.exe] in the Project window. Choose Add Node from the pop-up menu that appears.
When the Add To Project List dialog box appears, enter CLIENT.CPP
in the File Name entry field and click OK to create the file.
When the name client [.cpp] appears in the Project window, double-click
on it. When the editor window for this file appears, enter the
code from Listing D.
#include "MAGINT.H"
#include <iostream.h>

 void
clientCall(MagnumInterface* detective)
{
  cout << "car is " << detective->getCar();
  cout << endl;
  cout << "gun is " << detective->getGun();
  cout << endl;
}
When you finish entering the code, close the editor window for CLIENT.CPP by choosing Close from the Window menu. A dialog box will appear, asking if you want to save the changes to this file. Click OK. Now you're ready to build the application.
Use the right mouse button to click on the magnum [.exe] name in the Project window. Choose Make Node from the pop-up menu that appears.
As the compiler begins processing the files in this project, a
Compile Status dialog box will appear. When this window displays
Status: Success, the statistics for this compilation should be
Statistics      Total         Link
Lines:          2411          0
Warnings:       0             0
Errors:         0             0
Click OK to dismiss the Compile Status dialog box.
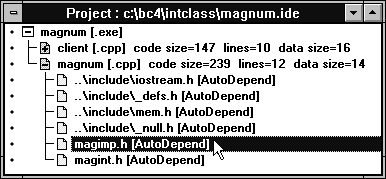
Now, click on the magnum [.cpp] icon in the Project window (the icon will now have a plus sign on it) to reveal the file's dependencies. Double-click on the name magimp.h [AutoDepend], as shown in Figure B, to re-open the header file for the implementation class.

Figure B - The Project window allows you to easily open the header file for a source file after you've compiled at least once.
In the MAGIMP.H file, locate the private data member
int otherI in the class declaration. Below this data
member, add
int thirdI;
When you finish, choose Close from the Window menu. A dialog box will appear, asking if you want to save the changes to this file. Click OK.
Use the right mouse button to click on the magnum [.exe] name
in the Project window. Choose Make Node again. When the Compile
Status dialog box displays Status: Success, the statistics should
be
Statistics      Total         Link
Lines:          1233          0
Warnings:       0             0
Errors:         0             0
As you can see, even though we changed the underlying format of the MagnumImplementation class, the compiler didn't need to recompile the CLIENT.CPP file. The number of lines that appear in the Statistics section of the Compile Status dialog box represent the compiler recompiling the MAGNUM.CPP file only.
When you run MAGNUM.EXE from a DOS command prompt, you'll
see the following output:
Detective Tom
car is 308
gun is 45
In a large project, changing the underlying structure of a class
may force the compiler to recompile files that use only the public
member functions for that class. When you create a public interface
class as we've shown, you can eliminate a client file's
dependency on a class's private or protected
representation.
Copyright (c) 1996 The Cobb Group, a division of Ziff-Davis Publishing Company. All rights reserved. Reproduction in whole or in part in any form or medium without express written permission of Ziff-Davis Publishing Company is prohibited. The Cobb Group and The Cobb Group logo are trademarks of Ziff-Davis Publishing Company.