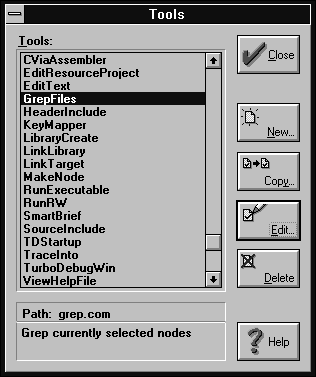
Figure A - You'll use the Tools dialog box to create a new version of the IDE GREP tool.

When you call the GREP utility from inside the Borland C++ 4.0 Integrated Development Environment (IDE), the IDE sends the results of the search to the IDE Message window. (If you're unfamiliar with using GREP from the IDE, see Borland C++ 4.0 feature - Calling GREP from the IDE.) However, if you want to keep a permanent record of the search results or print them out, there isn't an easy way to retrieve the information from the Message window.
By making a simple change to the Tool settings for the GREP utility,
you can direct its output to a text file rather than to the Message
window. Instead of modifying the existing IDE GREP tool, we'll
create a copy of the GREP tool and then edit the copy.
To create a new IDE tool that calls the GREP utility and then sends its output to a file, you'll first open the Tools dialog box. In this dialog box, you'll copy the GrepFiles tool.
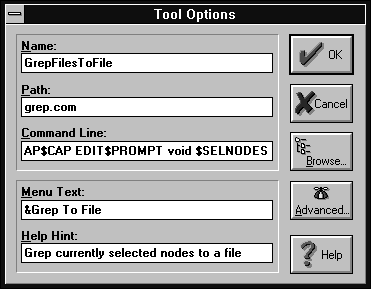
In the Tool Options dialog box, you'll first assign a name to the new tool. This will allow you to keep the new GREP tool as well as the original (two IDE tools can't have the same name).
Next, you'll remove the command-line macro that sends the output from the GREP utility to the Message window. In its place, you'll insert a command-line macro that sends the output from the tool to a file editor window.
Finally, you'll change the new tool's menu text
and help hint. This will help you identify the new tool when it
appears in the Tool menu.
To add to the IDE a GREP tool that will send its output to a file, first launch the Borland C++ 4.0 IDE. If the IDE is already running, close any project that may be open by choosing Close from the Project menu.
Next, choose Tools... from the Options menu. When the Tools dialog box appears, scroll through the Tools list box until you find the name GrepFiles, as shown in Figure A. Click on the name GrepFiles and then click Copy.... When the Tool Options dialog box appears, enter GrepFilesToFile in the Name entry field to give this tool a unique name.

Figure A - You'll use the Tools dialog box to create a new version of the IDE GREP tool.
In the Command Line entry field, find the macro
$CAP MSG(GREP2MSG.DLL)
and replace it with
$CAP EDIT
This command-line macro captures the output from the tool and sends it to an editor window.
In the Menu Text entry field, enter &Grep To File.
This is the name that will appear in the Tool menu. To make the
help hint for this menu item appropriate, enter Grep currently
selected nodes to a file in the Help Hint entry field. When
you finish, the Tool Options dialog box should resemble the one
that appears in Figure B.

Figure B - You set the characteristics of the new tool in the Tool Options dialog box.
To save this tool, click OK. To close the Tools dialog box, click
Close. Now the new version of the GREP tool is ready for you to
use.
You can use the new version of the GREP tool with open files and Project window nodes just like you use the original tool. However, for this test we'll supply all the command-line arguments manually.
To begin, choose Grep To File from the Tool menu. In the Program
Arguments entry field, enter the following:
^// \BC4\EXAMPLES\WINDOWS\WHELLO\WHELLO.CPP
When you click OK, the GREP utility will begin searching the WHELLO.CPP file for any lines that begin with the double-slash (//) comment symbol. When GREP finishes the search, a Transfer Output window that contains all of these comment lines will appear, as shown in Figure C.
Figure C - You can use the new GREP tool to send the output from the GREP utility to a file instead of to the Message window.

To save the data from the Transfer Output window to an editable text file, choose Save As... from the File menu. In the Save File As dialog box, enter the new filename GREPOUT.TXT.
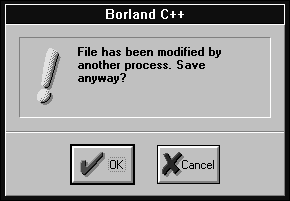
When you click OK to save the file, you'll see the warning
message shown in Figure D. This message appears because the IDE
has detected that GREP.COM made changes to the file. This is exactly
what you wanted, so click OK to save the file.

Figure D - When you save the information from the Transfer Output window, you can ignore this warning.
Unfortunately, when you add a tool to a project the way we did in this example, that tool is available only when you have the project open. In the example above, we added the Grep To File tool to the default project file by adding it with all project files closed.
When a tool is part of the default project file, it will show up only when there are no project files open or when you create a new project. If you open a project you or someone else created before you added the Grep To File tool, the tool won't be available while that project file is open.
You can also copy a tool like the Grep To File tool from one project
to another. In a future issue, we'll show you how to do
this.
You can easily create a new GREP tool for the Tool menu, and you
can use the tool to send the output from the GREP utility to an
editor window. You can then save this information as a simple
text file that you can edit, print, or keep as a permanent record
of the search results.
Copyright (c) 1996 The Cobb Group, a division of Ziff-Davis Publishing Company. All rights reserved. Reproduction in whole or in part in any form or medium without express written permission of Ziff-Davis Publishing Company is prohibited. The Cobb Group and The Cobb Group logo are trademarks of Ziff-Davis Publishing Company.