Figure A - Use the Edit Node Attributes... command from a Project window's pop-up menu to see the Node Attributes dialog box.

Borland C++ 4.0 offers a number of compiler options you can use when you're creating an application. As a project moves from early development to the final stages of testing, you may find that you're changing these options frequently.
With Borland C++ 3.1, it's fairly easy to change the current compiler options. Unfortunately, if you set them by using the Compile Options dialog box, it isn't always clear which source files will use the latest changes, unless you force the compiler to use them for each source file by completely rebuilding the project.
If you specify compiler options by using the command-line switches in the Local Options dialog box for each module, maintaining this level of control is easier. However, many programmers like to use certain combinations of compiler options as a group. It would be nice to be able to quickly assign a whole range of compiler options.
In this article, we'll show you how to apply a set of compiler
options from the Borland C++ 4.0 Integrated Development Environment
(IDE) by using a style sheet. In addition, we'll
look at style sheets that apply to the entire application as well
as style sheets that change the settings for an individual source
file.
Basically, a style sheet is a list of compiler options you can apply as a group to a project node. (A node is an icon in the Project window; it represents an executable target, a source file, a header file, or a previously compiled module.)
Borland C++ 4.0 ships with nine style sheets that Borland has created for you. You can also define your own style sheets or combine existing style sheets into a new composite style. See Creating composite style sheets for more information.
To apply a style sheet to an executable target, open the Project
window for the project. Click on the name of the executable target
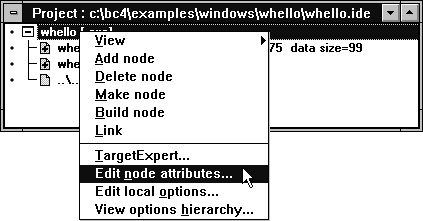
with the right mouse button and choose Edit Node Attributes...
from the pop-up menu, as shown in Figure A.

Figure A - Use the Edit Node Attributes... command from a Project window's pop-up menu to see the Node Attributes dialog box.
When the Node Attributes dialog box opens, select a style sheet from the Style Sheets combo box. After you select the appropriate style sheet, click OK to save the new setting.
Now, when you rebuild this executable target, the compiler will
use the settings from that style sheet to build the application.
However, these settings don't apply only to the executable
file. The compiler will automatically use the same settings for
any source file that's part of this executable target.
In Borland C++ 3.1 and earlier versions, compiling one source file with different settings from another is a cumbersome process. To do this, you must enter the command-line equivalent of each option in the Local Options dialog box for that source file.
In version 4.0, you can override these settings even though each source file that belongs to a particular executable target has the same settings by default. Style sheets provide an easy way to change the compiler settings at the source-file level and have the compiler remember to apply these settings to this file only.
To apply a style sheet to a source file, open its Node Attributes dialog box using the same technique you use for executable targets. Here, you can select any of the style sheets in the Style Sheets combo box.
Specifying a style sheet for a source file tells the compiler
to compile that file with the settings from this style sheet in
addition to the settings from the style sheet of its executable
target. If a conflict arises when the executable's style
sheet changes a particular setting and the source file's
style sheet adjusts the same option, the source file's
style sheet will have priority.
Sometimes, you may want to override a particular compiler option for a source file but not use the other option settings that are part of this option's style sheet. In this situation, you can override the current style sheet options with a local option for this source file.
To override one or more compiler options locally, click on the name of the source file with the right mouse button and choose Edit Local Options... from the pop-up menu. When the Options: At dialog box appears, change the options as necessary, and then click the OK button.
When you override a compiler option locally, the compiler will
give priority to that setting over any settings from the current
style sheet for the source file or the executable target. In addition,
a local override doesn't affect the style sheet that the
source file uses, so other source files that use this style sheet
won't see the override you apply to a given file.
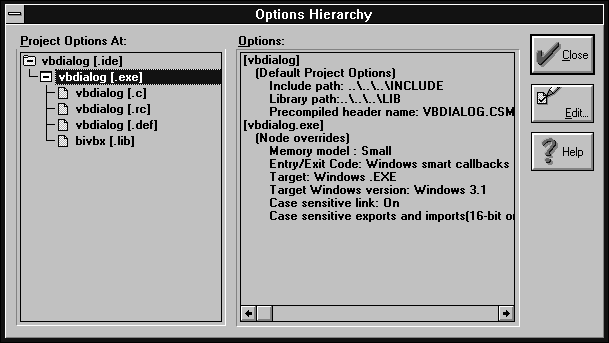
You can create a fairly complex relationship between the style sheet you apply to the executable and the style sheets or local overrides you apply to a source file. To keep track of how the style sheets and local overrides will affect a given part of the project, you can display a summary of the compiler settings for each node in the Options Hierarchy dialog box.
To open the Options Hierarchy dialog box, click anywhere in the Project window with the right mouse button and choose View Options Hierarchy... from the pop-up menu. In this dialog box, you can see the current options for any project node, as shown in Figure B.
Figure B - You can use the Options Hierarchy dialog box to review the compiler options for any part of the current project.

When you select a node from the Project Options At list box, the
Options text field will display the current compiler settings
you've applied to that node (Node Overrides). In addition,
you can see which settings the compiler will use from the parent
node's style sheet as well as the settings that are common
to all projects (Default Project Options).
To begin creating an example that sets a project's compiler
options by using a style sheet, launch the Borland C++ 4.0 IDE.
When the IDE's menu bar and desktop appear, choose New
Project... from the Project menu. When the New Project
dialog box appears, enter the following line in the Project Path
and Name entry field:
\bc4\newstyle\newstyle.ide
In the Platform combo box, choose DOS Standard as the application type. Then, choose Small from the Target Model combo box as the memory model for this project. To allow the compiler to link the standard C/C++ runtime library file, select the Runtime check box in the Standard Libraries group. Now you can create the new project by clicking OK.
When the NEWSTYLE.IDE Project window appears, double-click on the icon for the NEWSTYLE.CPP file. When the file's editor window appears, enter the code from Listing A.
Listing A: NEWSTYLE.CPP
#include <stdio.h>
#include <checks.h>

void foo2();

void foo()
{
  TRACE("> foo()");

  cout << "In foo()" << endl;
}

int main()
{
  foo();
  foo2();
  return 0;
}
When you finish entering the code for NEWSTYLE.CPP, choose Save from the File menu to save the file to disk. Then, close the file's editor window by double-clicking on its System menu icon.
Now, add a new source file to this project by clicking with the right mouse button on the name NEWSTYLE.EXE in the Project window and choosing Add Node from the pop-up menu. When the Add to Project List dialog box appears, enter SOURCE2.CPP in the File Name entry field and click OK.
When the new node for SOURCE2.CPP appears in the Project window, open the file by double-clicking on its file icon. When the file's editor window appears, enter the code from Listing B.
Listing B: SOURCE2.CPP
#include <stdio.h>
#include <checks.h>

void foo2()
{
  TRACE("> foo2()");

  cout << "In foo2()" << endl;
}
When you finish entering the code for SOURCE2.CPP, choose Save from the File menu to save the file to disk. Then, close the file's editor window by double-clicking on its System menu icon.
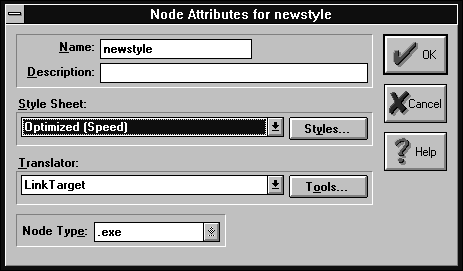
Open the Node Attributes dialog box for the executable target NEWSTYLE.EXE by clicking on its name with the right mouse button and then choosing Edit Node Attributes... from the pop-up menu. When the dialog box appears, click on the button for the Style Sheet combo box and select Optimized (Speed).
When you finish, the Node Attributes dialog box will look like the one shown in Figure C. Click OK to apply this style sheet to the executable target.

Figure C - You use the Node Attributes dialog box to apply a style sheet to a project node.
To use an additional style sheet with a source file, open the Node Attributes dialog box for the source file NEWSTYLE.CPP the same way you did for the executable target. This time, however, choose Diagnostics from the Style Sheet combo box. This option defines the constant that enables the diagnostic macros TRACE() and WARN(). Click OK to apply this style sheet to the source file.
To override a compiler option locally, open the Options dialog box for the source file SOURCE2.CPP by clicking on its name with the right mouse button and choosing Edit Local Options... from the pop-up menu. When the Options: At dialog box appears, double-click on Compiler in the Topics list box.
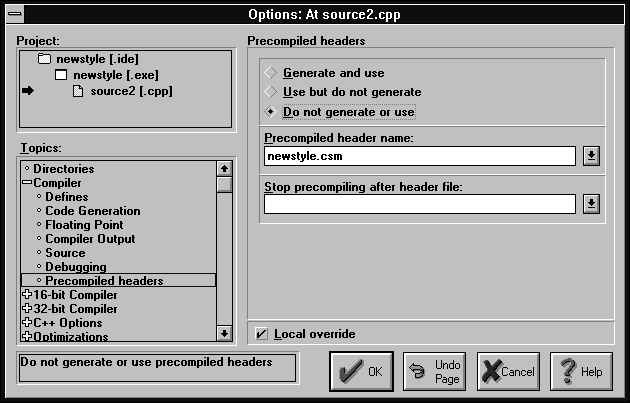
When the subtopics for the Compiler topic appear, select Precompiled Headers in the list box. Select the Do Not Generate or Use radio button in the Precompiled Headers area to force the compiler to always compile the headers for this source file.
When you click the radio button, notice that a check appears in the Local Override check box, as shown in Figure D. This signifies that you've locally overridden a value for this node. Click OK to save the settings for this source file.
Figure D - From the Options: At dialog box, you can override any of the style sheet settings that apply to a given node.

To confirm all of these compiler settings, open the Options Hierarchy dialog box by clicking anywhere in the Project window and choosing View Options Hierarchy... from the pop-up menu. When the dialog box appears, select NEWSTYLE.EXE in the Project Options At list box.
In the Options text field, you'll find a description of the default compiler settings under [Default Project Options]. Under [newstyle.exe], you'll see [Optimized (Speed)] and a description of each of the speed optimizations the Optimized (Speed) style sheet applies.
To see the Options the compiler will use for the source file NEWSTYLE.CPP, click on the file's name in the Project Options At list box. When you scroll to the bottom of the Options text field, you should see [newstyle.cpp], and under it [Diagnostics] and the constant definitions Defines: __DEBUG=2; __TRACE; __WARN.
Select the source file SOURCE2.CPP in the Options list box and you should see the text Do not generate or use precompiled headers under [source2.cpp] and [Node overrides] at the bottom of the Options text field. This illustrates the local override you set from the Edit Options dialog box.
Click Close to close the Options Hierarchy dialog box. Now you're
ready to build and run the NEWSTYLE.EXE executable.
To build the application without running it, click on the name NEWSTYLE.EXE with the right mouse button and choose Make from the pop-up menu. When the compiler finishes building the application (assuming there aren't any warnings or errors), click the OK button in the Compile Status dialog box.
To run the application, switch to the Windows Program Manager
and open an MS-DOS prompt. From the prompt, enter
\bc4\newstyle\newstyle
When the program runs, you should see the following output:
Trace NEWSTYLE.CPP 10: [Def[ > foo()
In foo()
In foo2()
You'll notice that the TRACE message appears for the function
foo(). This is because we used the Diagnostics style
sheet for NEWSTYLE.CPP, which is where we defined foo().
Since SOURCE2.CPP doesn't use the Diagnostics style sheet
and therefore doesn't see __TRACE as a defined constant,
the program doesn't display the TRACE message inside foo2().
Style sheets are a powerful means of changing the compiler options
for your projects. Not only can you use style sheets to change
the project-wide options for initial, debug, or release builds,
you can also use them to set the compiler options for individual
source files.
Copyright (c) 1996 The Cobb Group, a division of Ziff-Davis Publishing Company. All rights reserved. Reproduction in whole or in part in any form or medium without express written permission of Ziff-Davis Publishing Company is prohibited. The Cobb Group and The Cobb Group logo are trademarks of Ziff-Davis Publishing Company.